Everyone in the Christmas Club received the pattern for ornament #3 this morning. Happy Monday!
I love the sweet smile on this teddy bear face. And I love that this is a pattern you can use all year! Wouldn’t it be cute to top a baby shower gift with this cutie? Or appliqué that little face on a baby onesie? Lots of possibilities for this guy. 🙂
Why are we doing Christmas patterns already?
I know it’s early – but the holidays can be such a stressful time of checking things off lists that we sometimes don’t have fun. Every year I hear from people who had planned to make a lot of handmade items, but just ran out of time. Or did it – but were completely stressed out by the whole process.
The idea behind the Christmas Club is that we’ll make a dozen handmade felt ornaments (at a relaxed pace so we really enjoy the process) before the holiday craziness really starts at Thanksgiving. No pressure. No sewing machine. Just a little time every week to put our feet up and enjoy hand stitching on some lovely wool felt.
Want to join us? It’s not too late! If you sign up now you’ll be able to download a PDF with links to the first three patterns, then you’ll get a new pattern by email every Monday morning.
The club is closed now, but you can still get the patterns!
I’ve received a few questions lately about whether it’s possible to create an applique pattern from a drawing or clip art.
Yes!
You can create an applique pattern from just about any drawing – but you may have to do a bit of tweaking to the drawing.
Let’s take a look at this appliqué I did of a pattern from Mollie Johanson’s fabulous embroidery book Stitch Love.
This dinosaur was perfect because all the shapes that make up the image are already enclosed shapes. There are no “dead end lines.”
What’s a dead end line?
That’s what I call lines that end in the middle of nowhere – not making an enclosed shape.
See this sweet bear from Mollie’s book? Lots of dead end lines! I circled them all in red.
Mollie designed him for embroidery where dead end lines don’t matter. But let’s imagine the second you saw him you knew he would be perfect appliquéd on a pillow for your son (who you call Buddy Bear).
You can do it!
Just because it was designed for embroidery doesn’t mean you can’t appliqué this adorable bear. It just means it’s going to require that tweaking I mentioned. 🙂
I chose this bear because he needs a lot of different kinds of tweaks. Let’s start with the easiest – the dead end lines at his ears.
You can see where I “erased” the lines that extend into his head. The ears stick out enough to still be clearly ears, so that works. But what about those cute inner ears?
No erasing for them – I added the red lines to enclose them into cut-outable shapes. Also not hard – and I don’t feel like it interferes with the integrity of the drawing, so I’m ok with it.
Things start getting a little trickier with the arms. We’ll start with the bent arm. . .
For that one I re-drew the lines to extend them both to the edge of the body, making that arm a separate piece that would lay over the body piece. (I’d do it neater in real life because I wouldn’t be trying to draw with my mouse.)
Finally – that waving arm. That’s definitely the hardest bit. I experimented with erasing and drawing, but so much of the arm overlaps the body that erasing that top line really blurs/distorts the shape. It made it look like that arm was growing out of the side of his head!
What I finally did was actually cut that arm out and move it farther outside the body so that there’s less overlap.
See? I had to do a little erasing/adding to clean things up, but I think works well – again without messing up the look too much of the original drawing. He’s still immediately recognizable as a Wild Olive creation. That face!
When I stitched up my daughter Jo’s drawing of a dragon and a princess, it required very little tweaking.
Here’s the original drawing.
I would have been tempted to turn the head/neck/body/tail into one piece, but she had broken it into three pieces in her drawing, so I left it that way to keep the look the same. All I really did was “flesh out” the feet a little bit so there was green fabric behind the toes.
I also made all the back ridges one loooong piece. They’re all connected at the bottom, where the piece tucks behind the neck/body/tail. That didn’t change the look of the drawing, but it sure made the assembly of the appliqué a lot easier. 🙂
So there you go! A few tips to help you convert just about any drawing into an appliqué pattern.
Here’s a list of links all about choosing a quilt pattern – and even designing your own!
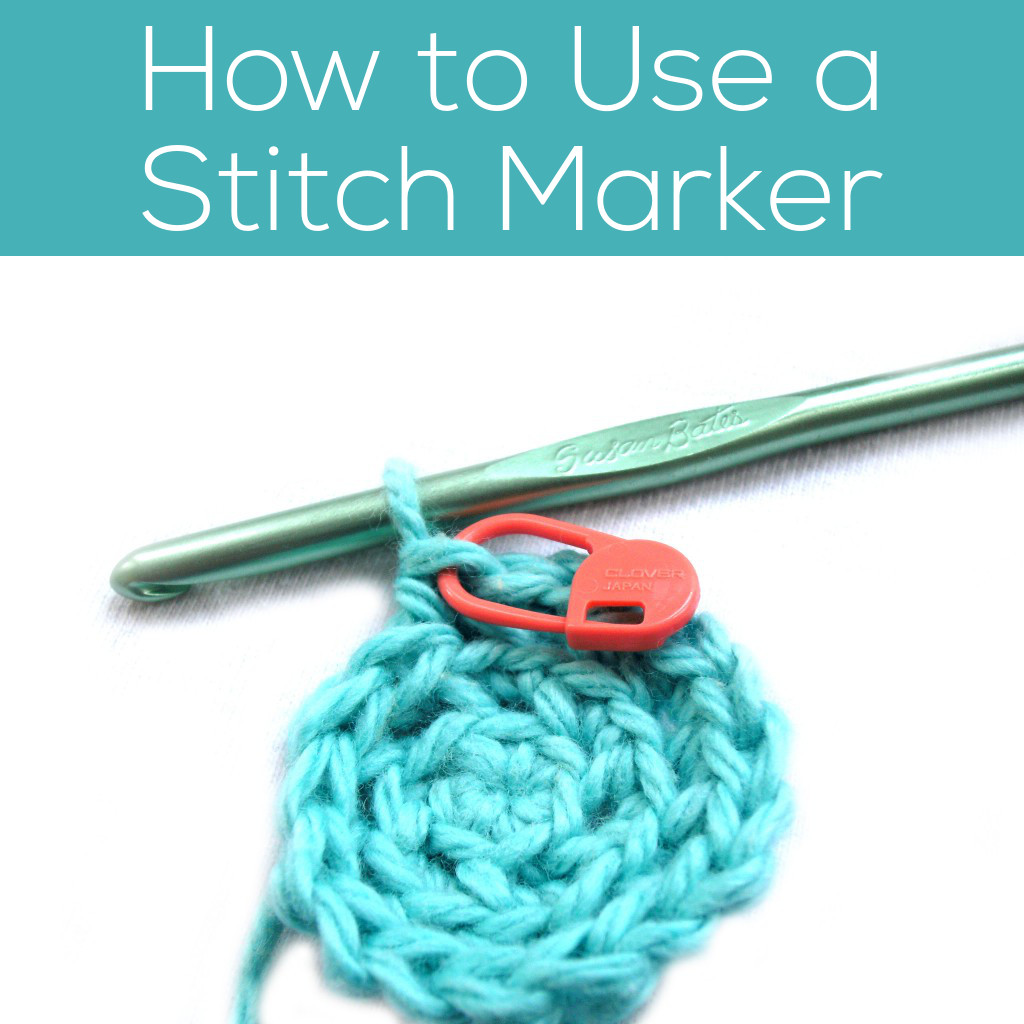
Besides your hook and yarn, a crochet stitch marker is your best buddy and most useful tool!
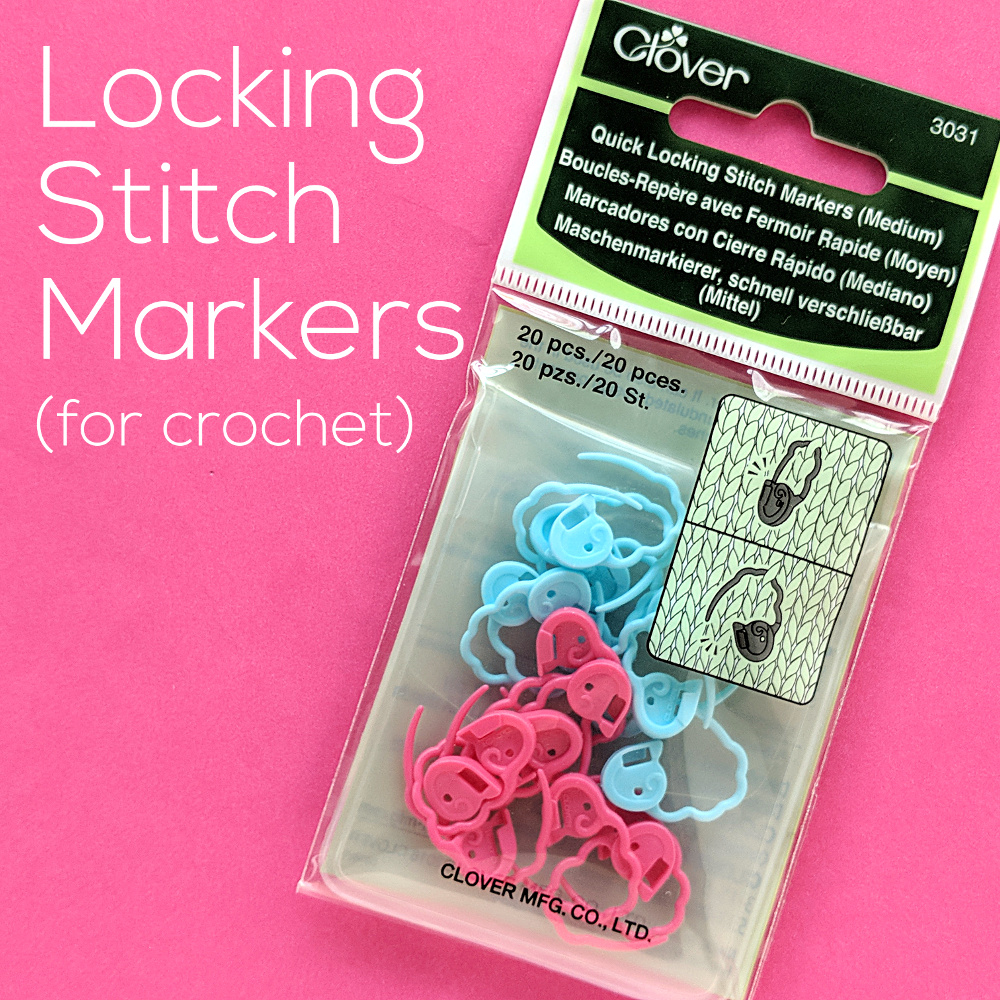
You want to look for a locking stitch marker, which is a lot like a fancy safety pin.
Locking stitch markers come in a few varieties, but the most important thing is that they open and close! Don’t get fooled into buying those ordinary ring markers that are for knitting needles. . . they don’t work for crochet.
Do you have your stitch markers ready? Let me get you and your new best friend acquainted!
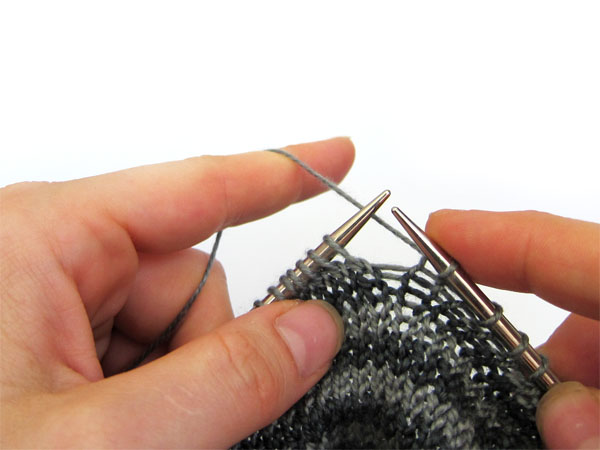
Handy Use #1: Mark the End of the Round
The most common problem crocheters have when crocheting in the round is losing track of where the round starts and ends – which leads to an incorrect stitch count and mayhem! So, I’ll show you how to use a locking stitch marker to mark the end of a round.
I don’t tend to use a stitch marker for the first couple of rounds (because there are so few stitches per round), but I usually start at the end of the third round. Here I’m crocheting the snout of the cow, but many circles begin the same way.
Since I crochet through the back loop only the front loop is available to hold a locking stitch marker.
Slip the stitch marker into the front loop of the last stitch in the round, close it up, and keep crocheting!
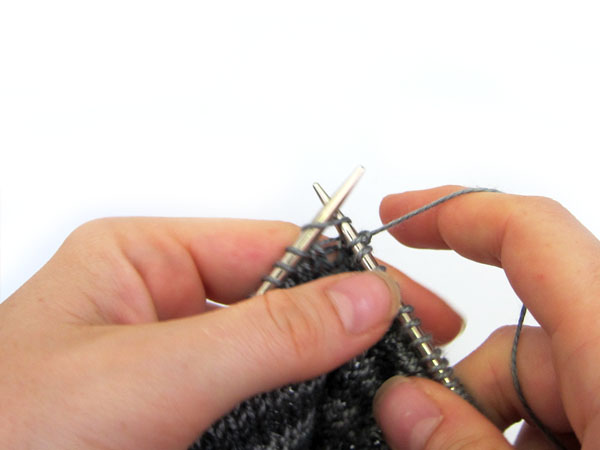
I know I’m finished with my next round when I’m just above the stitch marker, like this:
Then I can move the marker and start my next round. No confusion!
Handy Use #2: Counting How Many Rounds You’ve Done
A lot of amigurumi are made by crocheting in the round. When teaching classes, I’ve noticed that counting rounds is something that gives a lot of crocheters trouble… I mean, who wants to count every stitch? I’ll show you how a crochet stitch marker can help you in counting rounds.
Let’s do a little example.
I’ve been following my pattern instructions for the first three rounds, and now my pattern says:
Rounds 4-6: sc in each st (18)
How can we do this without counting?
I take a crochet stitch marker (the orange thing in the photo above), and lock it onto the last stitch of the round. Then, I’m just going to keep crocheting around and around until I’m exactly 3 rounds above my marker!
Check out the photo above… and you’ll also see why I prefer crocheting through the back loops- each round leaves behind a little horizontal ridge that makes each round super-easy to count!
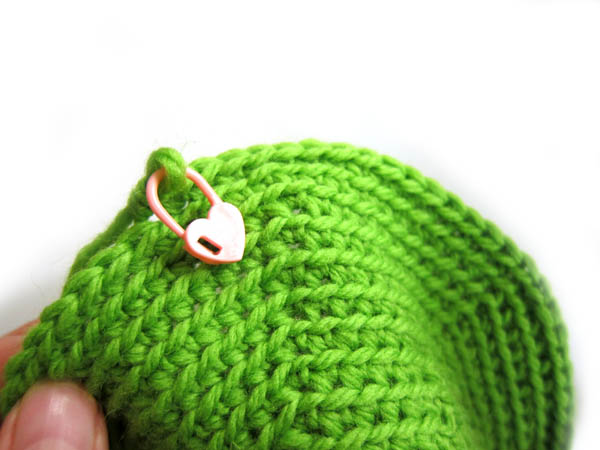
Handy Use #3: Position Your Pieces for Attaching
Attaching pieces can be a little tricky, too… but stitch markers can help! So, let’s look at some instructions that say, ‘attach legs to rounds 9-14’.
What you want to do is find out where round 9 is, and place a locking stitch marker there. Start counting (see the ridges?) from the center:
Count until you’re at round 9, and place a marker. Place another at round 14. Now you know where your leg should be located on the body!
Handy Use #4: Use Crochet Stitch Markers to Hold Pieces While Seaming
So now you’ve marked where your pieces should go… but locking stitch markers have one more great use. I use crochet stitch markers to hold my pieces in place while I’m sewing pieces together. It’s like having a few extra hands!
They’re big enough to go through a couple layers of crochet fabric, and by placing a couple around the piece that you’re attaching it’ll be held in place – making your sewing even easier. Yay!
I’ve been showing you lots of examples of circles… but this exact same trick can be used when assembling a sweater or afghan blocks! It keeps everything nice and even!
Handy Use #5: Keep Your Work from Unraveling When You Travel
Throw your crochet into your bag, and you’re just one snag away from all of your work coming undone. Eep! But not with a stitch marker!
Put your locking stitch marker through the loop when you’re done… and it can’t unravel even one stitch! Fabulous!
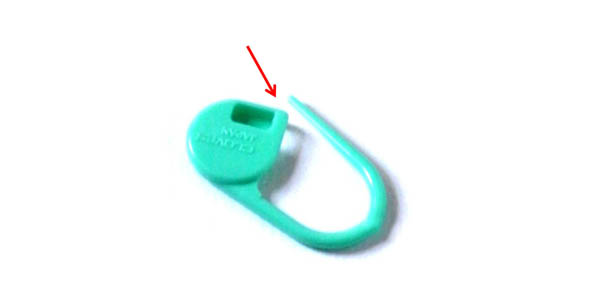
Caring for Your Crochet Stitch Markers
I bet you didn’t think these handy tools needed any special care, but there’s one little trick that will make them even easier to use.
Store them open!
That’s it! That’s the key to a healthy and long-lasting locking stitch marker.
Why? If you store your marker closed, the plastic slowly bends until the ‘open position’ isn’t very open anymore.
It’s not a huge deal, but it makes the marker just a little bit harder to slip onto your crochet piece. Store them open and there’s no problem!
There you go – lots of handy ways to use your crochet stitch markers to make your projects just a little easier and more fun.
Here are handy links to all the posts about crochet tools and supplies.
The second pattern in this year’s Christmas Club went out this morning!
I must be on a bit of a sweater kick. The first ornament was a snowman sweater. This week’s is a cute dachshund wearing a candy cane sweater.
I’ve wanted to do this design forever! I’ve never actually seen a dachshund in a candy cane sweater – but I always thought that long body would be perfect for those spiraled stripes. 🙂
Why are we doing Christmas patterns already?
I know it’s early – but the holidays can be such a stressful time of checking things off lists that we sometimes don’t have fun. Every year I hear from people who had planned to make a lot of handmade items, but just ran out of time. Or did it – but were completely stressed out by the whole process.
The idea behind the Christmas Club is that we’ll make a dozen handmade felt ornaments (at a relaxed pace so we really enjoy the process) before the holiday craziness really starts at Thanksgiving. No pressure. No sewing machine. Just a little time every week to put our feet up and enjoy hand stitching on some lovely wool felt.
Did you know that once you’ve got the basics of appliqué under your belt, you can appliqué anything? Including your child’s awesome drawings?
You can!
This is one of Jo’s drawings.
I never put a date on it, so I don’t know exactly how old she was when she drew it, but it’s in a sketchbook full of lots of similar gems – and a lot of random scribbles. 🙂
I enlarged it just a bit (so it would fit nicely into a standard 8″ x 10″ frame) and then I used all my basic fusible appliqué techniques to make a stitched version. This required no special skills, materials or techniques.
I left a little extra for pieces to tuck under other pieces – just like in my regular appliqué patterns.
I held the picture up to a window to trace all the line work (the words and the princess’s stick body) and then stitched over those lines with my sewing machine – just like I do the faces for my regular appliqué patterns.
If you can make any of my quilts, you can do this!
You could just watch this free video tutorial and jump into it – especially if your child’s drawings are fairly simple shapes.
If you’re a little nervous about that, or if the drawings are more complex, I recommend making one of my quilts or taking my Craftsy class first. That way you’ll have a bit more of a grounding in the techniques. That experience will help you make good design decisions – like what overlaps what, when to use stitching and when to use appliqué.
It’s super fun – and your kids will be thrilled to see what you do with their work!
Appliqué it to a T-shirt or tote bag for school. Make a pillow for Grandma – holidays are coming up soon! Add a drawing to a receiving blanket for a new baby brother or sister. Put a whole bunch of drawings together into a magnificent quilt! The sky’s the limit. 🙂
Did you know you can use a standard sewing machine to machine stitch eyes on your applique blocks?
You can!
The eyes are often the most difficult part of any of my appliqué patterns.
It can be tricky stitching around those small pieces!
(Tips – shorten your stitch length, go sloooooooooow, raise your presser foot often to spin the piece in tighter turns.)
But with the new Paper Doll Quilt I have reached new lows in tiny eyes.
These eyes are too small to appliqué. Don’t even try it.
So what to do?
You have a few options for the Paper Dolls quilt.
1. You can draw on the eyes with a marker. This is totally ok to do! But please test your marker first – and test it on every fabric you’ll be using because the results can vary. For bigger eyes (like all my animal quilts) I like my Marvy fabric markers. For smaller eyes like these paper dolls I get the best results with a small Sharpie. The worst bleeding I’ve ever had was with official “laundry” markers – go figure. (I share my favorite markers and paints here.)
2. You can embroider the eyes by hand.I really like this stitch for eyes. If you’re using Quilt As You Go you won’t even need to worry about a visible thread carry between the eyes because the batting should completely block it – even with a light color background block and skin color.
3. You can machine stitch the eyes. By machine! And you don’t need an embroidery machine, though it will need to have some fancy stitch options.
I’ve heard from a lot of you who have arthritis and appreciate as many machine options as possible – so I think a lot of you are really going to like this method. I loved it!
Here’s how I did mine. . .
Scroll through your decorative stitches and find one that is a series of round or oval satin stitches.
On my Bernina it’s stitch #407. My much-less-fancy Pfaff has an identical stitch #26. Most machines with decorative stitches will have something like this.
Now comes the slightly tedious part. Start playing around with the length and width of the stitch until you find one that’s right for your project. Once you find the settings you like – write them down! I actually make a little sample of the stitch on white fabric and write the settings directly on the fabric.
I stitched up one eye and made a note of the stitch number, the length and the width. See how this matches the settings on the screen above? Now I can make eyes all the same size whenever I want – and skip the playing around with settings step. 🙂
I have a whole stack of these swatches for any decorative stitch I think I might possibly use again.
When you’re ready to machine stitch eyes, you’re all set!
Check to make sure your bobbin is full. You don’t want to run out in the middle of an eye.
Put your block in the sewing machine and carefully lower the needle right into the top of the eye.
Lower the presser foot.
Stitch one oval. Watch carefully and stop stitching when it gets to the bottom of the oval. Backstitch just a stitch or two and remove it.
One eye done! Pause to admire the neat (easy!) stitching and be excited that we live in a time when such wonders are possible. 🙂
Repeat for the second eye.
Troubleshooting tips. . .
The combination of fusible adhesive and batting behind the block makes a great stabilizer. If you’re not using those (of if you find the fabric is bunching up under your eyes) use a stabilizer behind your stitching. It can be as simple as layering a piece of tissue paper behind the block. You might also need to adjust your tension.
Don’t push or pull or hold back the fabric going through the machine. You really need to just let it go through on its own or you might find that you are making the eyes longer or shorter than what the stitch really should be – and it will be nearly impossible to match every time. Just let those feed dogs do their thing. 🙂
That’s it!
The examples in the post are from the Paper Dolls quilt pattern – but you can use this method to machine stitch eyes any time the eyes are really tiny. In the cover image for the Peekaboo Mouse pattern you can see I used applique eyes on the cat, and machine stitched eyes on the little mice.
Here are links to all the posts showing how to applique with fusible adhesive – my favorite method. It’s fast and easy and (with the right materials) it holds up beautifully to rough use and repeated washing.
I rely heavily on three products/stabilizers for the work I do.
Freezer paper
Sulky Sticky Fabri-solvy
Heat & Bond Fusible Adhesive
(You can find links to sources for all of these – and all my other favorite tools and supplies – here.)
I recently had someone ask when I use each one – and that’s a great question.
Here’s the rundown. . .
Freezer Paper
Freezer paper is an excellent stabilizer.
I use it most often to cut out felt pieces. I print the pattern pieces directly onto the freezer paper. (You can trace if you’re not as lazy as I am.) I iron the paper to the felt and then I cut the pieces out – cutting through the felt and the freezer paper at the same time. Since I label all my pieces it means I have a nice pile of labeled felt pieces, cut perfectly accurately, waiting for me to stitch them together. Awesome!
Freezer paper also works this way when cutting out regular fabric, but I only use it on fairly small pieces – so small that I can’t use pattern weights. I use it for ALL my felt cutting.
Freezer paper is also excellent for fusing to the back of any fabric that you’re going to draw or paint on. If you’ve ever tried to do that without a stabilizer, you know that the pen or marker will tend to drag the fabric along with it. It can be really hard to keep it flat and smooth. Freezer paper makes the fabric act like paper. Handy!
Finally, people use freezer paper for this appliqué method. That used to be my favorite method – until I tested some of the new fusible adhesives out on the market and found a new favorite. 🙂
In all cases – the freezer paper will peel right off when you’re done. It doesn’t leave any residue behind, and you can reuse it a LOT of times before it loses its ability to fuse.
You can find rolls of freezer paper in the grocery store, or shop for printable sheets.
Fusible Adhesive
Fusible adhesive is what I use in all my appliqué projects. That’s mostly quilts, but also T-shirts, tote bags, pillows and more. Unlike the freezer paper – which sticks temporarily to the fabric – the fusible adhesive is a permanent glue.
So the only time I use this product is when I want to permanently stick one piece of fabric to another.
I LOVE LOVE LOVE using Heat & Bond Lite fusible adhesive in printable sheets, as opposed to the stuff you can buy by the bolt. It’s more expensive – yes – but it lets me skip over the tedious tracing step and jump right to the fun part of my appliqué project. That’s worth money to me. 🙂
I use it to transfer embroidery patterns to EVERYTHING. There are other products you could use to transfer a pattern to light-colored, smooth, woven fabric – but Sulky Sticky Fabri-solvy makes embroidery on every surface possible. And it makes stitching on smooth woven cotton easier and better.
With this stuff you can embroider stretchy fabrics like T-shirts and baby onesies (no extra stabilizer needed). You can embroider dark fabrics. You can embroider nappy fabrics like velvet and terrycloth and fleece. You can embroider felt. Oh! How I love embroidering on felt!
I use it to stabilize stretchy fabrics when I appliqué on them. It just washes away – leaving no itchy stabilizer behind.
I freehand all my quilting designs – but if I did anything fancy I would print or draw it on this and stitch through it, then soak it away later.
Freezer paper vs. Sulky Sticky Fabri-solvy
I think this is where most people get confused, because I use both of them extensively when I work with felt.
If I’m just cutting the shape out – I use freezer paper. It’s cheaper and doesn’t require soaking to remove.
If I’m embroidering something on the shape and then cutting it out – I use the Sulky Sticky Fabri-solvy. Sometimes you’ll see me recommend both things in one project – like this snowman ornament.
The hat, hat band, and carrot nose have no embroidery on them. Neither does the back of the ornament. I cut all of those pieces out with freezer paper.
The snowman front and the scarf both have embroidery on them, so for those I printed the pattern on Sulky Sticky Fabri-solvy, stuck it to the felt, embroidered the details, cut it out on the lines, and soaked off the stabilizer. (You can see how this works in this post.)
All of my patterns tell you which product to use where.
I hope that answers your questions about which product I use in which situation! Let me know if you have any other questions about any of them. I love them all and I’m always happy to share info about products that make your crafting easier and more fun. 🙂
These links go to all my posts about quilt supplies.
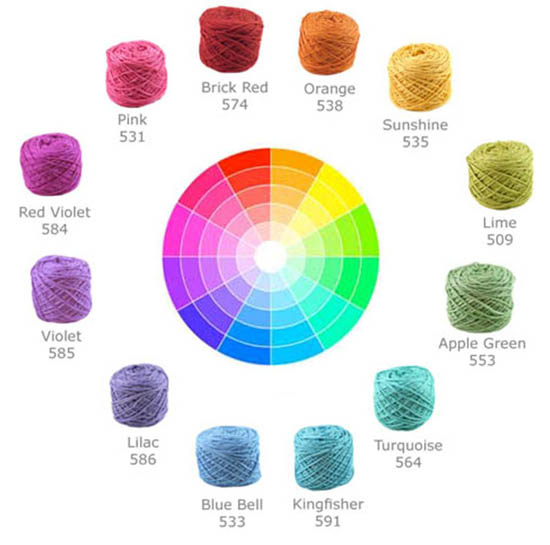
In fact, one of my most popular blog posts is this one where I talk about putting colors together.
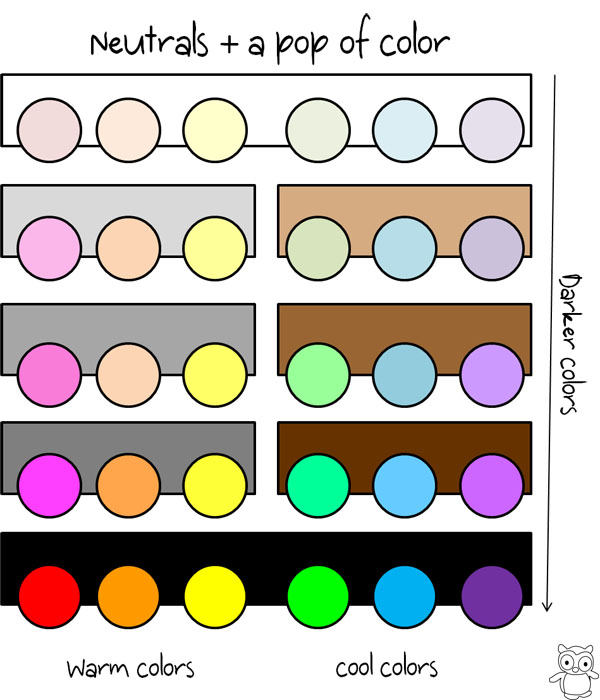
But maybe you’re not into wearing lots of different colors. I have another great color combo for you: a neutral + a pop of color!
How to do it
My philosophy for mixing neutrals and color is to mix warmth, but keep the darkness the same. For example, I mix a warm color with a cool neutral… but keep them about the same lightness.
Here’s a little chart showing some ideas:
See it in action!
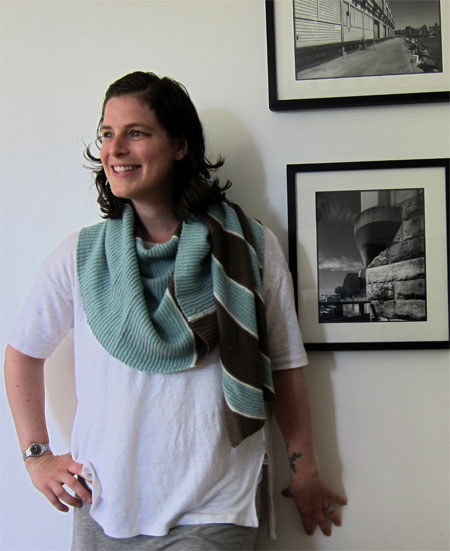
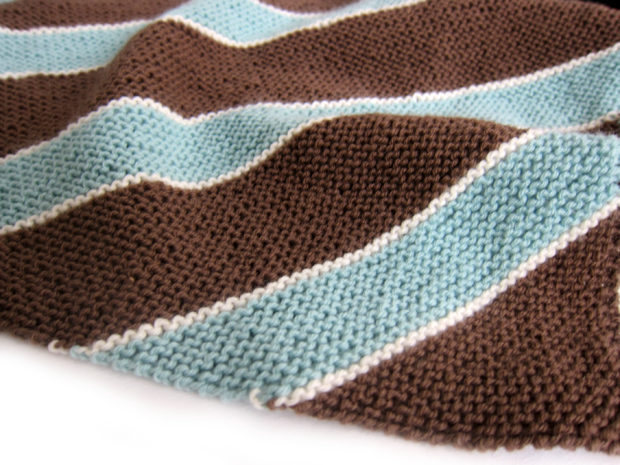
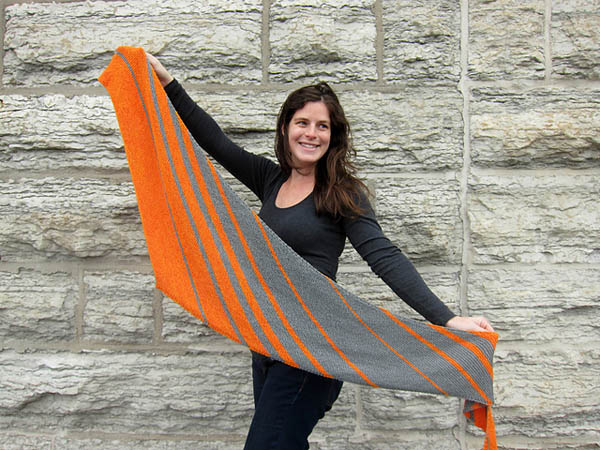
I just finished knitting Dromos (well… actually, I finished knitting it a long time ago, but I just finished weaving in the ends!), and I just love it. It combines a medium brown with a soft blue.
Here’s a close up:
Yummy, right? It’s a warm brown mixed with a cool blue, and they’re both similar darkness and a similar muted tone.
And do you remember Phi?
A cool grey plus a warm orange… both fairly dark. Delicious!
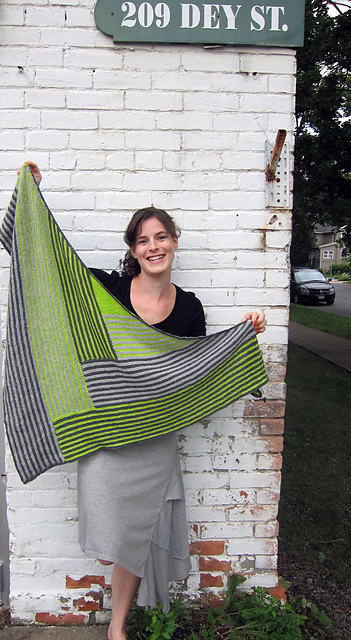
Dark grey and lime green? Oh, yeah.
Bonus: whenever you use different colors in a project, it’s an opportunity to stash-bust and use up some odd skeins you might have on hand! Stripes are a stash-busters best friend!
Have you done this before? What’s your favorite color combination?
Here it is! The very last block in the Controlled Chaos scrap quilt!
What You’ll Need
52 two-inch squares in color A (shown in purple)
48 two-inch squares in color B (shown in green)
Instructions
Use 1/4″ seam allowances for all sewing.
Press all the seams as you go. I’m pressing mine open for this quilt. I think it will make things simpler in the end.
Arrange your squares according to the diagram below.
For this block I worked in big chunks. I sewed things up in the following order. . .
Sew all your individual squares into pairs of matching colors. You should have 26 purple pairs and 24 green pairs.
Sew the purple pairs into 2 x 2 squares.
Pull out four of those purple squares. Sew two green pairs to opposite sides of each purple square. Sew the remaining green pairs into eight 1 x 4 rectangles.
Sew these rectangles to the top and bottom of your purple squares, so that there’s a green ring around each of the four purple squares.
Sew the rest of your purple squares into one 2×10 rectangle and two 2 x 4 rectangles.
Sew a 2 x 4 purple rectangle between two purple/green squares. Repeat with the last 2 x 4 purple rectangle and the last two purple/green squares
Assemble your chunks in rows and sew the long 2 x 10 purple rectangle between your other two rows.
Finished!
Well – finished with the blocks. 🙂 I still need to join them all together with sashing strips between them and then quilt the whole thing. Here’s what it’s going to look like. . .
I’ll have a tutorial showing how to do the sashing strips (there’s a little trick to that!) and then tutorials showing basic hand quilting, quilting without marking, and big stitch hand quilting. Yes – I’m going to spend the winter hand-quilting this beauty!
But all of that is going to have to wait just a little bit. I have a new and improved website that I’m really close to launching, so that’s taking a lot of my attention behind the scenes these days. It’ll be worth it! While you wait – finish all your blocks!
Remember – you don’t have to make your quilt the same size or number of blocks as my quilt. You can make fewer quilts for a crib size, or repeat some of the designs in different colors (or make up your own additions!) for a larger quilt. Mine is going to be just the right size for curling up on the couch. 🙂
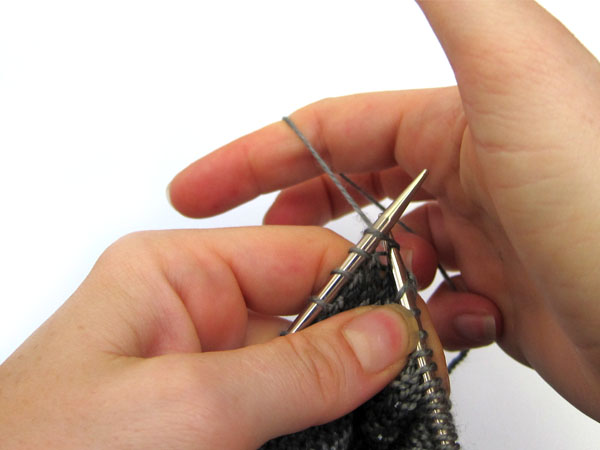
When I’m teaching new knitters, I notice that a lot of them get caught up in the terms for the different styles of knitting. What is continental knitting? What is throwing? And which one is better?
Do what’s most comfortable
When I teach beginning knitters, I don’t tell them anything about how to hold the yarn. I let them do what’s most comfortable. Most folks intuitively grab the needles and yarn in the way that works best for them!
What is Continental Knitting?
‘Continental Knitting’ refers to holding your yarn in your non-dominant hand. For right-handers, that means holding (and tensioning) the yarn with your left hand.
It’s called this because it’s thought to be the style of knitting most popular on ‘the continent’ of Europe (as opposed to England), but I’ve spoken to a number of international knitters that reveal this generalization isn’t completely accurate. The finer-grained truth is that there are a variety of knitting cultures (with their preferred yarn-holding styles) within Europe… but that’s a whole ‘nother blog post!
I made you a video so that you can see me knitting ‘Continental’:
Most crocheters knit this way, as they are used to tensioning their yarn in their non-dominant hand.
What is Throwing?
Throwing refers to the action of moving the hand holding the yarn around your dominant knitting needle. It is most commonly used with ‘English’ knitting (where you hold your yarn in your dominant hand), but not necessarily.
Most people consider this to be a slower method of knitting… but let me tell you, I know some throwers who make my continental knitting look like it’s happening at a snail’s pace!
I made a little video of me throwing. I’m a bit slower at it because it’s not my usual style!
And more…
There are all kinds of styles of knitting that describe how you hold your hands and where you hold your yarn. We’ve only scratched the surface!
And there is no ‘best’ technique! Each style takes practice and suits different knitters!
However, if you want to do stranded knitting (colorwork), then you’ll probably want to learn both of these techniques for faster two-handed knitting.