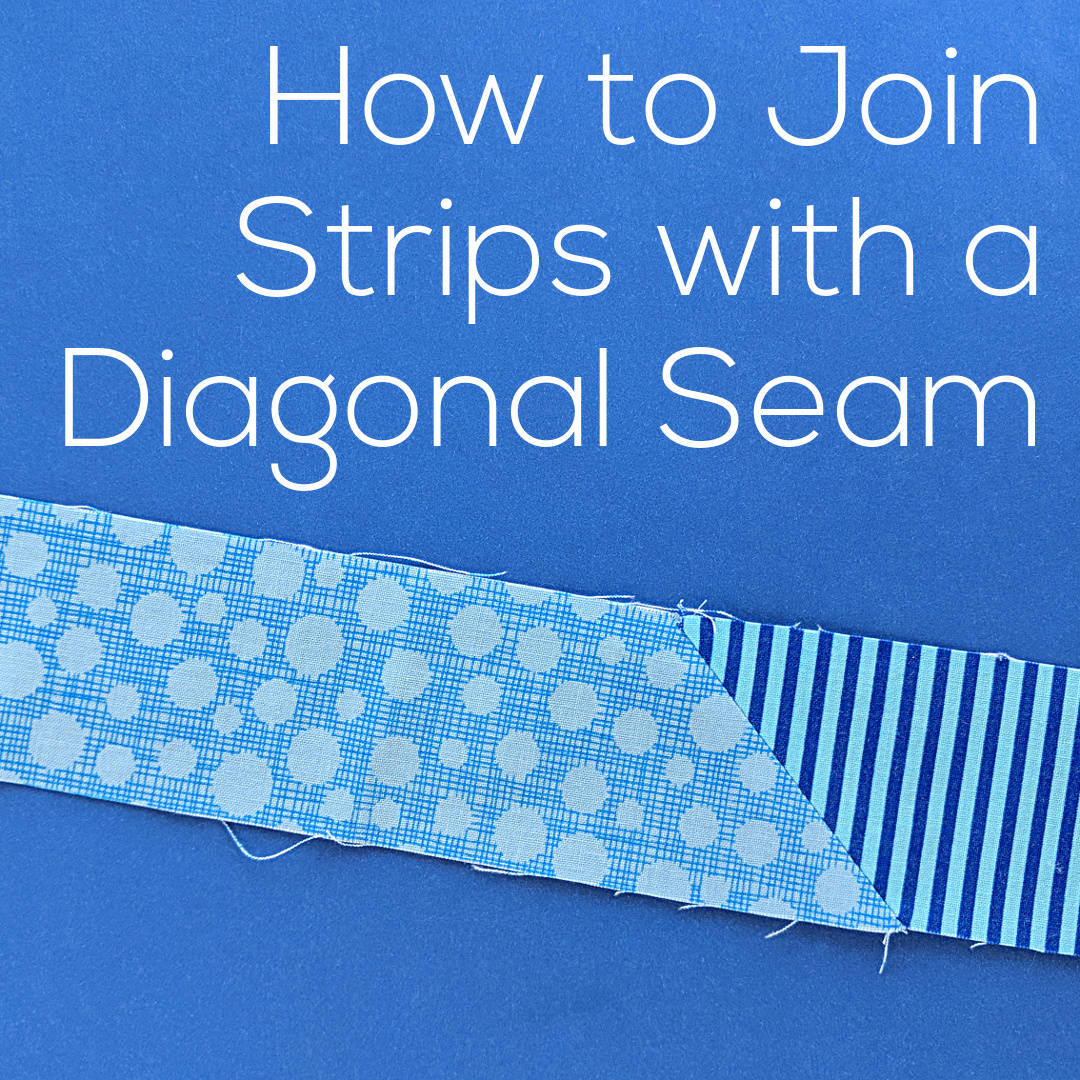
I almost always use scrappy bindings in my quilts and I get a lot of questions about how I get those diagonal seams.
I show the diagonal seam in my video How to Bind a Quilt – but I never actually showed how to do it.
Until now.
See how easy that is?
I use this method any time I’m joining strips together. For me that’s usually binding a quilt, but it can also be for bias strips on bags, clothing, and any other application.
Want to learn how to make adorable crocheted stuffed animals with an easy online workshop – totally free?
Sign up for Let’s Make Amigurumi here. You’ll learn how to get started, the tools and supplies you’ll need, and how to make an easy amigurumi from start to finish using simple crochet stitches.
It’s a fun, inexpensive, and totally portable craft. You can do it!
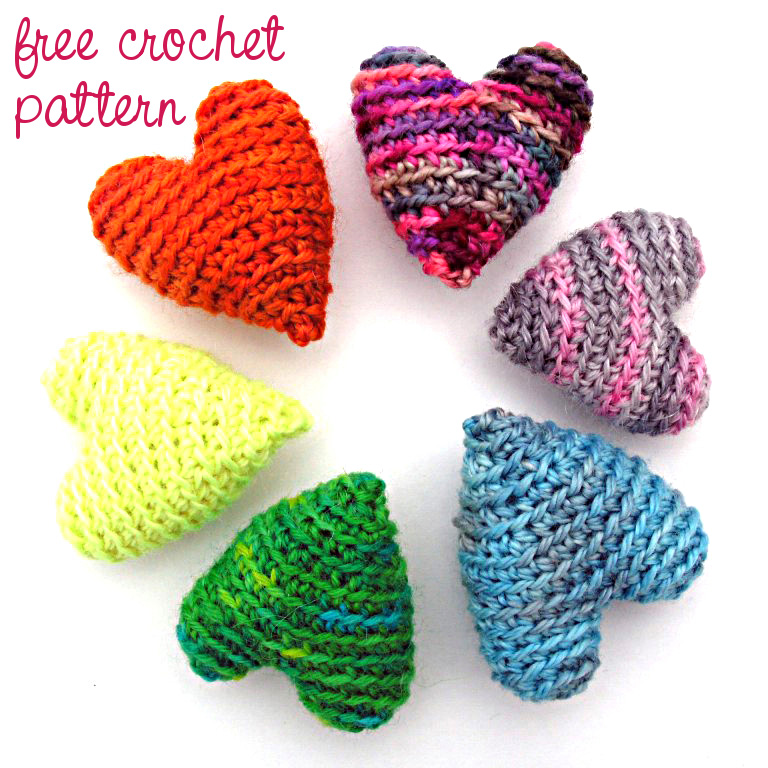
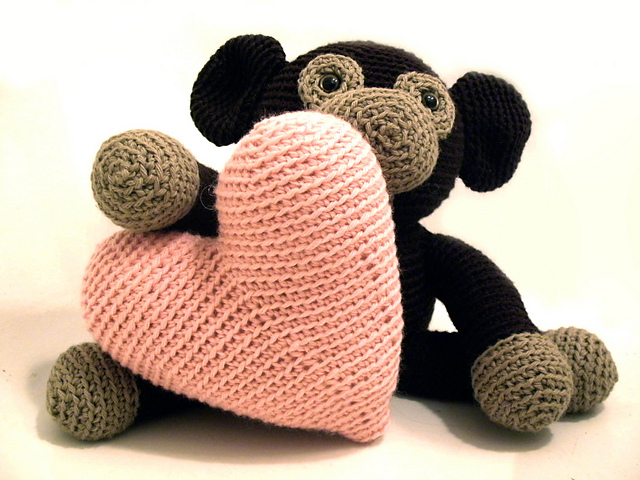
Crochet these fun hearts!
What’s better than hearts for Valentine’s Day? This pattern contains instructions for 3 sizes of stuffed hearts! The small measures 2.5 inches tall, the medium is 5 inches tall, and the large is a whopping 7 inches tall!!
These hearts are adorable plush decorations on their own… but the medium size is specially designed to turn any FreshStitches amigurumi into a Valentine’s Day amigurumi!
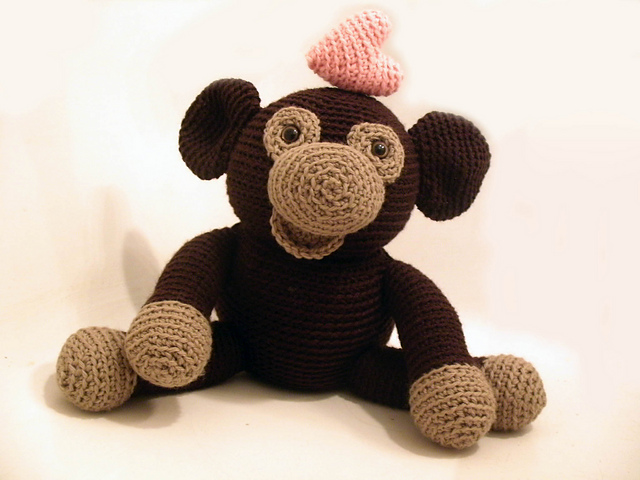
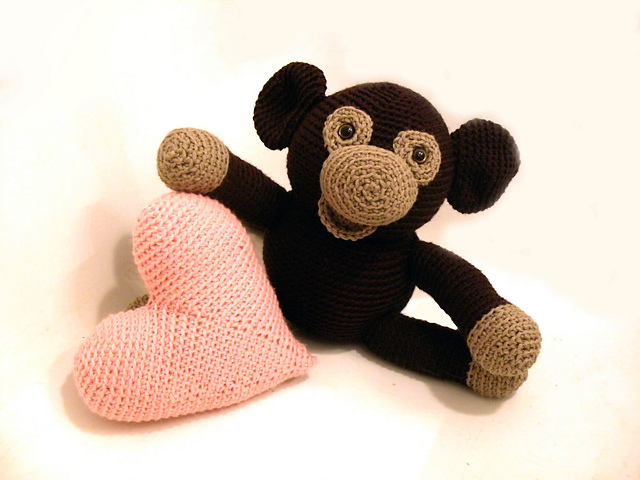
Here you can see the same Owen the Monkey with the three different size hearts. 🙂
I just haven’t sewn on enough different sewing machines to recommend one. Plus – a machine that’s perfect for me might not be perfect for you. It all depends on what you like to sew!
What I CAN do is tell you what I sew on and why it’s perfect for me. 🙂
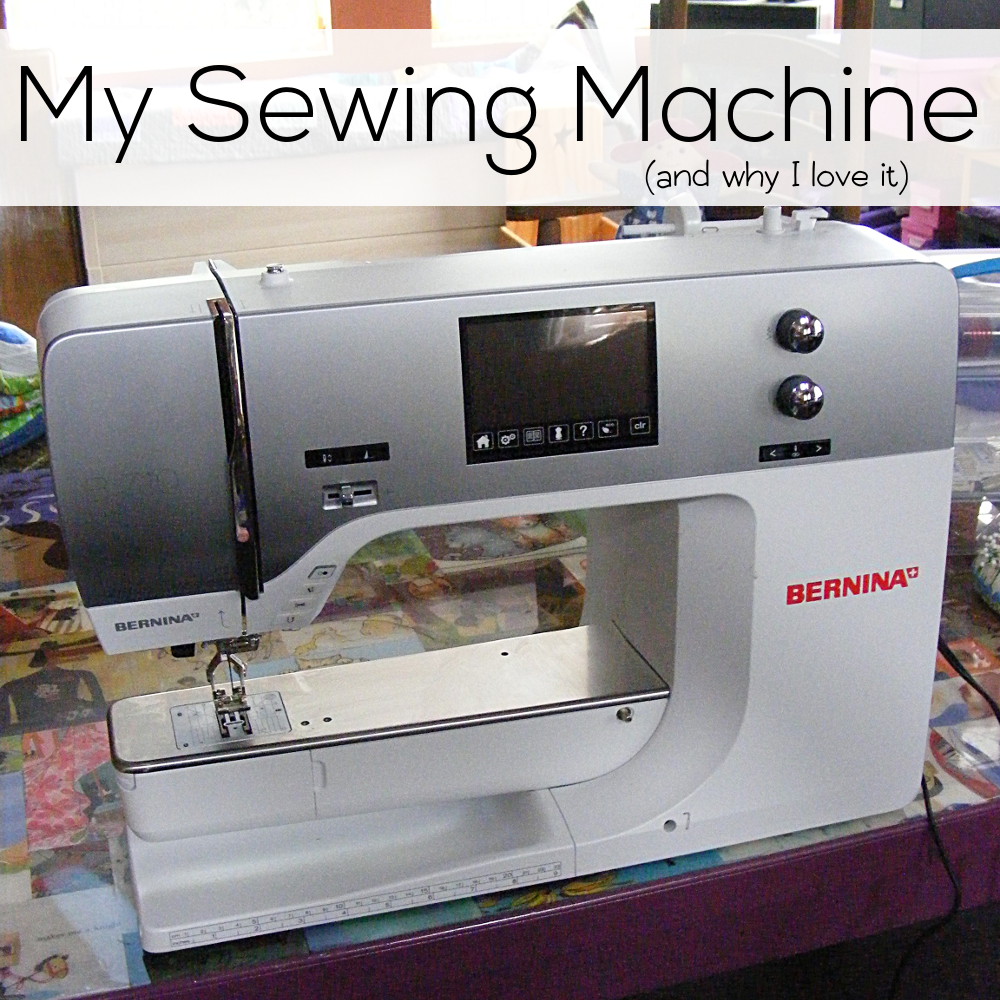
My current machine is a Bernina 710.
Before that I had a Pfaff Lifestyle (no longer made) that I really liked, but I went shopping for a new brand when we moved to the mountains and I was suddenly 3 hours from the nearest place that would service Pfaffs. So – number one – make sure whatever brand you buy is one you can easily get serviced. You should take your machine in once a year for a deep clean and you don’t want to have to drive for hours. 🙂
So – back to my Bernina.
I LOVE HER!
Here’s why. . .
I mostly sew quilts – and mostly applique – so these features knock my socks off:
I can set my machine to stop with the needle down and it automatically raises the presser foot halfway so I can pivot my work. This is my favorite feature!
My machine ties knots for me at the beginning and end of my stitching. And at the end of my stitching it also pulls the threads to the back and clips them. Magic!
I can adjust the amount of pressure on my presser foot – which is handy when I’m quilting really wavy lines without basting the layers first. This is also nice when I’m sewing softies and sometimes need to sew through 6 layers of cuddle fleece. 🙂
I love the built-in walking foot. I basically keep it engaged all the time.
It has a supersized bobbin which is great for quilting. Not as much running out of bobbin thread in the middle of a long line of stitching! (The next level up has an alarm that lets you know when you’re about to run out of thread – but I wasn’t willing to pay extra for that.)
It’s got a lot of general features that I really love too – not specific to quilting:
It’s quiet (for a sewing machine) and doesn’t shake the table too much.
It’s easy to change the needle and the feet.
It has a nice big slide-on table (not shown in the photo).
I don’t sew much clothing, but the free arm is great for sewing softie heads. (Most people use it for hemming pants and sleeves.)
It’s got a good strong light.
The controls are easy to use. (Though – honestly – it has a LOT of features that I never use.)
It handles any fabric I throw at it with no problems.
It does NOT have the built-in Bernina Stitch Regulator. I’ve tried it and think it’s pretty awesome, but I don’t do free motion quilting so I didn’t want to spring for that expense. I might try free motion in the future, though, so I made sure to get a model I could add that to at a later date.
My advice if you’re shopping for a machine is to test sew – a LOT. Do not be afraid to take up the people’s time at the sewing machine store! It’s a big investment and you should make sure you’re getting something that will work for you.
Bring in swatches of any specialty fabrics you like to sew with and make sure the machine you’re considering can handle them. I’ve heard several reports of Brother machines simply not feeding cuddle fleece through. We think maybe their feed dogs are less grippy than other brands? I LOVE using cuddle fleece for quilt backs so that would be a deal breaker for me – but it might not matter at all to you.
My last bit of advice is to ask other sewists. Nobody can recommend one machine above all others, but we can all tell you what we like and don’t like about what we use. The Shiny Happy People group is a great resource and I’ve seen many helpful discussions of different machines there. Hop in and ask about a machine you’re considering!
Choosing fabric for a quilt can be tricky – especially when you’re doing applique!
When I showed the lovely fabrics I was planning to use for this free receiving blanket pattern, a couple of people said they were eager to see how I used the prints, since I usually stick to solids and near-solids.
The reason I usually stick with solids and near-solids is because they’re so much easier to work with! Especially for applique where you don’t want the design to get lost in the background fabric. It’s soooo easy to end up with a block that you’re not happy with!
So – here’s the fabric.
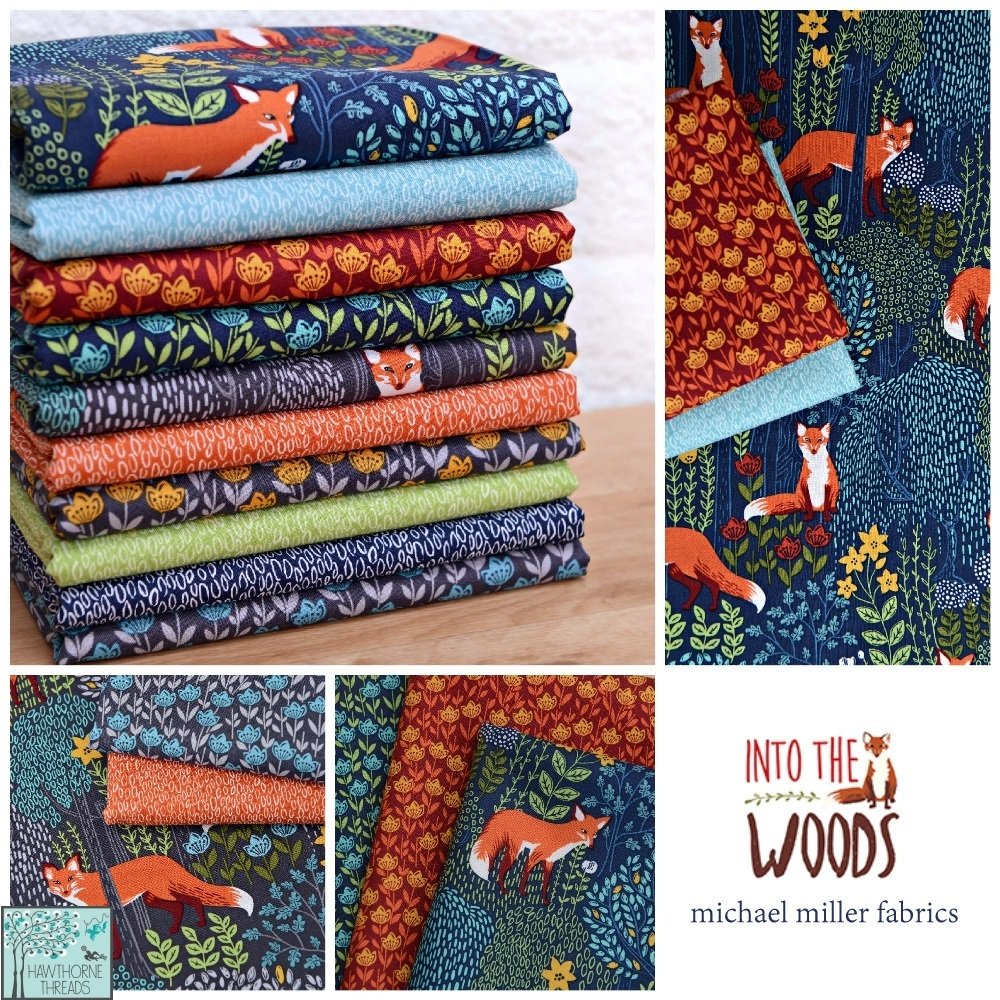
It’s the Into the Woods collection from Michael Miller Fabrics, sadly out of print now. But you’ll see a similar collection of fabric types in almost all quilt collections – some tone-on-tone small prints, some multicolored medium-scale prints, and some multicolored large-scale prints.
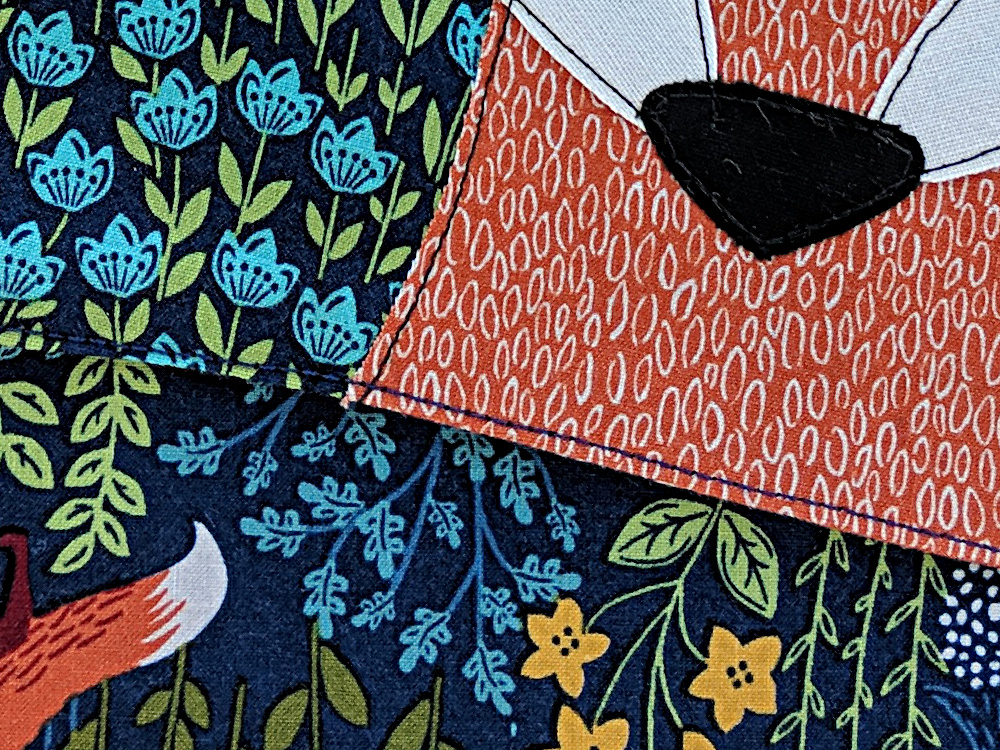
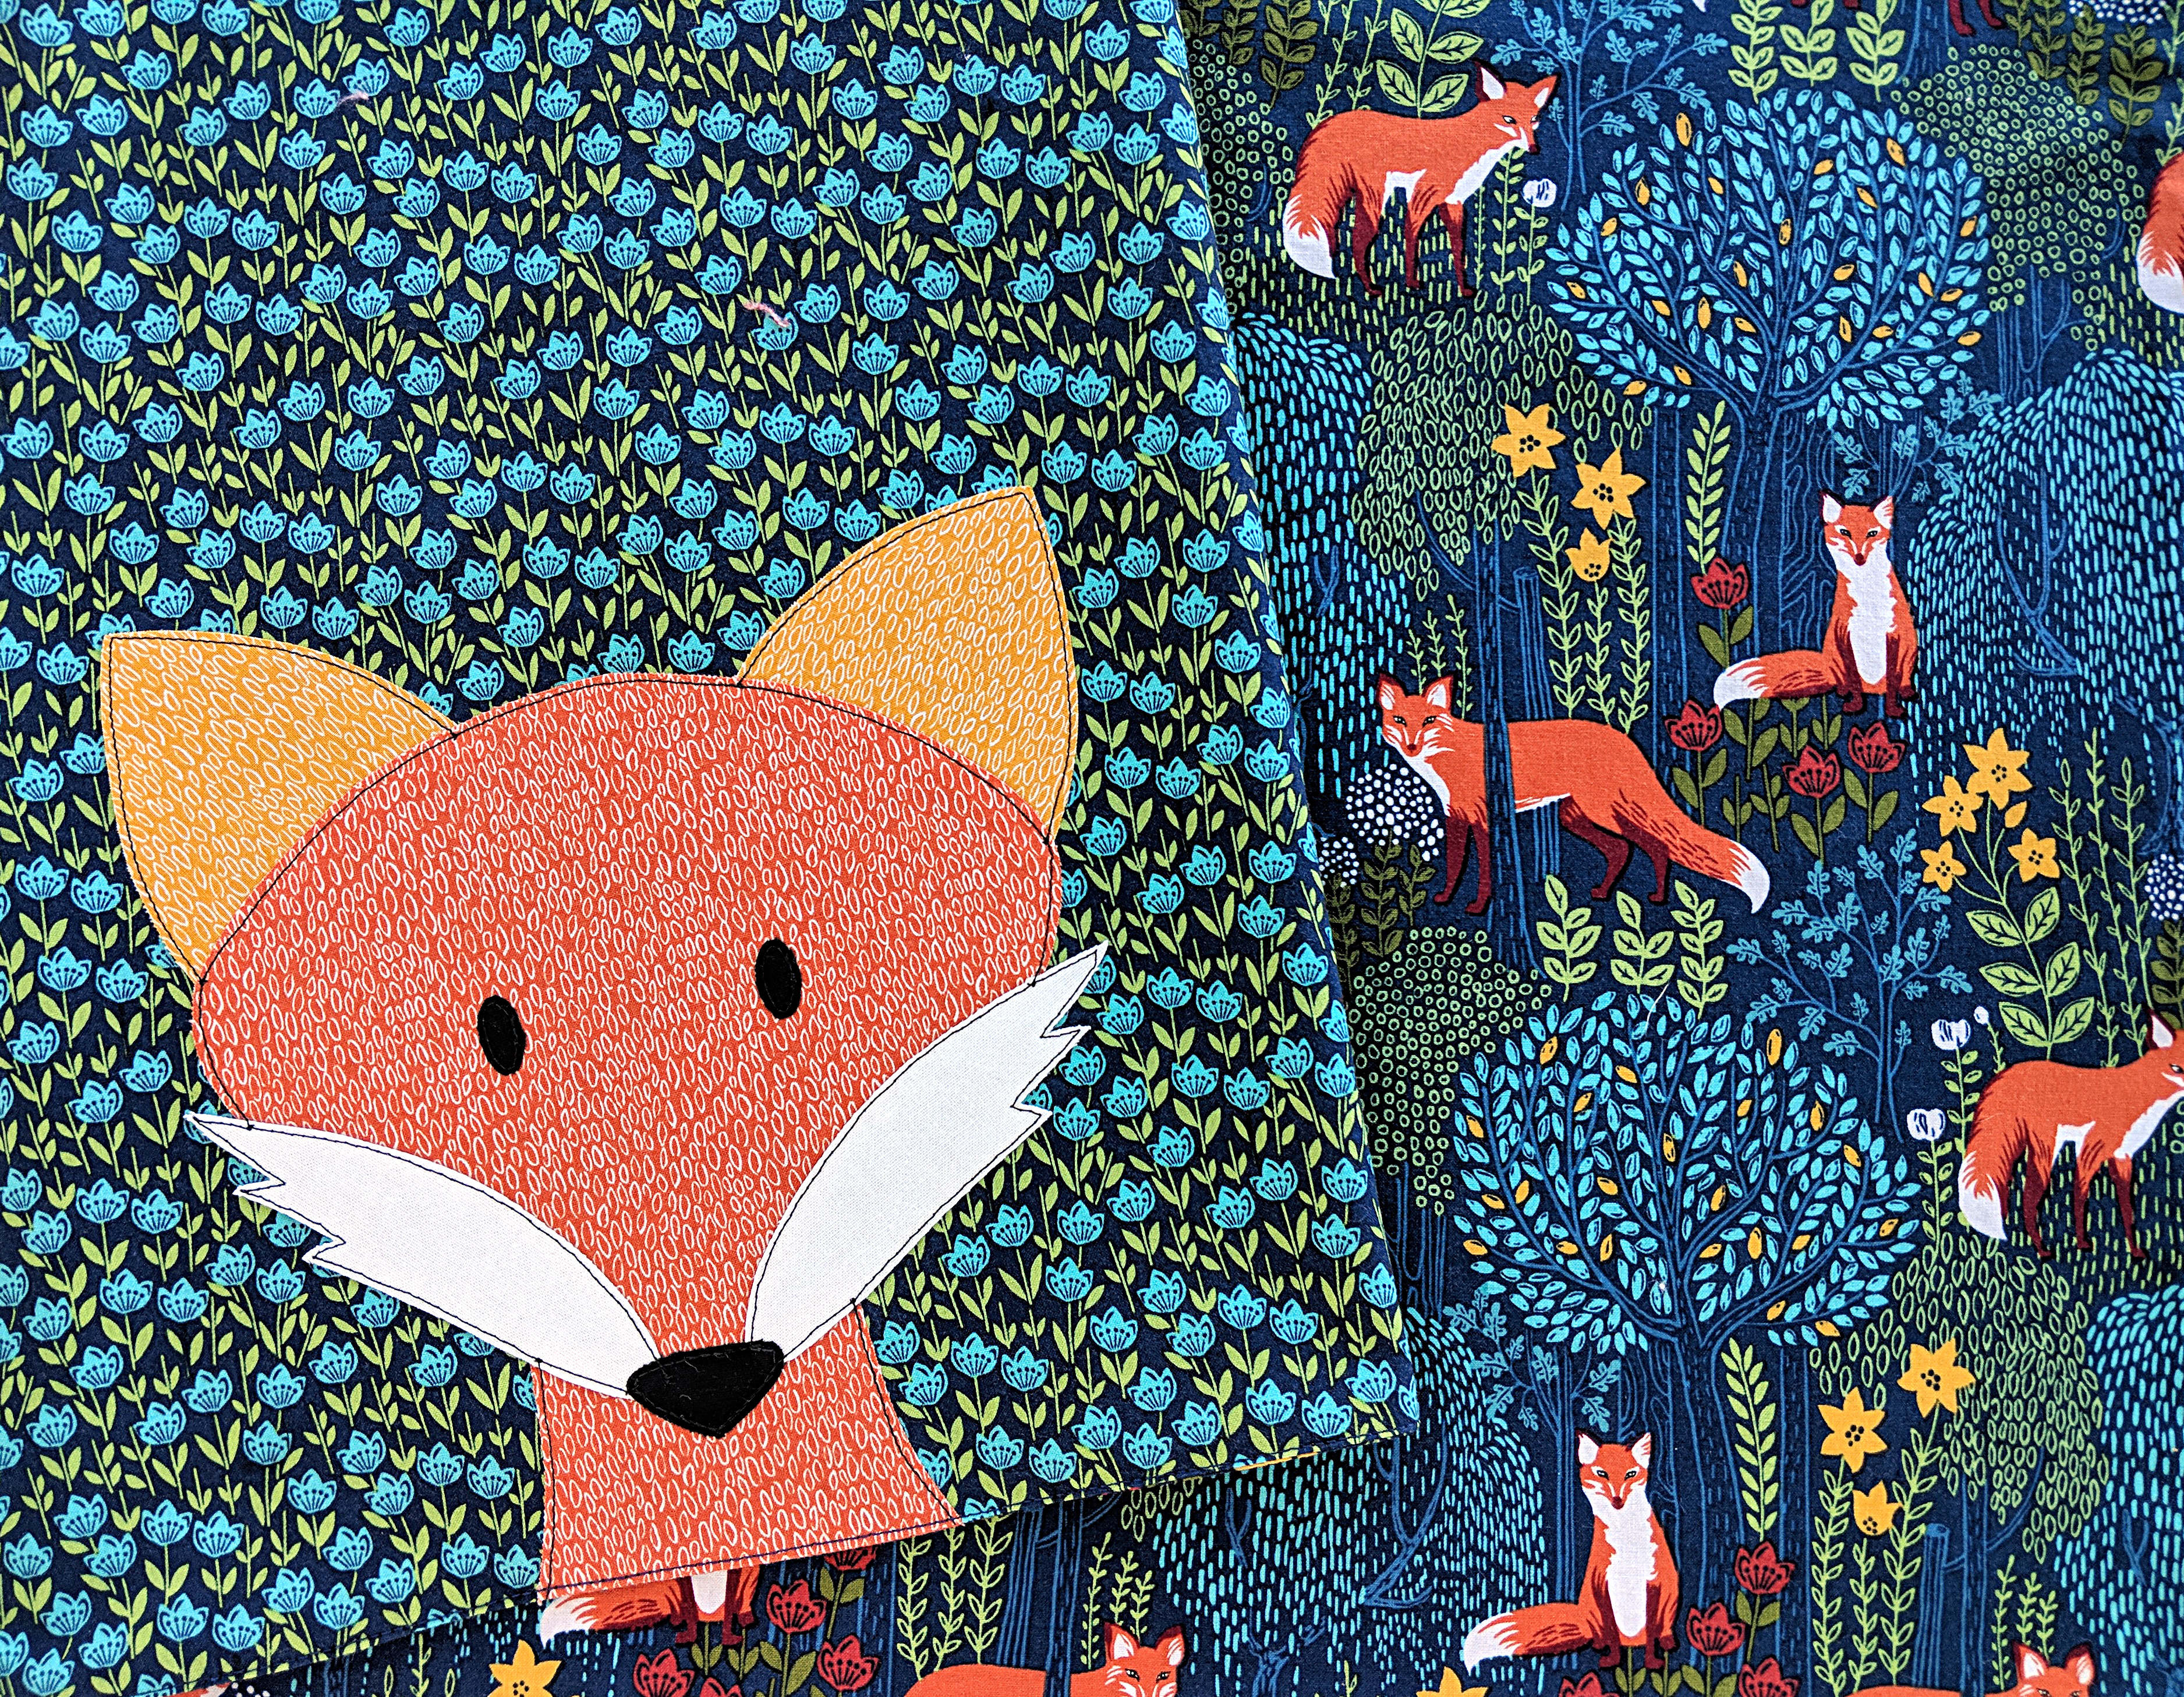
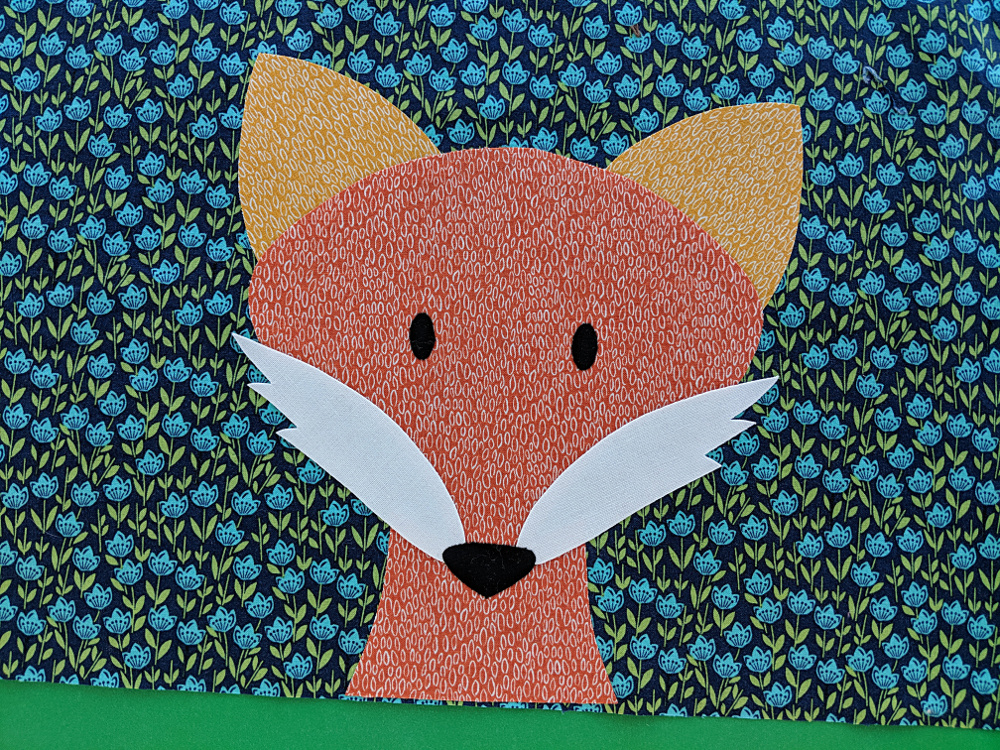
Gorgeous, right? Especially that larger scale print with the foxes and foliage.
But that’s exactly the print I didn’t want to use for my background. I used it for the back of the receiving blanket instead.
Why?
Because it contained all the colors I wanted to use in my applique fox face.
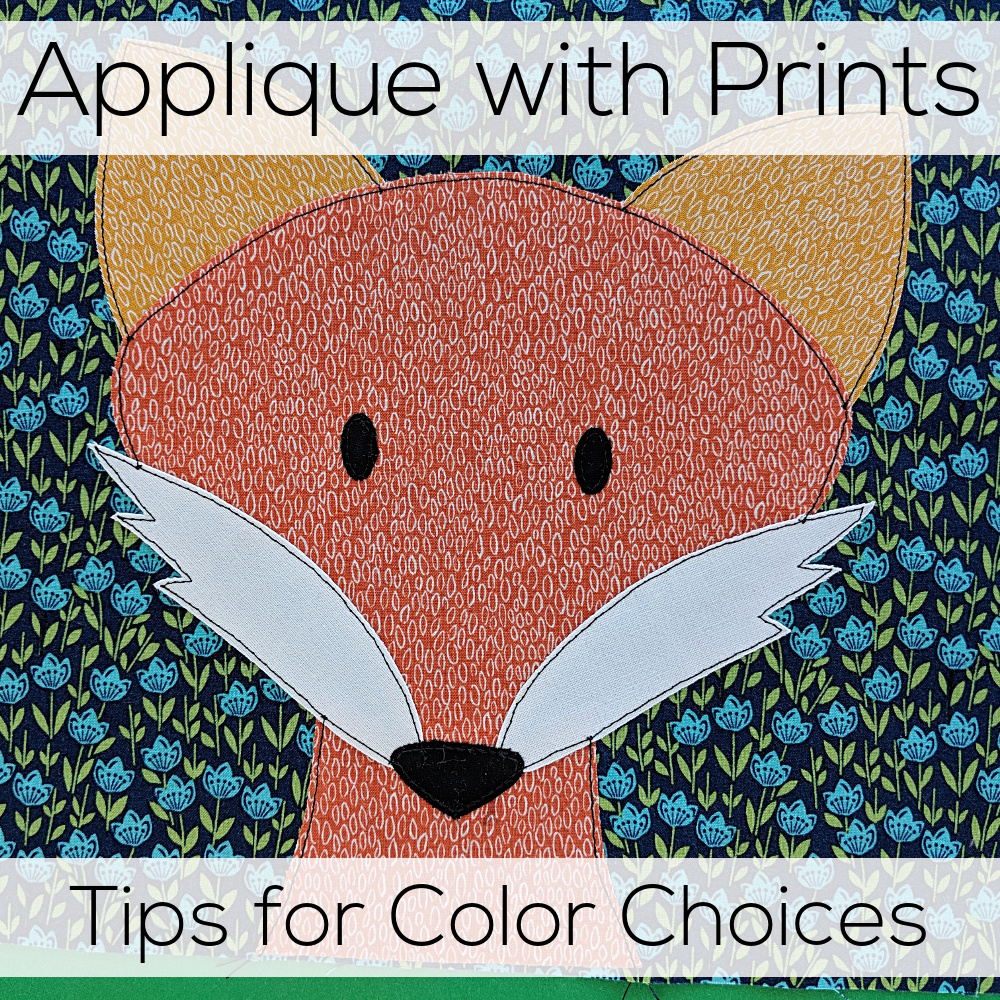
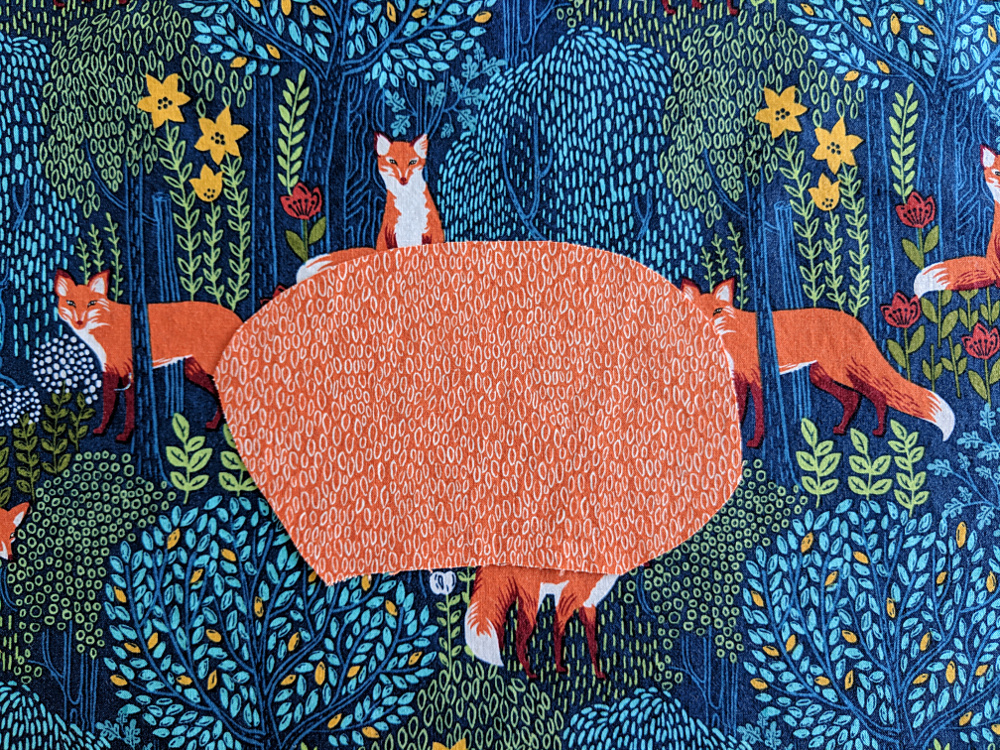
To show you why that would be a problem, I cut out a wonky little oval from the main fox color and laid it on that pretty fabric.
You can see the oval just fine, right?
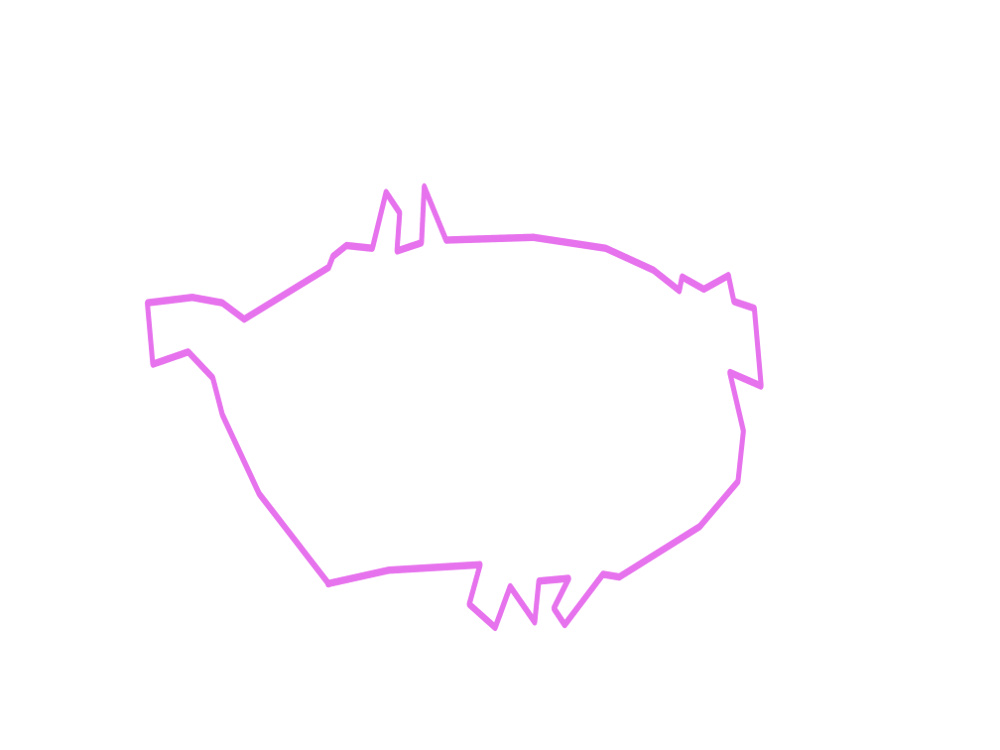
Yes, but your brain is actually kind of fighting to see the oval. Your brain wants to merge all the same colors into one shape, so it actually sees a shape like this.
See?
(This tendency is what makes it so much fun to play with negative space in traditional quilt designs. Your brain wants to merge those spaces together into new shapes.)
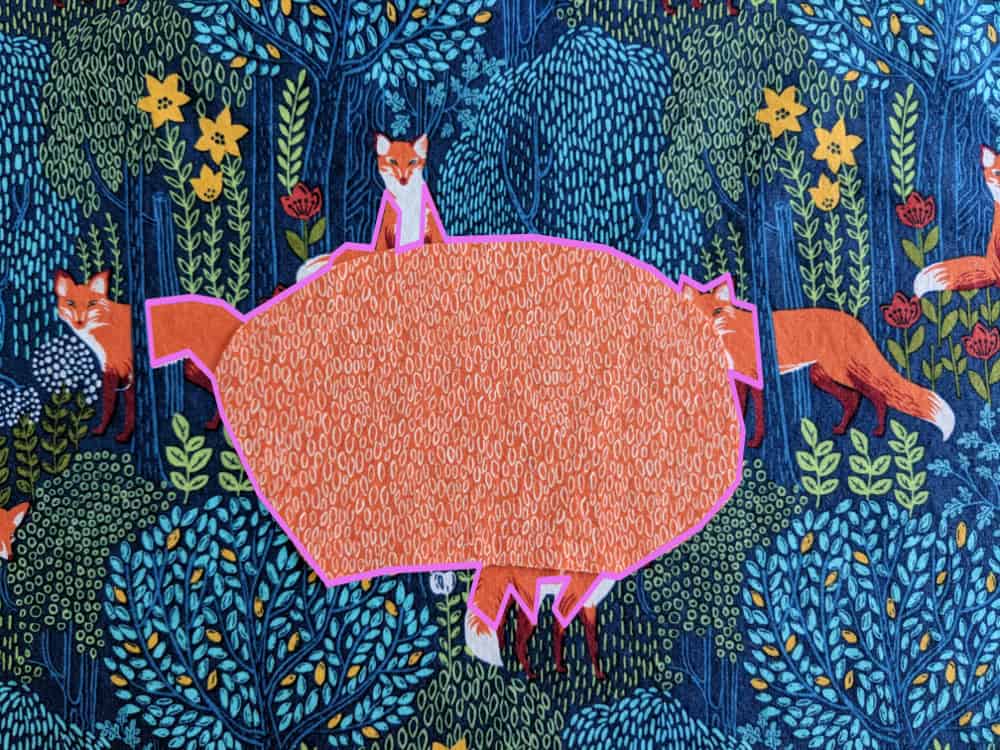
Again – you can still see the oval. It’s just that you’re having to overcome your brain’s natural tendency to see something else, and that will make for a less successful design overall.
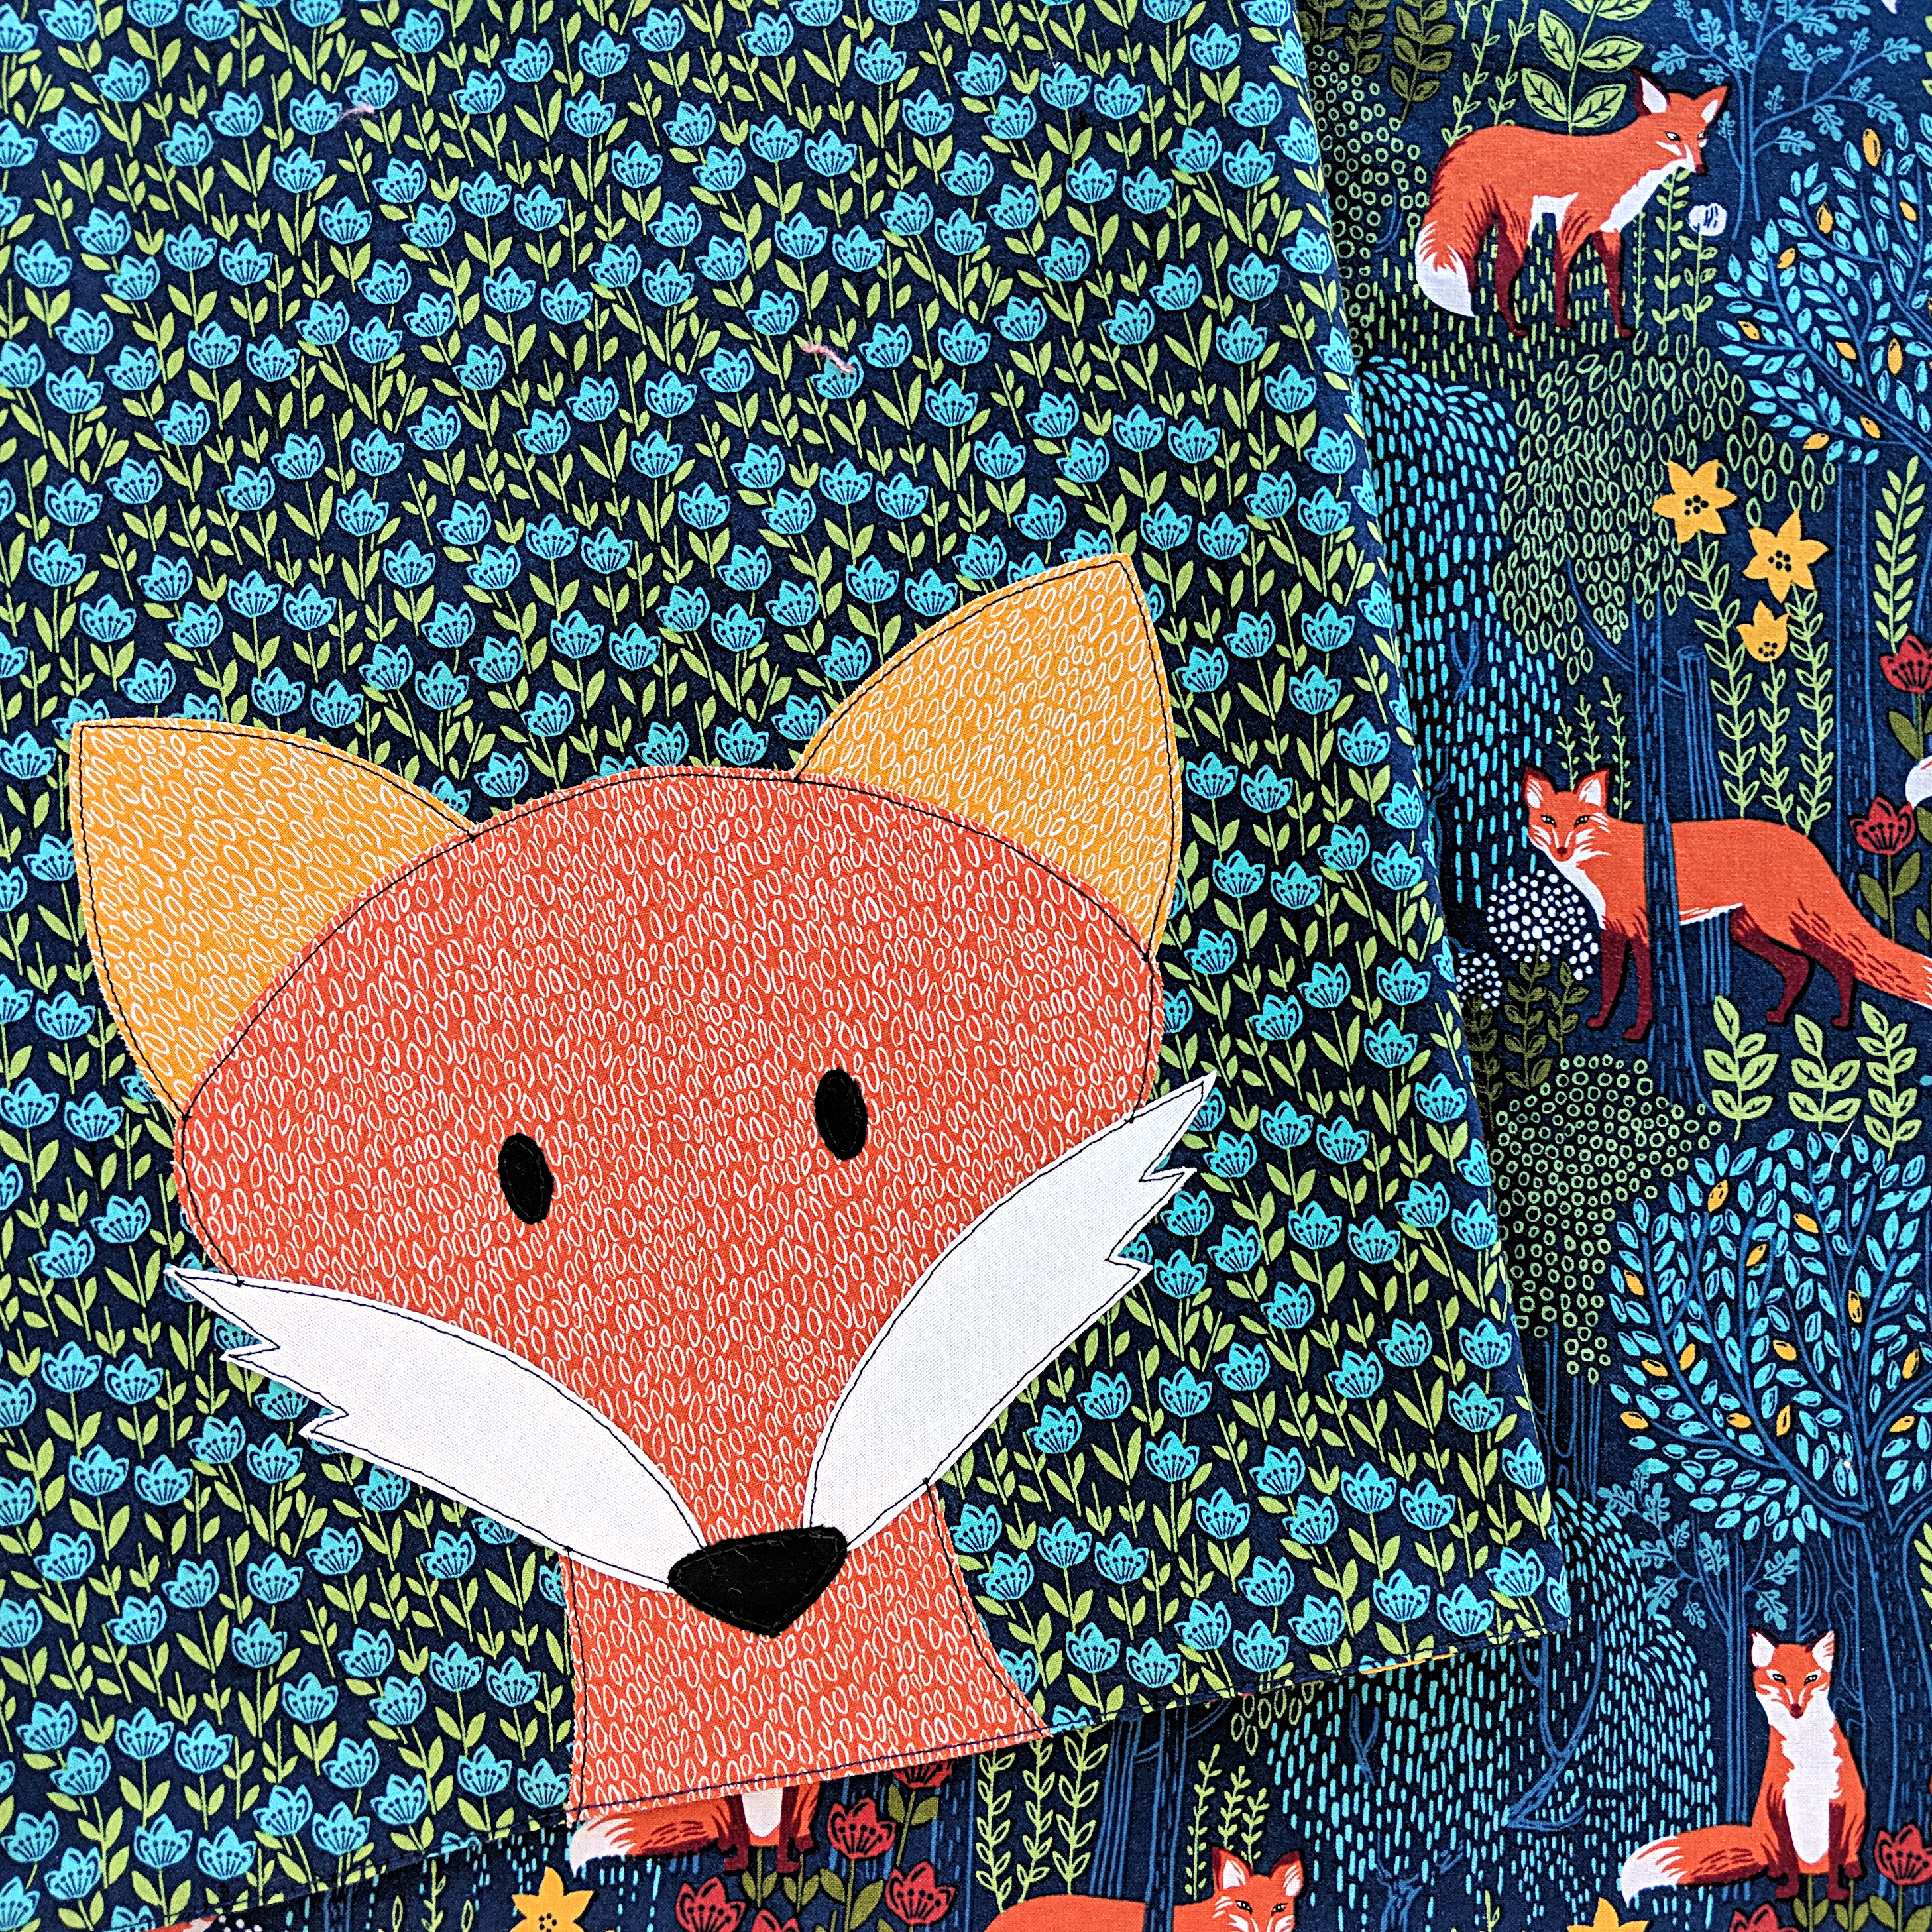
That doesn’t mean you can’t use fun prints. It just means that when you’re choosing fabric for a quilt, you have to pick your background very carefully. Here’s what I ended up choosing.
That pretty floral fabric I used in the background has dark blue, light blue, and green. No orange or gold or white – the colors in the fox applique. The green and gold are awfully similar – but ultimately I decided they were different enough for the combination to work.
And I still got that pretty fox and foliage print in there – just on the back of the blanket where it wouldn’t muddle the applique. 🙂
These color lessons apply to more than applique. Think about embroidering on a printed fabric, or using a print for a softie, or even a variegated yarn for a crochet amigurumi – the same color “rules” apply.
Sometimes working with limitations leads to awesome results – creative choices you wouldn’t have made if you had unlimited access to supplies.
Here’s one of my favorite examples.
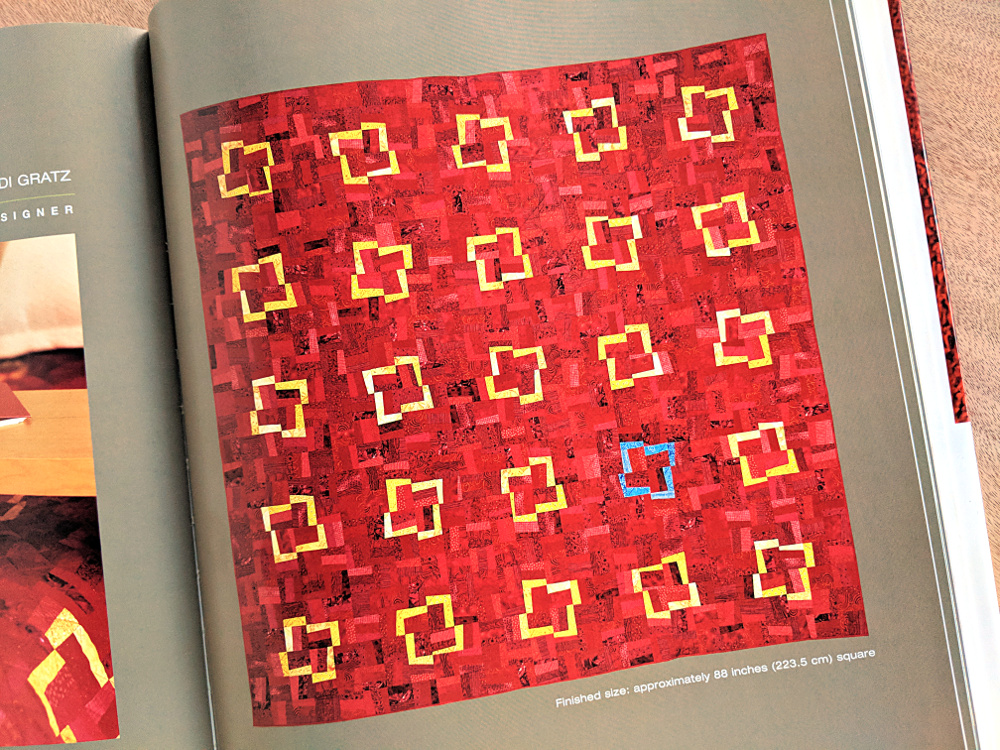
Many years ago I designed this quilt for a book called Simple Contemporary Quilts. I had already made a smaller, lap-sized version for myself, and that’s what I sent in for my pitch. They loved it and accepted it, but wanted a larger version for the book.
Here’s the thing – the smaller version was all yellow squares.
When I made the larger version I miscounted the yellow squares and ended up one short when it was time to sew the blocks all together.
And I was out of the mustard yellow fabrics.
And I was on a deadline.
I didn’t have time to go out and try to find more of the same yellow fabrics – so I decided to work with what I had. I made the last square lavender and LOVED IT. In fact, I think that lavender square is what makes this quilt.
(Luckily the editor of the book agreed.)
Give it a try sometimes. Make a small project using only what you already have on hand. Or work with what you have to solve a problem that crops up in the middle of a crafty project.
I’ve been trying to play around with lettering this year, and one of my goals is to make something new every week. I naturally gravitate toward stitchy letters, but this week I had no time. What I did have was an iPad, some patterns I had already created, and about an hour. Here’s the result – and I learned some new skills in the app (Procreate) I’m trying to teach myself.
Working with what you have doesn’t always result in a masterpiece – but it almost always pushes me to try something new. 🙂
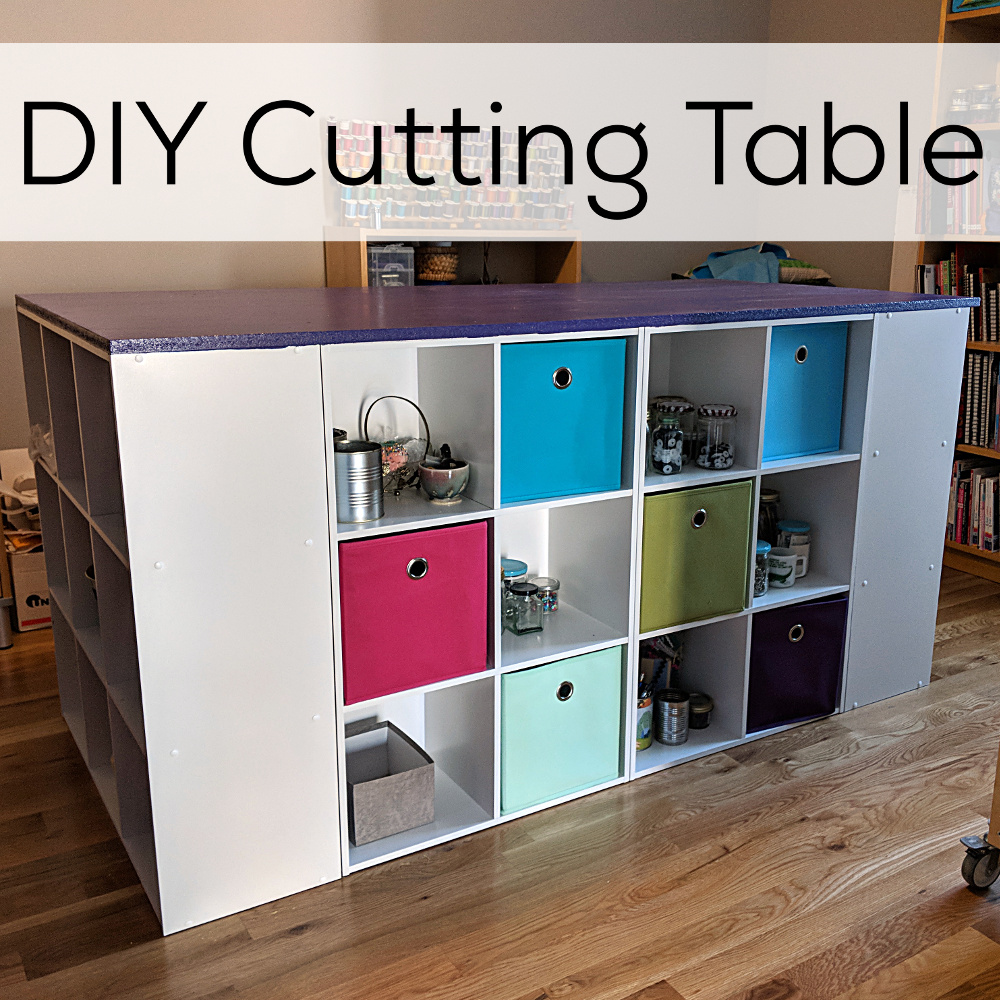
I cut a lot of fabric for bundles, so I really needed a large table at the right height for working while standing. Standing for hours at a dining table height surface will kill your back!
I used to have some good storage shelves that worked, but the bottoms of the legs got mangled in the move. The exact shelves weren’t made anymore (and the new version was much flimsier) so I needed to find something totally new.
I liked the look of an Ikea Kallax hack, but the height wasn’t right for me standing. I was going to go for kitchen base cabinets with a laminate top – but that was way (WAY) out of my price range. So I was walking around Lowe’s to see if there was anything that might work, and I stumbled across Cubicals from ClosetMaid.
They’re similar in look to the Kallax pieces from Ikea (though admittedly not as sturdy-looking) but the size is different. A piece 3 cubes tall was just the right height for me standing – and they made that configuration!
1 – 3 ft. x 6 ft. sheet of medium density fiberboard (you’ll need to buy a 4×8 sheet, but you can ask the folks at Lowe’s to cut it down to size for you)
1 piece of trim 1 1/2 inches wide x 3 feet long x 3/8 inch thick (optional – for cutting guide)
2 elevator bolts to hold the cutting guide in place (optional)
Assemble all the Cubicals cabinets.
Stand them in a rectangle with the cubes facing out. The two 3×3 cabinets are on the ends. There are two 2×3 cabinets (standing tall, not wide) on each side between each of the end cabinets. There’s some empty space in the middle.
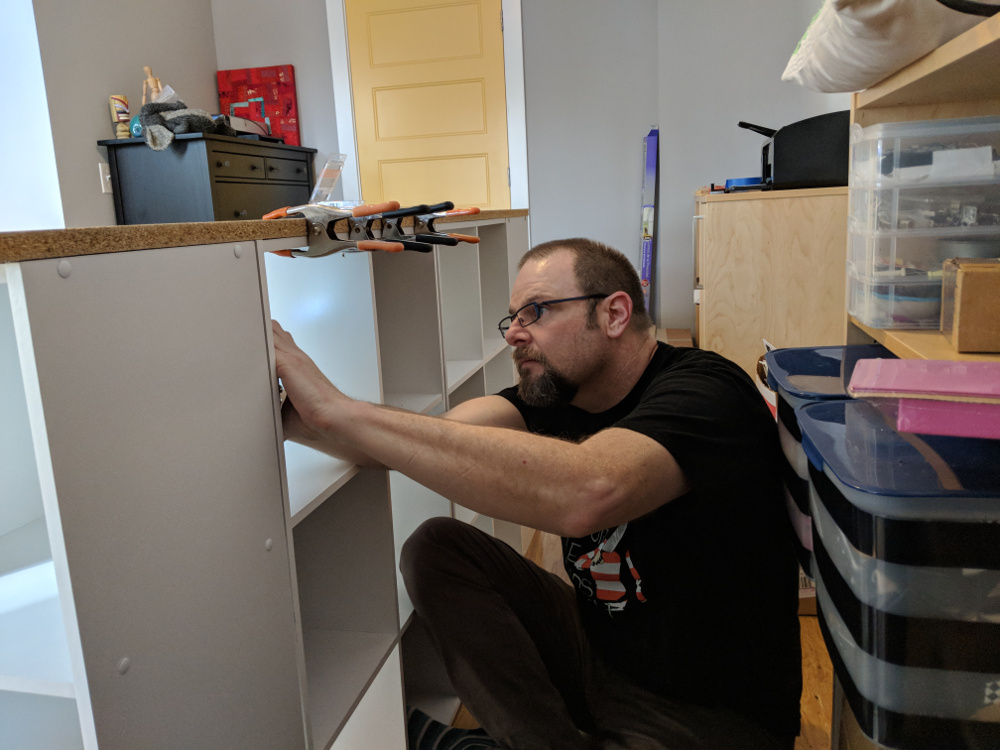
Get everything lined up neatly – exactly where you want it because this is NOT movable) and set the big MDF sheet on top. Drilling up from underneath the table (up through the top of the cabinets) screw the table top into place. We used 1 inch wood screws and put some tape on the drill bit to make sure we didn’t drill all the way through to the top of the table.
That’s pretty much it – except for a special feature I added to the top for cutting fabric bundles. I don’t know how many of you will need this feature – but you can see it in action in this video.
I sanded the sides and just barely rounded the top edge, and added several coats of pretty purple paint. Those colorful fabric drawers that fit right in the cubes are fun – but Lowe’s doesn’t carry many colors. You can find a bigger selection at Target.
One more thing. They make Cubicals with two different size cubes. These are the smaller ones (each cube is 11 inches). The cabinets with the larger cubes look and feel more sturdy (and more polished), but they won’t work for a table like this because they’ll end up way too tall for most humans. These smaller cubes feel a little less sturdy until they’re all assembled and now it seems pretty super strong.
Make sure you’re getting the right size. 🙂
Here are handy links to all the posts about quilting tools and supplies.
Make an easy baby gift with this free receiving blanket pattern.
A receiving blanket is seriously the easiest baby gift you can make. Choose fabulous fabric and no embellishment and you can make one in 15 minutes. Even if you add an applique (like the fox shown) you can still make it in less than an hour.
Here’s how. . .
Step 1
Cut two squares of fabric about 36 inches square.
Any kind of fabric is fine. I’m using quilting cotton here (from the GORGEOUS Into the Woods collection from Michael Miller Fabrics) but I’ve also used flannel, terry cloth, baby corduroy, and more. Just about anything goes.
I like to use one fabric for the front and a different fabric for the back, but you don’t have to.
And when I say “about” 36 inches I really mean it. I bought one yard cuts of fabric, but by the time I washed them and squared off the cut ends they were more like 34 inches. So I cut two 34 inch squares. No problem.
Step 2
Put the two squares of fabric right sides together and pin all the way around the edge.
Take a little care here and make sure you get everything laid out and pinned neatly. If your squares aren’t really lined up, it will show in the finished blanket – and make the pressing in Step 5 hard.
Step 3
Sew almost all the way around the edge, leaving an opening big enough to fit your hand for turning right side out. I usually leave 4-5 inches. Use a quarter inch seam allowance – or something close. I use the edge of my favorite presser foot as a guide which makes a seam more like 3/8 inch and that’s just fine. 🙂
Step 4
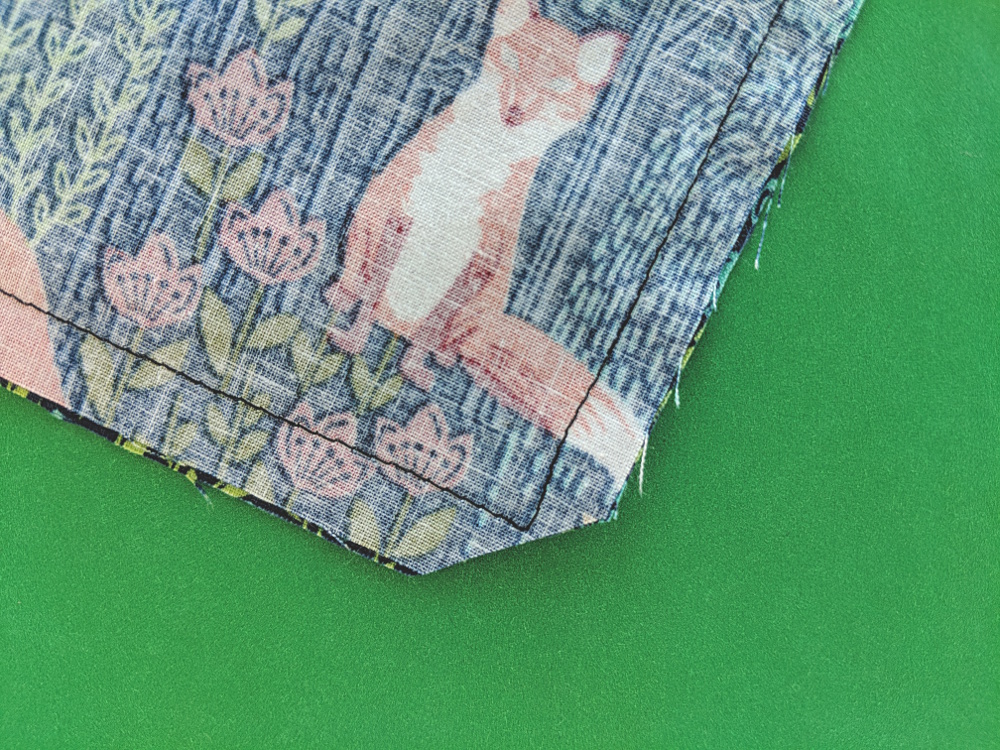
Clip the corners right up close to the stitching.
This will eliminate bulk in those corners when you turn it right side out.
Step 5
Turn the blanket right side out – taking care to poke out the corners and smooth all the edges. Press the edges flat.
Step 6
Now you have a choice. You can leave the edges as they are and hand sew the opening. I like to use ladder stitch (that links to a video tutorial) for invisible stitching.
Or (if you want a no-hand-work project) you can topstitch your blanket all the way around the edge. That will make your seams extra secure and sew up that opening at the same time.
Here’s how close to the edge I typically stitch.
Finished!
But that’s not all. This receiving blanket pattern is basically a blank slate for you to play with.
Sure – you can use fabulous fabrics and make it just this simple. How beautiful is this?
Honestly – no further embellishment needed at all.
You can add some applique. On this sample I added the Fergal Fox applique pattern in the lower right corner of the blanket.
No resizing needed – and it’s a great way to get extra mileage out of patterns you already own. If you do this, make sure you place the bottom edge of the neck right up against the raw bottom edge of the blanket.
That way the raw edge will get sewn up in the stitching that sews the front and back of the blanket together and it will look like the fox is peeking into the frame rather than like a decapitated head floating in the corner. 🙂
Have fun with this pattern! Be sure to tag any photos of your finished work with #shinyhappyworld – or share it in the Shiny Happy People group on Facebook.
Here are several free patterns that work with my basic 10-inch applique squares – no resizing needed!
Here are several free patterns that work with just some simple resizing. This post about making coasters has info about resizing an applique pattern that can be applied to any of these projects.
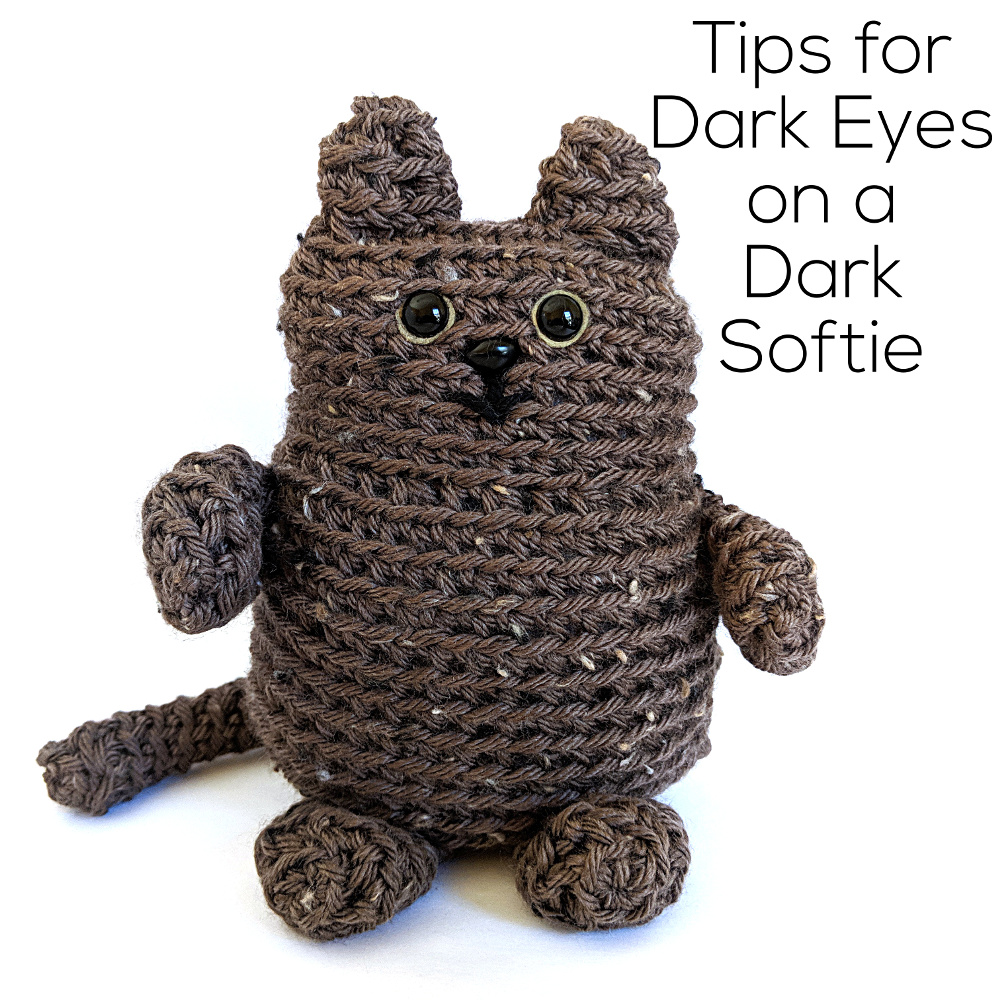
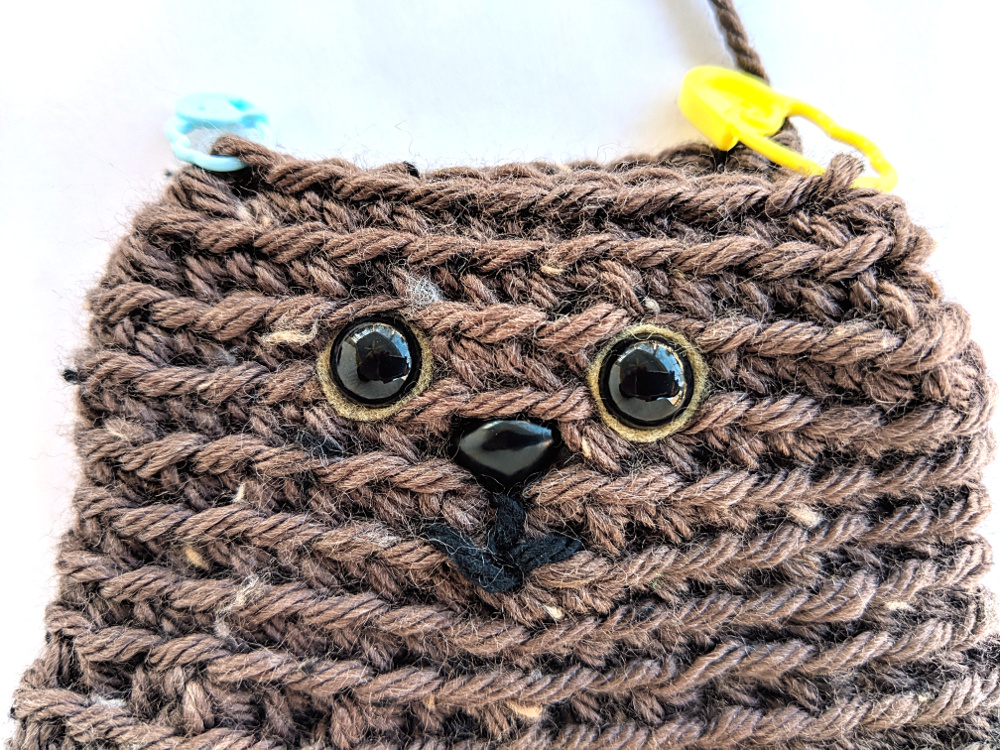
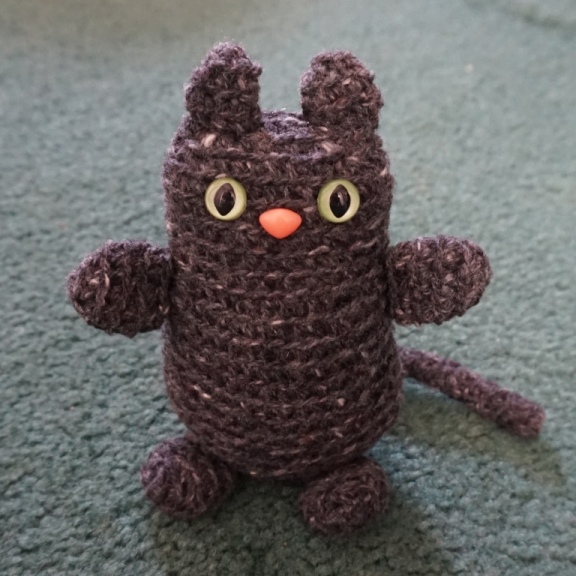
For the pattern I stitched him up in yellow, because lighter (and solid) colors make it easier to see the individual stitches. But I also wanted to make him in this tweedy dark brown for more of a tortoiseshell cat look – just for fun.
The tricky part of using dark yarn – or dark fabric for a sewn softie – is getting the eyes to show up well. The eyes are the most important part of the face!
I’ve got two solutions for you today.
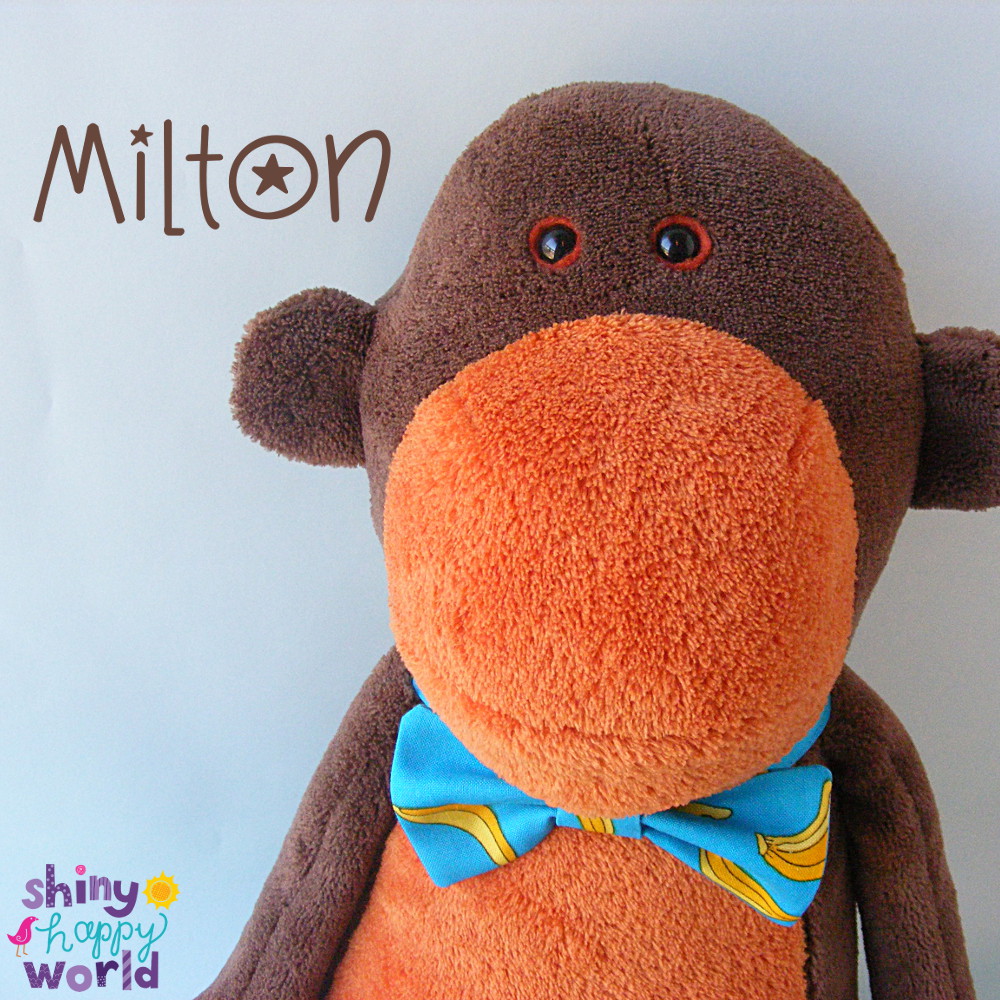
If you want to use a solid black craft eye (which is what I use for most of my softies) then it’s a big help to back those eyes with a circle of a lighter colored felt just a smidge bigger than the eye. That’s what I did with Milton Monkey. . .
And that’s what I did with Felix. Here you can see those eyes a little closer.
I used a 1/2″ circle of sandstone felt with 9 mm eyes.
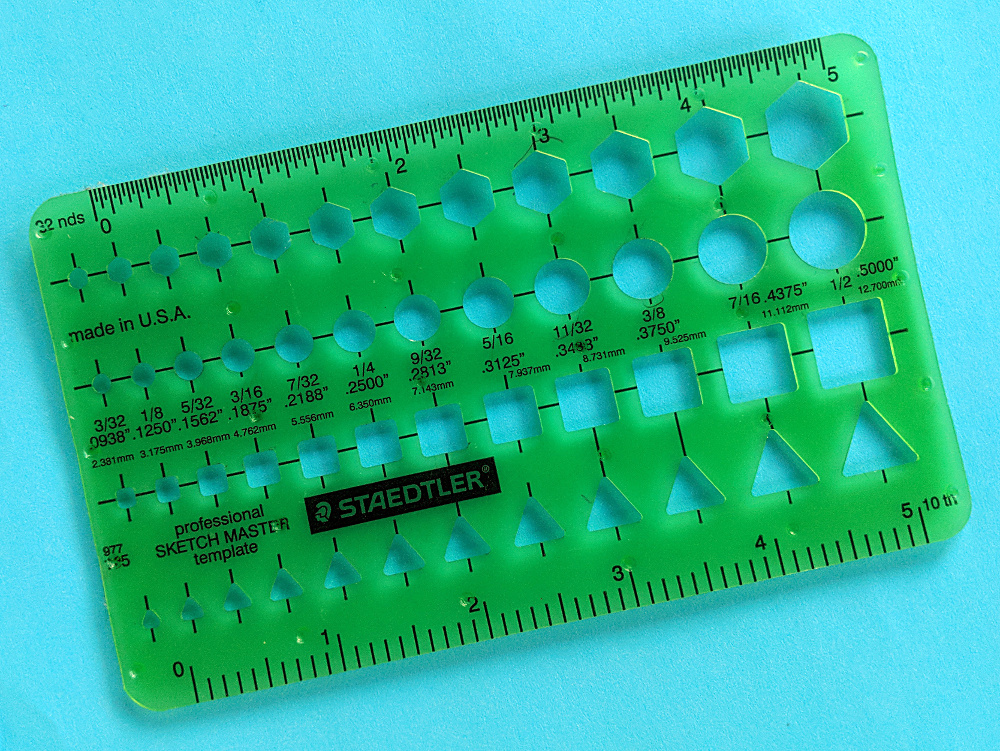
I use this tool to trace nice neat circles in lots of sizes.
I don’t remember where I got this exact template, but I’ve seen similar items at Office Max and Staples.
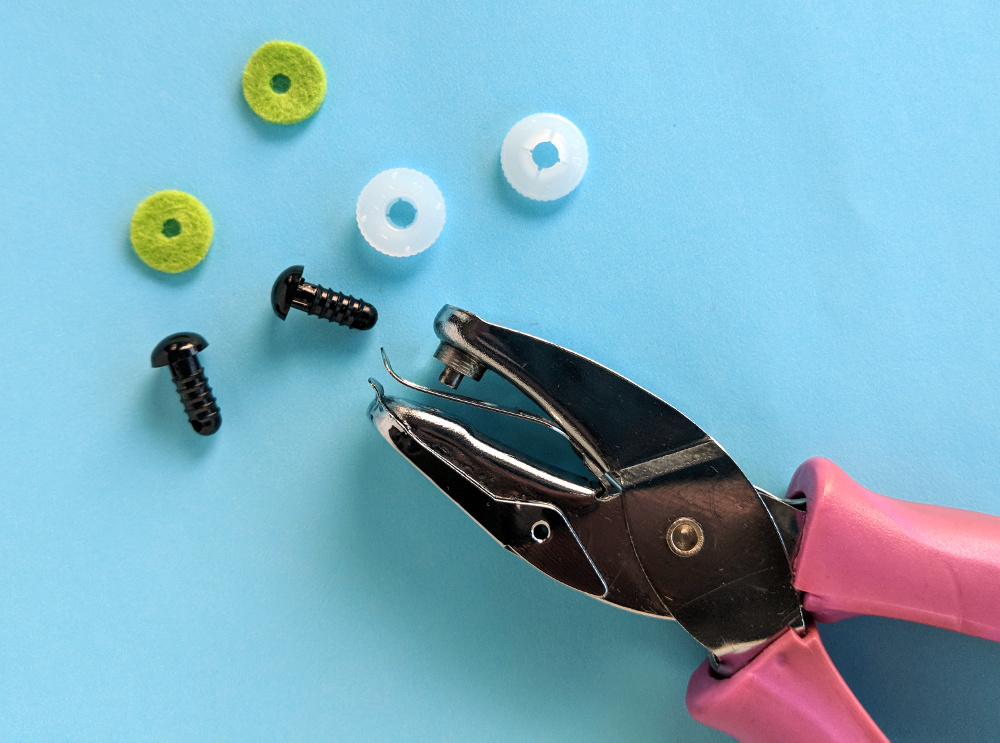
If you make a lot of softies and tend to use the same size eyes, you can also buy die-cut eyes which are perfectly perfect circles. I like the ones from Woolhearts on Etsy. You can choose the size and an assortment of up to six colors. It’s handy to keep a little stash of favorite colors.
Once you have the circles cut, there’s one more step. You need to punch a hole in the middle for the shank of the eye to go through! You can use an awl, or you can use a 1/8 inch hole punch for extra neat holes.
Perfect little backs to set off your eyes! I usually stick to a color that’s a lighter shade than the main color – but not too light! White in particular can make your softie look scared.
Another option is to use an eye with color already in it.
(When I do that I usually use a slightly larger eye than what the pattern calls for – like jumping from a 9 mm to a 12 mm eye.)
Look at Sharon’s cat (named Arnold). She also made a dark brown kitty, but she used awesome cat eyes for hers!
With those big eyes and no mouth he immediately reminded me of the cat from Kiki’s Delivery Service.
And now I need to make a black cat. 🙂
Here are handy links to all the posts about amigurumi eyes. . .