Begin – a free felt applique and embroidery pattern

I started this project AGES ago and finally finished it. I haven’t been working on it anything like steadily. I didn’t plan on releasing a pattern, so I just picked it up and worked on it at odd moments, and didn’t worry about documenting the process much.

Of course, now people want a pattern! I’m happy to share. It was a lovely project and one that was really relaxing and low-pressure to stitch. I’m just letting you know upfront that it’s a pretty loose pattern. 🙂

So here’s how to make it!

My project finished at 11 inches square. That gives me a little bit of breathing room all the way around, because I’m going to put it in a 12-inch frame. You can size yours up or down as you like, but here are the materials you’ll need for this size.

  • One 20-inch square of background fabric. I used a nice dark slate grey.
  • Assorted wool felt pieces. I used all the colors in the Frosty Pastels felt bundle except the white.
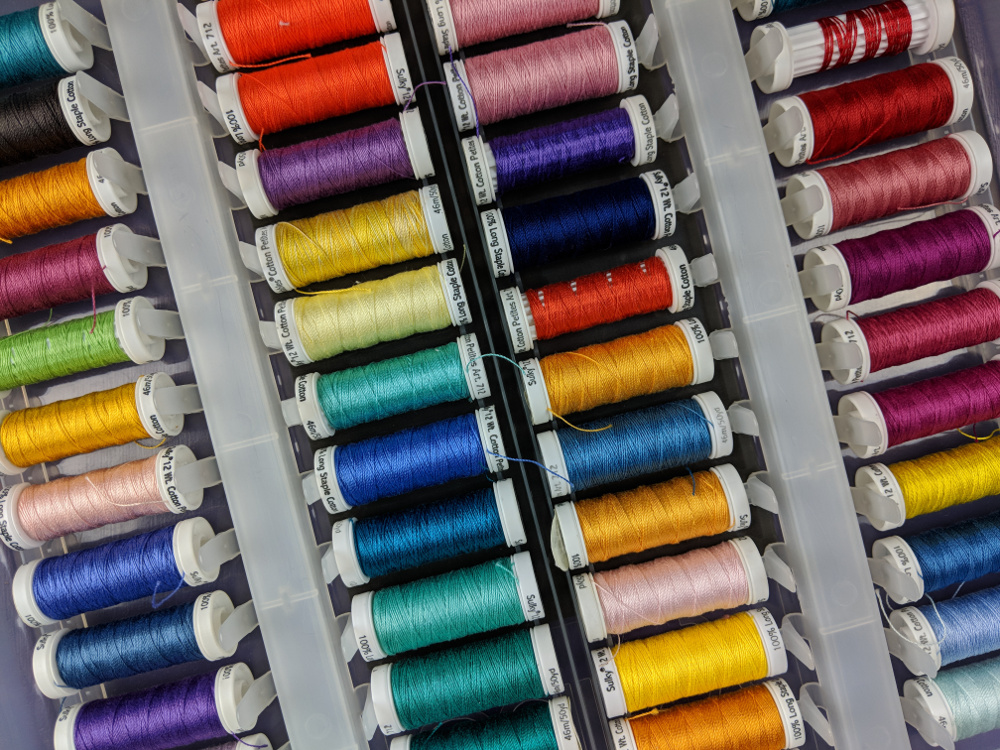
  • Thread to match the felt. I used Invisifil 100 wt. thread. (Yes – you read that right. 100 weight. It’s the thinnest thread I’ve ever used – like sewing with spider silk.) I matched the colors to the felt but, honestly, that thread is so fine that you could probably just use a medium grey for everything. If you want to use embroidery floss, there’s a bundle that matches the felt in the Frosty Pastels collection.
  • Slightly darker, thicker thread to contrast with the felt. I used Razzle 8 wt. rayon thread. I love the way the shiny rayon thread contrasts with the wooly felt.
  • Needles appropriate for your thread size.
  • Fabric glue stick.
  • Freezer paper (optional)
  • Frame or hoop (I used a 14-inch PVC frame)

Download the pattern here.

Print it at 100% size – or scale as desired. You can print directly onto the freezer paper, or you can print it onto regular paper and then trace it onto freezer paper.

Using freezer paper to cut small pieces like these makes it sooooo much easier to be accurate. You’ll find more info here.

The pattern page has the letters and eight blocks of blocks.

Cut the letters out of light grey felt.

Cut four blocks of blocks out of each of your other six felt colors. That way you’ll end up with four of each shape/size in each color. That’s more than you’ll actually need – but it will give you some extras to play with as you arrange.

Ok. Here’s where things are a little loose. Sorry – I didn’t take any photos of this process and I was really just winging it. That’s ok – it means you can wing it too!

Lay your background square on a flat surface.

Map out a 12-inch square in the center. I used a few rulers to block it out – use what you have handy. You just need to be able to “see” the borders of your square of workable space.

Start by laying out the letters, centering them in the space.

Here’s the finished layout again so you can refer to it for the next bit.

Start building your way out from your letters, filling the square space you have mapped out. I followed a few “rules” as I built.

  • I kept all my blocks running horizontally or vertically. None of them are tipped at an angle.
  • I tried to keep the spacing between the blocks pretty consistent. Think of it like grout between tiles.
  • I tried to never have two tiles of the same color right next to each other.
  • I sometimes had two of the same shape next to each other, but I kept it a pretty rare thing.

You can follow my finished project as a map if you like, but please don’t feel like you need to follow it exactly.

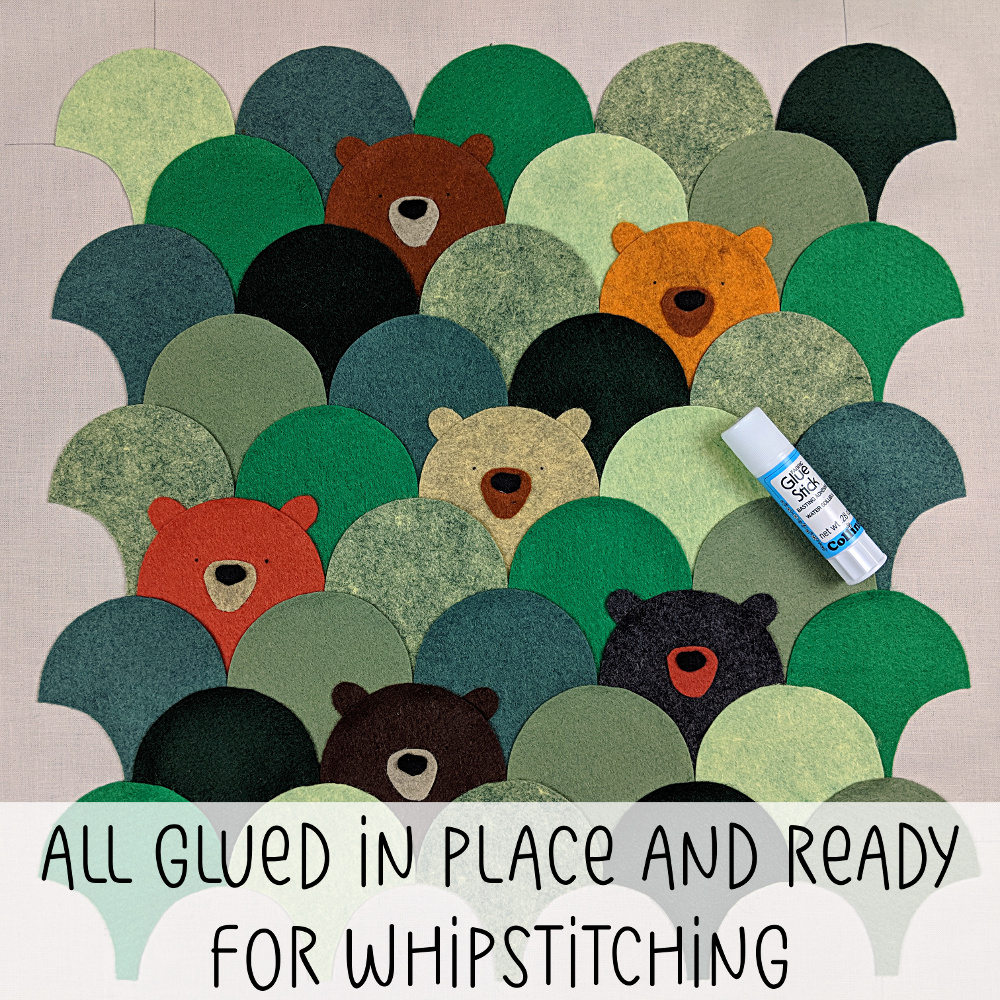
Once you’re happy with how everything looks, use a swipe of fabric glue stick to stick all the pieces in place. If you don’t have a glue stick, you can use liquid glue like Elmers, but I recommend brushing it on. If you squeeze it right out of the bottle you may get too much glue on there and it will seep through to the top of your felt and remain visible even after it dries. Don’t use a restickable glue (like a post-it glue stick). As soon as you put your hoop in the frame and pull it tight, those pieces will pop right off. Ask me how I know. 😛

Let it dry and hoop it up. You’re ready to start stitching!

Now I started taking some pictures. 🙂

The first thing I did was whipstitch around each piece using matching thread. This tutorial shows how I whipstitch applique felt.

whipstitch applique felt - free Begin felt applique project from Shiny Happy World

Once everything’s whipstitched down I can stop worrying about accidentally pulling any of the pieces up, or catching my thread on them. Time to relax and settle into the fancy stitching.

I chain stitched in dark grey right down the center of each letter.

There’s a tutorial here showing how to chain stitch.

I stitched a lazy daisy in the center of the dot over the. Here’s the video showing how to stitch a lazy daisy.

Finally, I wanted to embellish each block. The stitching is all tone-on-tone, using a thread color a little more vibrant than the felt color. I really agonized over what kind of stitching. I debated it for what felt like weeks and finally settled on simple stacks of straight stitches. I just love the texture of that!

I started with the long skinny pieces since there was only one way I wanted to stitch those. Just stitch a stack that almost fills the block.

Next I stitched the larger rectangles. They’re twice as wide as the skinny rectangles, so they get two stacks of stitches, side by side, but not touching.

Finally, I stitched the squares. The small squares got one stack, the medium got two, and the large got three. But which direction? Horizontal or vertical? I made the call for each square based on what kind of stitching was going on around them, trying to keep the direction as varied as possible.

Done!

We’re currently staying home because of the pandemic, but when I can leave the house again, I’ll get a 12-inch frame to finish it. Here’s a tutorial showing how to frame textiles without damaging them.

Happy stitching!

Make a Fancy Felt Frame – free tutorial

I had so much fun with the Bears in the Hills project that I immediately needed another way to play with felt applique and embroidery. I had been having glimmers of an idea about using traditional quilt patterns as felt applique and I thought it would be fun to do that as a frame around one of my applique patterns.

It was so much fun to make that I decided to put together a tutorial showing how to make the frame. I want you to be able to use it in combination with any of my applique patterns you already have. I’m always looking for ways you can get more use out of your library of patterns. 😄

So here we go!

This layout works for two different possibilities. If you want the full rectangle, use a double-sized sheet of felt (I carry them now in the shop in some colors) and a 12″ x 18″ frame. That’s a standard size I know for sure you can get at Michaels because I checked over the weekend. 😄

If you want just a square frame around your square image, ignore the blue striped parts of the image and use a 12″ x 12″ frame – also a standard size.

What You’ll Need

One 12″ x 18″ sheet of felt for the background. I highly recommend wool-rayon blend or bamboo felt. Don’t use acrylic felt – it will pill and look grubby before you even finish making it. This is the felt I use in all my projects.

Assorted felt colors for the other parts. I used the following colors. . .

  • ruby red slippers (background)
  • grape jelly (purple triangles)
  • blue snow (blue stripes)
  • sandstone (cat)
  • Tahitian sunset (cat stripes)
  • black (cat nose)
  • shocking pink (polkadots)

Thread to match all the applique pieces. (I use this Invisafil 100 wt. thread.)

Thick black thread to embroider the eyes and mouth. (I use this.)

Other thick thread for fancy embellishment. (I used this Razzle rayon thread. I love how the shine looks against the wool felt.)

Glue stick to hold the applique pieces in place. (This is my favorite.)

Optional – I like to use a Q-snap frame for this kind of handwork, so I bought a couple of extenders for my 17-inch frame so it could go all the way to 20 inches. I also used some cheap muslin as a base for my felt so I didn’t need to catch the felt in the clamps.

That’s it!

Prep the Pieces

You’ll need to cut some strips, triangles and circles from your felt.

For the triangles, cut four strips of felt 1″ wide and 12″ long. From each strip, cut 1″ squares. You need a total of 40. Cut each square in half on the diagonal to get 80 triangles.

For the blue stripes, cut 8 strips 1/4″ wide and 12″ long.

For the pink polkadots, cut nineteen 1/2″ circles. (I buy mine pre-cut from Woolhearts on Etsy.)

Choose your pattern for inside the frame and print it at 80% size. I used one of the cats from the Cuddly Cats quilt pattern, but changed his eyes to happy sleeping eyes. There are also a bunch of free patterns available here. Cut out all the pieces. (I like to print mine on freezer paper to make it easier to cut out the pieces accurately.)

Put It All Together

I started by gluing my large background sheet of felt to some cheap muslin so I could easily hoop it without covering up any of the stitch area. Here you can see my piece in its hoop.

I used a couple of batting scraps under the clamps to give them more to grab onto, since the muslin was pretty thin.

Next I started to arrange the cut pieces onto the background felt. Here’s the plan. . .

Each square in the grid is 1/4 inch. I don’t like to mark on felt, so I used a ruler as a guide to position my pieces.

Here you can see that I’ve laid the ruler across the bottom of the background piece so that the top edge of the ruler is exactly 3 inches up from the bottom edge of the felt. That’s where I lay down the purple triangles in a pinwheel arrangement. I originally positioned one triangle in each inch of the background felt, but I photographed this after I finished all the stitching – which draws up the width a little bit. (You can see that the finished width is now a smidge less than 12 inches, which throws off the alignment of the triangles a bit – but you get the idea.)

Once you get the bottom row of triangles in place, it’s easy to build out the rest of the pinwheel frame. When you’re happy with how it’s all laid out, glue each piece in place with a swipe of glue stick.

Use the ruler as a guide to position all the skinny blue stripes as shown in the diagram and glue in place.

Position your face. I shifted mine a bit to the right, just to make things more interesting.

Sprinkle some polkadots in the background and glue them down too.

Once the glue is dry – hoop it up and start whipstitching all the pieces in place. This video shows how I whipstitch applique felt.

Once you get all the pieces whipstitched in place, it’s time to have fun with the embellishment.

I used backstitch to embroider the cat’s eyes and mouth.

I used darker blue straight stitches to stripe the stripes.

I used three lazy daisy stitches in each triangle.

I used simple running stitches in the pink negative-space triangles in the pinwheels and also in the spaces between the blue stripes.

I used straight stitches arranged like spokes in each polkadot, and French knots scattered around the polkadots.

Here you can see all the different types of embellishment stitching I used, in one close-up shot.

I’m definitely not a member of The Back Is As Neat As The Front Club – though this isn’t bad at all for me.

And that’s it!

You can frame your finished piece, make it into a wall hanging, a pillow cover, a tote bag, or more. Have fun with it!

Here are several free patterns that work with my basic 10-inch applique squares – no resizing needed!

Here are several free patterns that work with just some simple resizing. This post about making coasters has info about resizing an applique pattern that can be applied to any of these projects.

Return to the main Let’s Make a Quilt Table of Contents.

Happy stitching!

Bears in the Hills – the Finished Project

Last week in the comments on one of the Bears in the Hills work-in-progress posts, someone asked if they could see it finished.

How did I never post a photo of the finished piece? That’s crazy!

But it’s true. 😛 I shared it in the newsletter, but I never posted a photo here.

So I’m fixing that now. 🙂

Ta da! The Bears in the Hills are finished! Here they are. . .

Aren’t they cute?

I’m so happy with this project! I loved every bit of the stitching (so many lovely stitching hours on the sofa!) and now it’s framed and hanging in my studio where I see it every day.

Want to make your own? Sign up for the Bears in the Hills class here.

Happy stitching!

Best,
Wendi

What to Watch While Stitching – an Awesome List of Reader Suggestions

Last week in the newsletter I asked for reader suggestions for what to watch while I stitch embroidery samples for my new book. The response was AMAZING! And lots of you said you watch while working too so I thought I’d share all the suggestions in one awesome list. I’m adding a star to the ones I’ve watched and can also recommend. 🙂

Here are all the shows that got multiple mentions (in order of number of mentions) . . .

  • Doc Martin
  • *Father Brown
  • *Midsomer Murders
  • *Downton Abbey
  • Doctor Blake Mysteries
  • *The Marvelous Mrs. Maisel
  • Shetland
  • Anne with an “E”
  • Outlander
  • Vera
  • Lark Rise to Candleford
  • Scott & Bailey
  • *West Wing
  • A Place to Call Home
  • *Sherlock
  • *Great British Baking Show
  • *Death in Paradise
  • *Frasier
  • *Longmire
  • Broadchurch
  • McLeod’s Daughters
  • Murdoch Mysteries
  • Home Fires
  • Agatha Raisin
  • *Bletchley Circle
  • Line of Duty
  • The Incredible Dr. Pol
  • Bodyguard
  • *Inspector Morse
  • The Paradise
  • Endeavor
  • *Rosemary and Thyme
  • Hinterland
  • Grace and Frankie
  • Vikings

And here are the rest (in alphabetical order). . .

  • *Arrow
  • Artful Detective
  • Back Roads
  • Being Human
  • Blue Bloods
  • *Bones
  • *Cheers
  • The Closer
  • Darkest Hour
  • Denver Pet Show
  • Derek
  • Designated Survivor
  • Dirk Gently’s Holistic Detective Agency
  • Doctor Foster
  • Dr. Quinn Medicine Woman
  • Drop Dead Diva
  • *Elementary
  • Escape to the Country/Escape from the City/Escape to the Continent
  • *Flash
  • *Friends
  • Game of Thrones
  • Girlfriends
  • The Good Cop
  • Home Fires
  • Homecoming
  • Indian Summers
  • Inspector Lewis
  • Jack Irish
  • Jack Ryan
  • Jamestown
  • Keeping Faith
  • Kids’ Baking Championship
  • *Kingdom
  • Land Girls
  • The Last Kingdom
  • Last Tango in Halifax
  • Legends
  • Little Dorrit
  • Little Women
  • Love Child
  • *Madmen
  • Mercy Street
  • The Miniaturist
  • Misfits
  • Mr. Selfridge
  • *Monk
  • Mozart in the Jungle
  • The Mysteries of Laura
  • Mystery Road
  • The Nature of Things
  • NCIS
  • Offspring
  • Ozark
  • The Palace
  • *Poirot
  • Rake
  • Reign
  • Ripper Street
  • *Salt, Fat, Acid, Heat
  • Schitt’s Creek
  • The Science of Stupid
  • Secret Agent Selection WWII
  • Silent Witness
  • Striking Out
  • Sugar Rush
  • *Supergirl
  • The Supervet
  • This Is Us
  • Time Goes By
  • The Time of Our Lives
  • Timeless
  • The Tudors
  • The Unforgotten
  • The Waltons
  • Watership Down
  • We Will Meet Again
  • White Collar
  • Wolf Hall
  • Yukon Vet

Oh – and for those who don’t get the newsletter, here are the shows I mentioned that I’ve already watched and loved to stitch to. . .

  • The Crown
  • Call the Midwife
  • Victoria
  • Foyle’s War
  • Miss Fisher Mysteries
  • Poldark
  • Law & Order
  • Grey’s Anatomy

You guys – this is an amazing list! Please keep adding suggestions in the comments so we have a continuing resource. 🙂

Best,
Wendi

Bears in the Hills – WIP

I don’t usually do all caps but. . .

I AM SO EXCITED WITH HOW THIS IS TURNING OUT!

Seriously! I can’t wait to get these guys in a frame to start stitching. You’re going to have to pry me out of my couch for the next few weeks. 🙂

And that’s not all!

I want you guys to stitch with me!

I decided the best way to make this a pattern is to actually make it a video workshop. I’ve shot video already showing how to position all the pieces and my little tricks for securing them in place while I stitch.

This was my studio today, with those fancy new lights in action.

Look at that awesome even lighting! 🙂

The next step is going to be whipstitching the edges down with matching thread (not embroidery thread – I want these stitches to disappear) and then I’ll jump into fancy stitching!

My plan is to get all the kind-of-boring-to-most-people-but-I-really-love-it whipstitching done, and then start recording videos showing how I freehand stitch the hills. Maybe one new video a week?

Update – the pattern is now available here.

Happy stitching!

Play with some felt! Try the Oddballs – a fun pattern for silly monsters.

Free Beaver Pencil Case Pattern

I’m participating in the Back to School Sewing Series with Sulky. You can make this fun pencil case!

That beaver can’t wait to chomp on all those colored pencils. 🙂

See a little sneak peek of that beaver design here – including a look at all the beaver designs I didn’t use. 🙂

Materials

Step 1

Download the embroidery pattern here.

Step 2

Print or trace the pattern out onto a sheet of Sulky Sticky Fabri-solvy at 100% size. The rectangle should be 4 x 9 inches.

Step 3

Peel off the paper backing and stick the pattern onto the fabric. Make sure you position it so that the whole image will fit in the hoop, with fabric all the way around.

Step 4

Choose your threads!

So many pretty colors. 🙂

Step 5

Embroider the design using two strands of Sulky 12 wt. thread. Stitch right through the stabilizer and the fabric.

I used backstitch for all the lines. Learn how to backstitch here.

I used satin stitch for the pencil leads. This video shows how I satin stitch pointy shapes.

Look closer!

I decided partway through stitching that I wanted a little more color on the barrels of the pencils – so I added some stripes running down them.

Your pattern has the added stripes. 🙂

That nose!

I wanted the nose to be solid, but instead of satin stitching I decided to applique it with a tiny scrap of black felt for a velvety soft texture.

At this point I just left it unstitched.

Step 6

Trim the fabric down to 1/2 inch outside the rectangle.

Make sure you do that now – once you soak away the stabilizer that handy line will disappear. 🙂

Step 7

Soak the piece in cold water for an hour or longer. I often leave mine to soak overnight with no problem. Rinse it in clean water, gently squeeze out the extra water, and iron it dry face down on a fluffy towel. This video shows how I iron my embroidery dry without smooshing the stitches.

Step 8

Whipstitch the nose in place using matching thread.

For a small piece like this I like to use a glue stick to hold the piece in place while I stitch it down.

Step 9

Stitching done!

The front piece for your pencil case is all fancied up. Now it’s time to sew it up into a pouch.

Cut a back piece from the main fabric 10 x 5 inches.

Cut two lining pieces, also 10 x 5 inches.

Step 10

Follow the instructions in this post to sew up your fancy lined zipper pouch. 🙂

Finished!

Now – go check out the rest of the series! It’s a fun group of free projects!

Happy stitching!

Sneak Peek at a New Project: Which Beaver Is the Cutest?

I’m making a new project for the Back to School series at Sulky – and I needed a beaver.

Not a quilted beaver. . .

. . . and not a stuffed beaver. . .

. . . and not a crocheted beaver. . .

For the project I had in mind I needed to embroider a beaver – and I wanted to see him from head to toe.

I sat down to draw some sketches and then remembered that my husband had a whole page of adorable beaver drawings in his airplane sketchbook.

Perfect!

You might think it was hard to choose between all those sweet faces – but I had my favorite picked out with one glance. It’s the one down in the right corner.

Isn’t he a cutie?

Now for a much harder decision. . .

Choosing thread!

That lucky beaver has something colorful to chomp on, so I get to dip into the rainbow. 🙂 So many colors to choose from! And these are only about half of my stash of Sulky Petites 12 wt. thread. (You can read my review of this thread here.)

Final project coming Saturday! It’s going to be a free pattern. 🙂

Update – the free pattern is here now!

Happy stitching!

Best,
Wendi

Add an Embroidered Label to Your Quilt

How to Make a Quilt Label - tutorial from Shiny Happy World

It’s easy to add a quilt label to your creation – and it’s fun to make it coordinate with the designs on the front of the quilt.

I like my labels to be about 4 inches wide. To resize any block design to fit in that size you print it at 40% of the original size. Easy peasy!

The bear you see on this label is one of the blocks from this Woodland Critters quilt pattern.

Cut a piece of fabric big enough for the full four inch square to fit flat in a hoop. A seven inch square of fabric should work just fine.

Stitch the design on your quilt label. I used 4 strands of thread and two simple stitches – backstitch for all the lines, and satin stitch for the solid eyes and nose.

If you want to add a date – or maybe a name – there’s a free alphabet embroidery pattern here – with letters that are relatively simple to stitch, with no serifs, curlicues, or extra-tight curves. 🙂

When you finish stitching, trim the fabric so there’s about an extra inch all the way around the part you want to show as the quilt label. Fold about 1/2 inch under on each side and press.

There’s a video here showing how to press your embroidery without smooshing the stitches.

Position the label where you want it (I always put mine in the lower right corner) and pin or glue it in place to hold it secure while you stitch it.

Stitch the label to the quilt back all the way around the edge, being sure to only stitch through the quilt backing. Don’t let your stitches go through to the front of the quilt. I like to use ladder stitch.

That’s it!

It doesn’t take long and it’s a really nice finishing touch. 🙂

Here are all my posts about how to bind and finish your quilt.

Finished with this topic?

Return to the Let’s Make a Quilt main Table of Contents.

Move on to more info about other things (not quilts!) that you can make with your applique patterns.

Happy stitching!

Free Pattern! Big Stitch Felt Coasters

Big Stitch Polkadot Coasters - a free pattern from Shiny Happy World

Practice your running stitch with these big stitch felt coasters.

This project is all about those big stitches!

It’s simple, fun and easy.

It’s all hand-sewn – perfect for stitching while you binge-watch your favorite show. 🙂

My friends at Sulky were watching my progress on this big-stitched lap-sized quilt. . .

Quilt-in-progress from Shiny Happy World's Big Stitches and Patchy Patchwork class

(It’s a WIP from my Big Stitches and Patchy Patchwork class.)

They knew I was using Sulky Petites 12 wt. thread for all the big stitch quilting, and they knew this was a BIG project. They asked me if I’d consider designing a smaller project for people who just wanted to give big stitch quilting a try.

Of course I would!

I loooooove stitching in spirals and I had been kicking around the idea of making some round coasters. This is what came out of it!

Materials

Other Tools and Supplies

Step 1

Trace a circle onto the Sulky Soft & Sheer. You can trace a jar lid or a roll of tape – anything coaster-sized.

circle traced on Sulky Soft & Sheer stabilizer

I forgot to measure my circle before I shipped the finished coasters. I think it was about 3 ¼ inches?

Step 2

Roughly cut around the circle, leaving at least ¼ inch of stabilizer all around the circle. Layer with a scrap of fabric, right sides together, and sew directly on the traced line.

making coasters - circle sewn on stabilizer with pink fabric

Sew all the way around the circle.

Step 3

Trim around the edge, leaving a narrow seam allowance.

making coasters - sewn circle, cut out with pinking shears

I like to use pinking shears so I don’t have to trim notches to remove bulk.

Step 4

Pull the layers apart and cut a small slit in the center of the Sulky Soft & Sheer.

turning a circle of pink fabric right side out

Step 5

Turn the dot right side out through the slit.

Circle of fabric turned right side out with stabilizer backing

Smooth the curved edge and press it flat.

finished circle with neatly turned edges

See? A nice, neat circle with perfectly turned edges.

Step 6

Glue the circle to a scrap of felt using fabric glue stick.

Making Felt Coasters - pink fabric circle glued to a square of grey felt.

Step 7

Using running stitch and a single strand of Sulky Petites 12 wt. Thread, sew the circle to the felt all the way around the edge.

Making Polkadot Felt Coasters - sewing a pink circle of fabric to grey felt using a running stitch and matching thread.

There’s a video here showing how to embroider running stitch.

Step 8

Once you get all the way around the outside edge, start spiraling in to the center of the circle.

Making Polkadot Felt Coasters - stitching a pink circle down to grey felt using running stitch

Step 9

Using a glue stick, glue a second layer of felt to the back of the first.

Making polkadot felt coasters - almost finished.

Step 10

Cut out the final coaster circle through both layers of felt at the same time for a perfectly even edge.

making polkadot felt coasters - almost finished

Cut just a little bit beyond the edge of the fabric dot so that you can see the felt color around the edge.

Step 11

Using running stitch and a single strand of Sulky Petites 12 wt. Thread to match the felt, sew the felt edges together.

close up image of Big Stitch Felt Coasters, showing the detail of the stitching

Finished! Now make more in every color of the rainbow.

Felt polkadot coaters made with big stitch quilting

Pretty, pretty big stitch felt coasters!

Happy stitching!

Free Embroidery Files for Machine Stitched Eyes

Free Embroidery Files for Machine-Stitched Eyes - from Shiny Happy World

I know the eyes are the trickiest part of my applique patterns.

I’ve got a video here showing some tips for outlining them, and I have a tutorial here showing a cheater-pants way to stitch the very small Paper Doll quilt eyes on many regular sewing machines.

But I’ve heard from several of you who have embroidery machines and want embroidery files to satin stitch those eyes – including the larger ones.

That would be awesome! But I don’t have an embroidery machine and I have no idea how their files work. 🙁

We were chatting about this in one of the video Q&A sessions, and Ceil followed up after the session by putting me in touch with Titania Creations – someone who specializes in designing patterns for embroidery machines.

Thanks Ceil!

Titania Creations created a set of files for oval eyes that I’m giving away for free here.

Yep – free!

The eyes are all ovals in various sizes – from 1/8″ tall (great for the Paper Dolls quilt pattern) up to 1 1/4″ tall (great for the Silly Sloths quilt pattern).

You can find all the files here.

Here are the details. . .

Sizes

  • 01 = 1/8 inch tall
  • 02 = 1⁄4 inch tall
  • 03 = 1⁄2 inch tall
  • 04 = 3⁄4 inch tall
  • 05 = 1 inch tall
  • 06 = 1 1⁄4 inch tall

Machine Formats

  • PES – Brother / Babylock
  • XXX – Singer
  • JEF – Janome
  • VIP / VP3 – Pfaff / Husqvarna
  • HUS – Husqvarna
  • EXP – Melco / Bernina (Bernina also uses .ART but this is not available commercially)
  • DST – Tajima / Industrial machines. Any machine can use DST format but most home embroiderers don’t like to use it because it does not retain any colors.

So if you need a 1/2″ tall eye and you have a Janome embroidery machine. . .

  1. Go to this link.
  2. Double click on folder 03 for the half-inch eyes.
  3. Download the file ending in JEF.
  4. Wave a magic wand to get that file onto your embroidery machine.
  5. Stitch your eyes.

You can see that my knowledge of this process breaks down at Step #4. 🙂

I’m hoping that if anyone has a question they can ask it in the Shiny Happy People group and someone who actually HAS an embroidery machine will be able to help. 🙂

Oh! And these files can also be used to machine-embroider eyes on softies, for those of you making them for kids too young for the safety eyes. Hooray!

Here are links to all the posts showing how to applique with fusible adhesive – my favorite method. It’s fast and easy and (with the right materials) it holds up beautifully to rough use and repeated washing.

Here are links to special posts about eyes.

Here are links to some extra fun things you can do with your applique.

Other Applique Methods

Finished with this topic?

Return to the Let’s Make a Quilt main Table of Contents.

Move on to the lessons about outline stitching.

Happy stitching!