Joining Strips with a Diagonal Seam

Joining Strips with a Diagonal Seam - a video tutorial from Shiny Happy World

I almost always use scrappy bindings in my quilts and I get a lot of questions about how I get those diagonal seams.

I show the diagonal seam in my video How to Bind a Quilt – but I never actually showed how to do it.

Until now.

See how easy that is?

I use this method any time I’m joining strips together. For me that’s usually binding a quilt, but it can also be for bias strips on bags, clothing, and any other application.

Happy stitching!

Best,
Wendi

Applique with Prints – Choosing Fabric for a Quilt

Choosing fabric for a quilt can be tricky – especially when you’re doing applique!

When I showed the lovely fabrics I was planning to use for this free receiving blanket pattern, a couple of people said they were eager to see how I used the prints, since I usually stick to solids and near-solids.

The reason I usually stick with solids and near-solids is because they’re so much easier to work with! Especially for applique where you don’t want the design to get lost in the background fabric. It’s soooo easy to end up with a block that you’re not happy with!

So – here’s the fabric.

It’s the Into the Woods collection from Michael Miller Fabrics, sadly out of print now. But you’ll see a similar collection of fabric types in almost all quilt collections – some tone-on-tone small prints, some multicolored medium-scale prints, and some multicolored large-scale prints.

Gorgeous, right? Especially that larger scale print with the foxes and foliage.

But that’s exactly the print I didn’t want to use for my background. I used it for the back of the receiving blanket instead.

Why?

Because it contained all the colors I wanted to use in my applique fox face.

To show you why that would be a problem, I cut out a wonky little oval from the main fox color and laid it on that pretty fabric.

You can see the oval just fine, right?

Yes, but your brain is actually kind of fighting to see the oval. Your brain wants to merge all the same colors into one shape, so it actually sees a shape like this.

See?

(This tendency is what makes it so much fun to play with negative space in traditional quilt designs. Your brain wants to merge those spaces together into new shapes.)

Again – you can still see the oval. It’s just that you’re having to overcome your brain’s natural tendency to see something else, and that will make for a less successful design overall.

That doesn’t mean you can’t use fun prints. It just means that when you’re choosing fabric for a quilt, you have to pick your background very carefully. Here’s what I ended up choosing.

That pretty floral fabric I used in the background has dark blue, light blue, and green. No orange or gold or white – the colors in the fox applique. The green and gold are awfully similar – but ultimately I decided they were different enough for the combination to work.

And I still got that pretty fox and foliage print in there – just on the back of the blanket where it wouldn’t muddle the applique. 🙂

These color lessons apply to more than applique. Think about embroidering on a printed fabric, or using a print for a softie, or even a variegated yarn for a crochet amigurumi – the same color “rules” apply.

And if you want to make your own fox receiving blanket, the fox applique pattern is here, and the free receiving blanket pattern is here.

Vibrant handmade crochet toys and patterns from Shiny Happy World.

Here are links to all the posts about choosing fabric.

And here are links to posts about using specialty fabrics.

Finished with this topic?

Return to the Let’s Make a Quilt main Table of Contents.

Happy stitching!

Vibrant handmade crochet toys and patterns from Shiny Happy World.
Colorful patchwork chameleon embroidery on blue fabric, part of Shiny Happy World sewing patterns.

How to Clean a Cutting Mat

blue rotary cutting mat with fuzz embedded in it

I love Quilt As You Go and use it for almost all of my quilts – but cutting the batting squares and then trimming the finished blocks to size makes a real mess of your cutting mat. All those cotton fibers get embedded in the mat and no amount of rubbing with a rag will get them out.

But there’s a really easy solution – easy, fast, and cheap.

Yep. One of those inexpensive white artist erasers.

Just rub it on the mat wherever it’s fuzzy, like you’re erasing the fuzz.

It pulls all the fuzz right out of the cuts and balls it up so you can just brush it into the trash.

Easy peasy.

In five minutes your cutting mat will look almost like new, all ready for your next quilt. 🙂

Here are some related posts about rotary cutting tools and how to use them. . .

Vibrant handmade crochet toys and patterns from Shiny Happy World.

Here are handy links to all the posts about quilting tools and supplies.

Sewing Machine

Iron

Rotary Cutting Tools

Scissors

Other General Sewing Room Supplies

One More Hugely Popular Post that Seems to Fit Here Better than Anywhere Else

Return to the Let’s Make a Quilt main Table of Contents.

Move on to the posts about choosing your quilt pattern.

Happy quilting!

Vibrant handmade crochet toys and patterns from Shiny Happy World.

Quilting with Decorative Stitches

close up of quilting with decorative stitches - a series of circles

The Fish Quilt pattern is finished! I did the final quilting with decorative stitches that come standard on my sewing machine. More on that in a minute.

All week I’ve been sharing peeks behind the scenes at some of the design decisions I made for my sample quilt.

In this post I showed how I quilted my background blocks in a fun wavy pattern.

In this post I talked about choosing fabric – especially the color.

In this post I talked about how to work with the print/pattern of your fabric – using the example of the striped fabric I used for some of my fish.

Today I’m talking about the final quilting.

This is different from the waves I quilted into the background blocks. This is the final round of quilting – just over the seams joining the blocks – that holds the backing to the quilt.

Usually I do either straight line quilting 1/4″ on each side of all the seams, or a fairly open and narrow zigzag over the seams.

But sometimes I find a decorative stitch on my machine that will be perfect for a quilt – and that’s what I did for this one.

Doesn’t this look like bubbles?

I used it for all the vertical seams, because streams of bubbles like this travel straight up. 🙂

For the horizontal seams I used a small wavy stitch to echo the wavy quilting within each block.

I used a variegated blue thread for both of them.

(For the Beep Beep quilt I did the final round of quilting with a decorative stitch that looked just like tire tracks. Perfect!)

Decorative stitches like the bubbly one CAN BE TRICKY – so I recommend doing some test stitching on a swatch to make sure it’s going to work for you.

The biggest problem is with stitches where the feed dogs move the quilt back and forth to achieve the stitch, instead of always steadily forward. It can be very hard to manage that back and forth motion with a large, heavy quilt in there!

Here’s where I went wrong on my quilt.

I didn’t have the quilt “fluffed” loose enough and it was hooked on the corner of my working surface. That was keeping it from feeding through properly, and you can see in the top of the photo where the stitches are all scrunched together and those bubbly circles are distorted and almost overlapping each other.

Instead of properly fixing the problem, I gave the quilt a tug – and ended up feeding the next section through too quickly, so that I made distorted wavy spirals instead of circles. 🙁

Sigh. I really know better. I slowed down and “stuffed and fluffed” properly for the rest of the quilt and everything else looks great. 🙂

(If you don’t know what I mean by “stuff and fluff” this post about quilting a full-sized quilt in a standard machine will explain.)

So – the moral of the story is. . .

It’s a lot of fun to use decorative stitching for the quilting, but only do it if you have the patience for it. If not (or if this is your first time machine quilting) use either a straight stitch, or a wide stitch that moves steadily forward, like a zigzag.

I hope some of you will share close-ups of your quilting in the Shiny Happy People Facebook group! It’s always so much fun to see what design decisions everyone else is making!

You can order the Fish Quilt pattern here.

You can order the Sea Creatures quilt pattern (designed to combine with the Fish pattern) here.

Vibrant handmade crochet toys and patterns from Shiny Happy World.

Here are all my posts about layering and basting your quilt, and the final round of quilting.

Here are all my posts about hand quilting and Big Stitch quilting. I don’t use these techniques with fusible applique or Quilt As You Go, but I LOVE using Big Stitch Quilting with my cheater fabric.

Finished with this topic?

Return to the Let’s Make a Quilt main Table of Contents.

Move on to the lessons about binding and finishing your quilt.

Happy quilting!

Vibrant handmade crochet toys and patterns from Shiny Happy World.

Make Your Fabric Print Work FOR You in Applique

Pink and red fish quilt block with striped fins on blue fabric background, demonstrating fabric print techniques.

Some of the most common questions I get are about choosing fabric for a quilt. People often want to know how to choose colors that go together, but I also get questions about how to choose the right print.

Usually I make things really easy on myself by choosing a tone-on-tone print or blender. These work GREAT for applique, because the fabrics read as a solid (making it easy to “see” each shape distinctly), but they have texture from the print (making your finished block more interesting).

A lot of times a high-contrast print fights against your applique, because you tend to see all the shapes within the fabric more than you see the shape that you’ve cut the fabric into.

But sometimes we can use that tendency to our advantage and make a high-contrast print work for us.

I’m using examples from the Fish quilt pattern – but this applies to choosing and using your fabric print for any quilt. Here’s just one example of a block from the Wild Flowers quilt pattern that uses stripes really well. Having smaller vertical stripes in that top section suggests the stamens of a flower.

Bright fabric flower applique with red and pink scalloped patterns on green glitter background.

So – back to the fish. In addition to the crosshatch and tiny polkadots prints I used, I also used some skinny stripes. It’s those stripes I want to focus on today.

When you’re working with stripes, you really want to pay attention to the way you position the applique pieces. I actually do that with all kinds of fabrics. See how the crosshatching on Gerald’s body runs at an angle, and on the spot and his tail it runs straight up and down?

Yellow fish on a blue background - Fish Quilt - Gerald - from Shiny Happy World

I actually did that on purpose, but most people don’t even notice it.

That’s not the case with bolder patterns like stripes. You really have to think about how those stripes will run.

On Hank here I made the stripes run horizontally.

On Charlie I chose vertically.

You could use striped fabric on some fish and skip the smaller applique stripes, Like Louis here.

If you wanted to simplify that fish, just skip the purple applique stripes and use a striped fabric set vertically for his body. Easy peasy!

On Angelina I used the stripes to mimic the way a lot of fins have ribs in them, and how the angle of the ribs change – kind of sweeping back as the fish moves through the water.

In both of her fins, the stripes are parallel with the front edge of the fin.

I fully admit that that last example may be overthinking things a bit. 🙂

But I do stand by the notion that when your fabric print is bold, you need to put some thought into how you use it in your applique.

This post is part of a series specifically about working with the Fish pattern. Here are the rest. . .

Vibrant handmade crochet toys and patterns from Shiny Happy World.

Here are links to all the posts about choosing fabric.

And here are links to posts about using specialty fabrics.

Finished with this topic?

Return to the Let’s Make a Quilt main Table of Contents.

Happy stitching!

Vibrant handmade crochet toys and patterns from Shiny Happy World.

Fish Quilt Step 2 – Choosing Fabric

Colorful fish quilt with orange and white striped design, perfect for kids' bedding or decor.
Brightly colored quilt with playful patterns on a cozy bed.

Want to learn how to make a quilt with an easy online workshop – totally free?

Sign up for Let’s Make a Quilt here. You’ll learn how to get started, the tools and supplies you’ll need, and how to make a quilt from start to finish using Quilt As You Go and applique with fusible adhesive.

It’s the easiest, most fun way to make an applique quilt. You can do it!

Brightly colored quilt with playful patterns on a cozy bed.

The Fish Quilt pattern is finished!

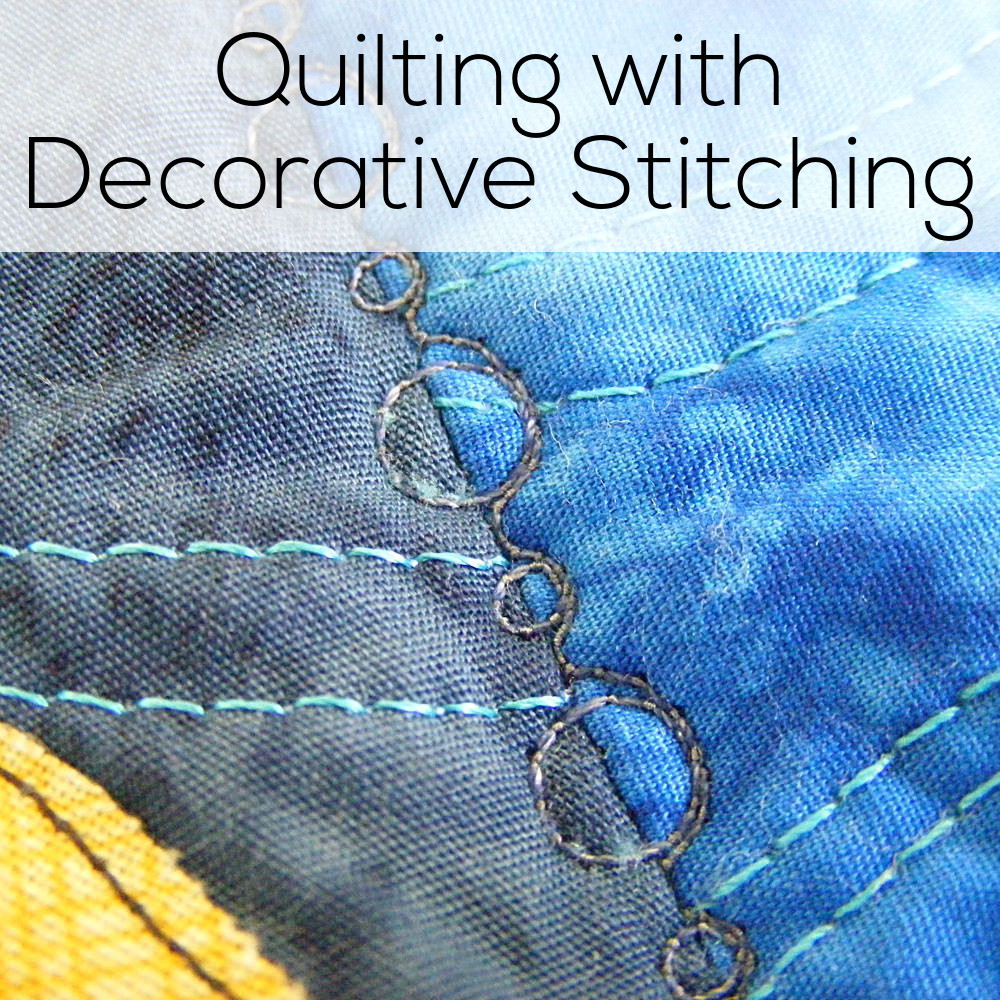
In this post I showed how I quilted my background blocks.

Today I’m talking about fabrics. What color will your fish be?

I opted for the brilliant colors you see in a coral reef. Think bright, bright, BRIGHT!

Bright yellow embroidered fish illustration on blue quilt background, children's fabric art.

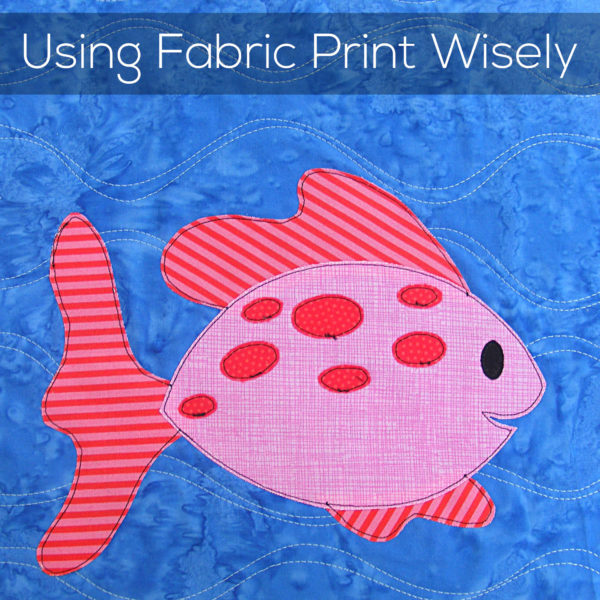
I used two different fat quarter bundles for my fish. Most of the colors come from the Rainbow Brights fat quarter bundles.

Vibrant rainbow jelly roll fabric bundles for quilting and sewing projects.

That bundle has a darker and lighter shade of each color in the rainbow. That allows me to combine the light and dark for contrast in one fish, like this. . .

Vibrant fish quilt with green fish appliqué on blue water background, perfect for aquatic themes.

Isabella is made with the two shades of green in that bundle.

For a little extra contrast, I also added the Little Stripes fat quarter bundle. I love stripes so much!

Colorful fish quilt block on blue background, playful and vibrant sewing pattern.

Even though the fabrics in the two bundles come from different companies, I picked them so that the colors would still work really well together. 🙂

If I was making this for myself – and not as the sample quilt for a pattern – I probably would have also included fabrics from the Dots fat quarter bundle.

Colorful dots fabric bundles for quilting and sewing projects.

Those irregular dots and the crosshatch background would have added another nice texture to the fish – and the colors coordinate well with the other two bundles.

But I try to keep the numbers of fabrics I use in my samples to a minimum because I don’t want anyone to feel like they need to buy a TON of different fabrics to make the quilt work. Fabric is expensive! But if you have some Dots left over from making a Dinosaurs quilt – add them into the mix!

But what if you don’t want to make brightly colored tropical fish? What if you want to make fish that look like what you can pull out of any freshwater lake or stream?

For you I recommend the Warm Neutrals fat quarter bundle.

Colorful fabric bundles for quilting and sewing projects on green background.

That will give you fish that look trout-tish and bass-ish and perch-ish.

(All of my fish are Ish Fish. The only fish in the quilt that really looks like a very specific type is the angler fish – and even on him I eliminated the exceedingly-scary-looking-very-sharp teeth.)

Bright purple whale applique with a water-inspired quilted blue background, perfect for kids' sewing projects.

Which brings me to my final topic while we’re talking about color.

Camouflage.

I designed most of the blocks so there would be a very high contrast between the fish and the background water. I really wanted those fish to pop!

But I made a few be lower contrast. Angler fish (mine is named Kevin) have a very dull, practically invisible body so that all you really see is that glowing lure. I tried to sort of duplicate that (without making him too invisible) by making his body and the background the same darkness of fabric. You can see that really clearly when I switch his photo to black and white.

Small whale embroidery design on quilt fabric.

I added the lighter purple fin to help you spot him a bit, but you could go all dark for a more hidden fish lurking down there.

I chose purple on the blue because they’re in the same color family – both cool – so there’s even less contrast.

(If you want to read more about my normal “rules” for choosing applique fabrics (which I break here for Kevin) check out this post.

So Kevin is the lowest contrast, and most of the blocks are very high contrast, but I added in just a couple of low-ish contrast blocks to help make the overall quilt mimic a bit the look of a school of tropical fish – where some really stand out and some are less noticeable. Like this block where the lighter purple fish blend a bit with the lighter dapples in the background.

Colorful fish quilt pattern featuring purple fish on blue marbled fabric, perfect for kids' bedding.

These guys appear in another block where they have higher contrast, so it’s only this pair who tend to recede into the background just a bit.

So there you go! That’s how I chose the colors for my fish. I can’t wait to see what you all do! I hope you’ll post photos as you go in the Shiny Happy People Facebook group. It’s awesome to see samples with different fabric choices!

You can order the Fish Quilt pattern here.

You can read about how I quilted my background blocks here.

You can read about how I worked with the print of the fabric here.

You can read about how I did my final quilting (bubbles!) here.

Happy quilting!

Best,
Wendi
Bright, cheerful woman smiling at a colorful fabric craft display at Shiny Happy World.

Fish Quilt Step 1 – Quilting the Background Blocks

Blue watercolor quilt waves pattern with quilted wavy stitching, perfect for quilting projects.

The Fish quilt pattern is finished (you can get it here) and I’m sharing some of the behind-the-scenes design decisions I made for my sample quilt.

Today – quilting the background blocks!

I used a variety of blue batik fabrics and cut all my blocks and batting pieces 11 inches square. They’ll be trimmed down to 10 1/2″ square so that gives me a bit of wiggle room. You can cut yours a little bigger if you like more room for error. 🙂

I usually do different quilting in each block, but for this quilt I decided to use a double wavy line for every block. It gives a nice watery/wavy look that’s perfect for the fish.

Wavy blue quilting fabric with stitched seams, perfect for sewing projects.

You can see how I quilt those wavy lines (no marking!) in this video.

One other change for this quilt is in my choice of quilting thread. I usually match the thread pretty closely to the background fabric, but this time I wanted those waves to stand out a bit more. I chose thread with a little bit of contrast – either darker or lighter blue, and sometimes veering into a blue-green.

Here’s one with slightly lighter thread.

And here’s one with slightly darker thread.Vibrant blue tie-dye fabric with abstract swirling patterns, perfect for quilting or crafting projects. And here’s one with some blueish green thread.

Bright blue quilting fabric with wavy stitch design, perfect for quilting and crafting projects.

It’s subtle – but I like how it adds to the dapply, watery effect.

Read all about choosing colors for your fish here.

Read about how I worked with the print of the fabric here.

Read about how I did my final quilting (bubbles!) here.

Happy quilting!

How to Sew a Zippered Pillow Cover – a video tutorial

How to Add a Zipper to a Pillow Back - a video tutorial from Shiny Happy World

I’m pretty picky about pillow covers.

I don’t like the envelope backs. They’re easy to sew, but they don’t cover the pillow as snugly as I like.

I like zippered covers, so they cover tightly and can be removed for washing – but I don’t like when the zipper is in one of the side seams. They never “sit” the same way as the other seams, so the finished pillow shape is always a little distorted.

I like the zipper to be somewhere in the pillow back (it doesn’t have to be the exact center) but I don’t like it to extend all the way to the edges, because the stiffness of the zipper again can distort the overall look of the pillow.

So here’s how I sew a pillow with a zipper in the back.

  1. I make the cover a little small. If the pillow is 18 inches square, I cut my fabric 18 inches square. When I sew the front to the back using a 1/2 inch seam allowance, the pillow cover ends up 17 inches square – perfect for the nice snug fit I like.
  2. I make the zipper a little short. Specifically – two inches shorter than the cut fabric. So for an 18 inch pillow, I buy a 16 inch zipper.

Here’s how I assemble the zipper back.

See how easy that is?

(Do you like that super fun, slightly wobbly gingham print? It’s part of the Gingham Play collection from Michael Miller Fabrics. I also have my own irregular gingham-ish fabric here.

I make a LOT of these pillow covers.

My daughter doesn’t like using regular rectangular bed pillows. Instead she has an enormous pile of square pillows – mostly with quilted and applique designs on them. 🙂 She doesn’t like the inexpensive “hard” pillow forms. She likes these Fairfield brand Home Elegance pillows. They feel like down pillows, but they’re a LOT less expensive and they’re machine washable. Win!

You can use any quilt block pattern to make a pillow cover.

Bright colorful quilt block pillow with cute monster face design, perfect for kids' decor.

There are basic instructions here.

Happy sewing!

Best,
Wendi

How to Applique Eyes – Easy Options

applique brown puppy with a spot on one eye - title image for a post explaining several different options for how to applique eyes

Ugh! How on earth do you applique eyes? They’re so small!

The eyes are definitely the trickiest part of any of my applique patterns, but I have several posts that show you easy ways to deal with them!

Applique

I usually applique eyes using solid black fabric. I like the look of it, and (after some practice) I don’t think it’s too tricky to outline those eyes. Plus I use black thread on black fabric so if my line gets wonky, nobody really sees it. 🙂

For tips on outlining those small eyes, watch this video.

If you want to applique the eyes but you don’t want to do the outline stitching, use Heat & Bond Ultrahold fusible adhesive.

The Heat & Bond Ultrahold is too stiff for the main applique, but you’ll never notice the stiffness on such small pieces as the eyes.

Careful! If you choose this option, you need to be sure to dry your quilts on a less hot setting. If your dryer gets as hot as the wool setting on your iron, that’s hot enough to re-melt the adhesive and the eyes could come loose.

Machine Embroidery

I’ve got two different posts showing how you can embroider eye shapes by machine.

This one shows a “cheater” way to do it using a regular sewing machine. It only works for small eyes, like those on the Paper Dolls and Dinosaurs quilt patterns.

If you want to satin stitch larger eyes and you have an embroidery machine, this post includes a file for embroidery machines to embroider eyes in a wide range of sizes.

Hand Embroidery

Of course, you can also embroider the eyes by hand. If you go with that option I recommend using satin stitch for larger eyes.

Here’s a tutorial showing how.

For smaller eyes, I recommend this stitch.

needle and thread embroidering an eye

It gives a nice, rounded oval.

Markers or Paint

You don’t have to sew the eyes at all! You can use fabric markers or fabric paint for them!

I tested a bunch of different markers and paints and in this post I shared my favorites.

See? Lots and lots of options for those pesky eyes. 🙂

Vibrant handmade crochet toys and patterns from Shiny Happy World.

Here are links to all the posts showing how to applique with fusible adhesive – my favorite method. It’s fast and easy and (with the right materials) it holds up beautifully to rough use and repeated washing.

Here are links to special posts about eyes.

Here are links to some extra fun things you can do with your applique.

Other Applique Methods

Finished with this topic?

Return to the Let’s Make a Quilt main Table of Contents.

Move on to the lessons about outline stitching.

Happy stitching! Or not-stitching – depending on the method you choose. 🙂

Vibrant handmade crochet toys and patterns from Shiny Happy World.
Colorful quilt featuring adorable dog appliqué patterns for making plush dog toys.

Using QAYG with Sashing – video tutorial

applique dinosaur quilt with sashing - demonstrating QAYG with sashing

I’ve had SO MANY people ask how they can use QAYG with sashing. So many!

I don’t usually use sashing (or borders) in my quilts – but for this dinosaur quilt I really wanted them to divide the long panorama-style rows of dinosaur landscapes.

So it’s the perfect opportunity for a video!

I need to clarify one thing up front. This is NOT the sashing you often see in QAYG quilts. In most QAYG with sashing, that sashing is designed to hide the seams between the blocks, and it’s usually pretty skinny (usually maxing out at about an inch wide).

This is more traditional-style sashing (or borders) that you can make any width you like.

It’s done just like adding sashing to a regular quilt – except that you quilt the fabric to the batting before you cut it in strips and sew it to the blocks.

It really is that simple.

Here’s the video showing how. . .

See how easy that is?

You use the exact same method if you want to add borders to your QAYG quilt.

I promised links to a few more helpful videos and tutorials related to this one, and here they are.

There’s a printable download with fabric requirements, cutting guides, and assembly diagrams for quilts (six different sizes) with sashing and borders here.

General intro to my Quilt As You Go method

You can also get a great overview of my QAYG method in this free video workshop.

How to Add Sashing to a Quilt – this is for any quilt, not just those using QAYG

Quilting from the Center Out to the Edges (used on the large piece of sashing fabric you saw in this video)

Dinosaur quilt pattern

And that awesome dinosaur skeleton fabric I used for the sashing? Sorry. It’s been discontinued now. 🙁 But the good news is that there’s ALWAYS a great selection of dinosaur fabrics in the world. 🙂

Vibrant handmade crochet toys and patterns from Shiny Happy World.

Find links to all the posts about pattern size and layouts here.

Quilt Sizes and Supplies Needed

Play with Your Layouts – Multiple Possibilities for One Quilt Pattern

Sashing

How to Make Applique Bust Out of Its Frame

Alternate or Broken Grid layouts (adding half and double blocks)

How to Make an Applique Rag Quilt

How to Make a Polaroid Quilt

How to Make a Wonky Churn Dash Frame for Any Block

Finished with this topic?

Return to the Let’s Make a Quilt main Table of Contents.

Move on to the lessons about choosing your fabric.

Happy quilting!

Vibrant handmade crochet toys and patterns from Shiny Happy World.