Time for a process post – showing a bit behind the scenes of how I do some of my design work.
Today we’re talking faces.
I think the face is one of the most important parts of any softie. It’s where the personality really shines through!
I want to make it easy for you to get the face just right in any pattern you’re making. But sometimes just right isn’t clear until after the softie has been stuffed.
Stuffing changes the curve of the surface, so eyes that looked great when it was flat might now look too far apart. Or a smile that was clearly visible is now kind of hidden under the curve of the chin.
What to do?
Well – I usually work through several prototypes of each softie – getting the shape of the body right – before I even start on the face.
Then I draw the face on the already stuffed prototype.
I usually sew my prototypes from plain white cotton. It’s easy to draw on that with a soft pencil. I can even erase and redraw it several times until I like what I see – though the surface gets a bit grubby after a few erasings. For Caterpillar Phil I tried features positioned very high on the face (to make him look chubby), very low (to make him look younger), and centered (even though I almost never like plain centered). I finally settled on something just a bit below the center line. (If you want to learn how to draw faces read Ed Emberley’s Drawing Book of Faces. It’s awesome.)
After I’m happy with the face I go over it with a black marker, Then I unpick all my stitches to remove the face piece(s) from the prototype. I iron it flat again and trace the face onto my final pattern piece. That way you’re getting the pattern and the placement exactly like what I worked up in my sample.
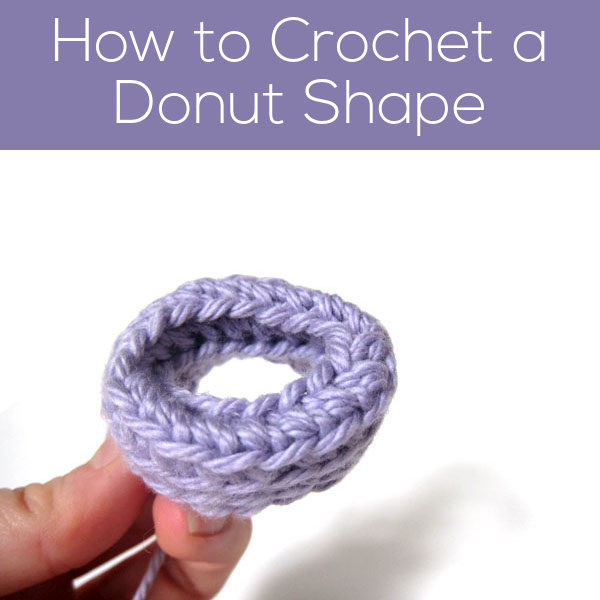
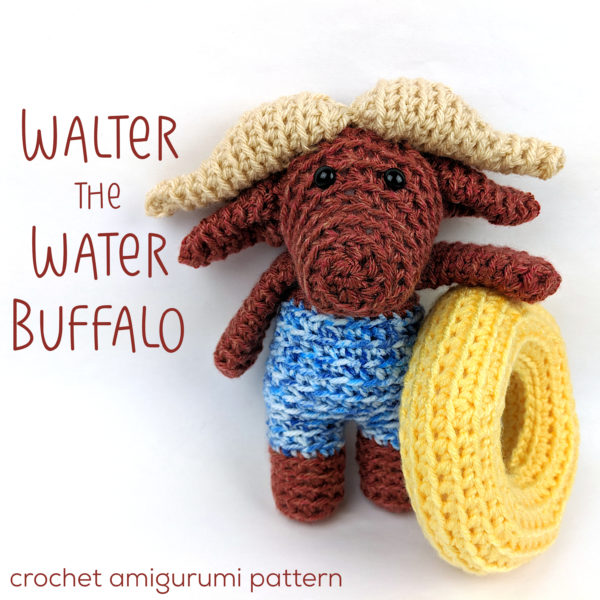
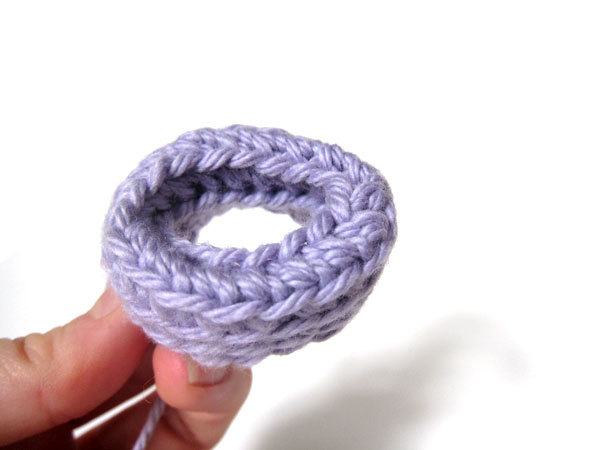
If you add stuffing, you can make a swim ring for your stuffed animals, like Walter here.
You can also – of course, make a donut!
It can be a little tricky the first time you try to crochet a donut shape from written instructions alone, so today I’ll show you a photo tutorial!
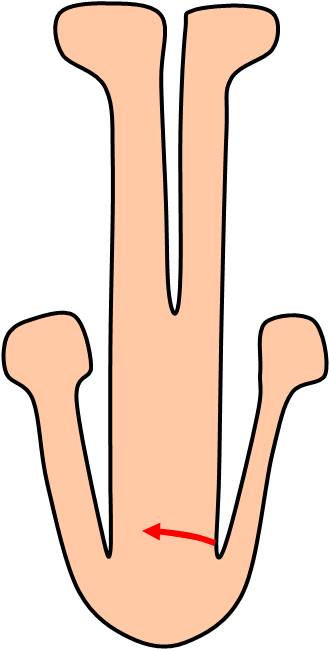
The piece usually begins with a tube. . .
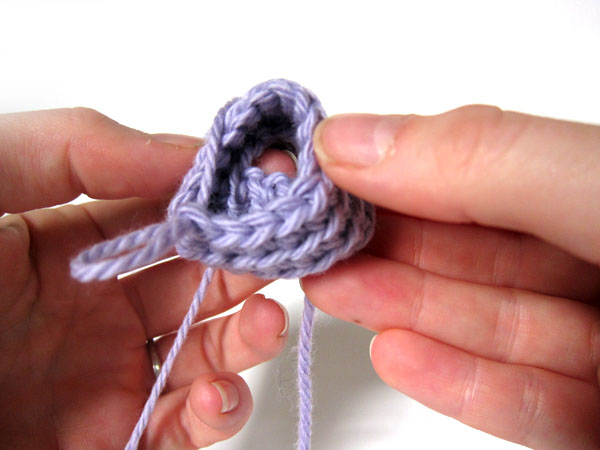
To turn that tube into a donut shape, you’ll need to crochet two rounds together. First fold the piece so that the two (desired rounds) are touching:
In this (pretend) example, you’re folding the foundation chain to round 6, in preparation for “crochet through the round you just crocheted AND the foundation chain”.
You may want to pin the rounds together if that would help you:
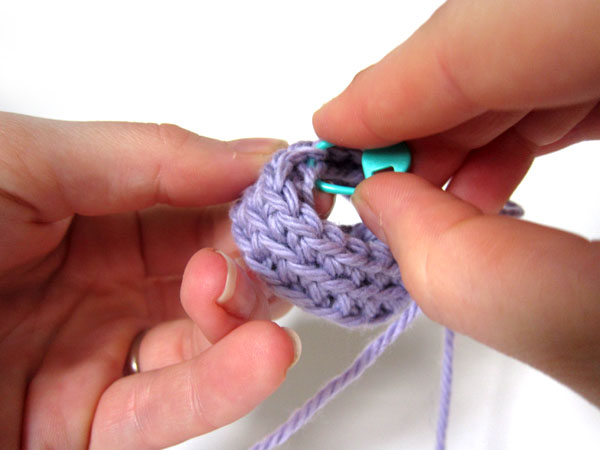
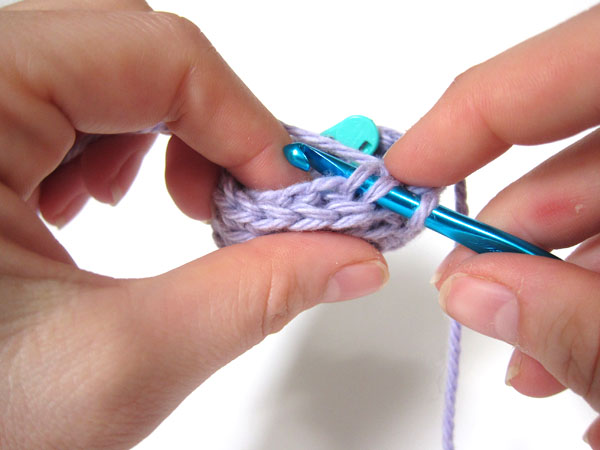
Now it’s time to crochet! Insert your hook through the next stitch (on round 6) and the corresponding stitch on the foundation chain:
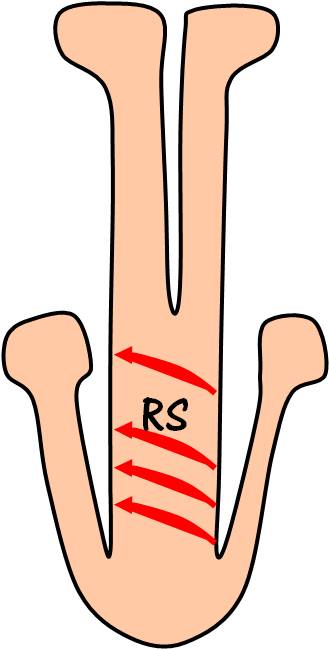
Wrap the yarn around your hook, and draw through the first two loops (treating these as one loop of a ‘normal’ single crochet):
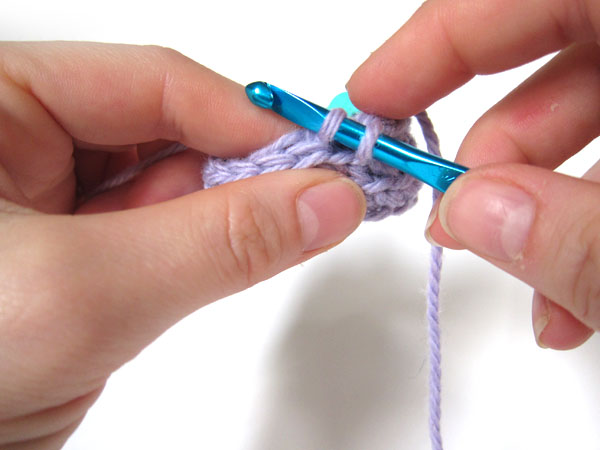
Wrap the yarn around your hook and draw through both remaining loops.
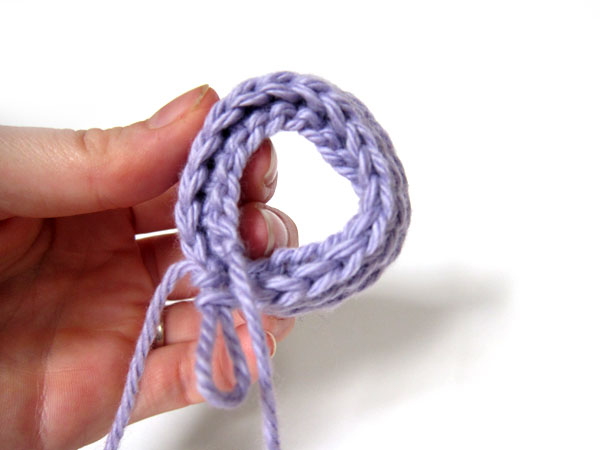
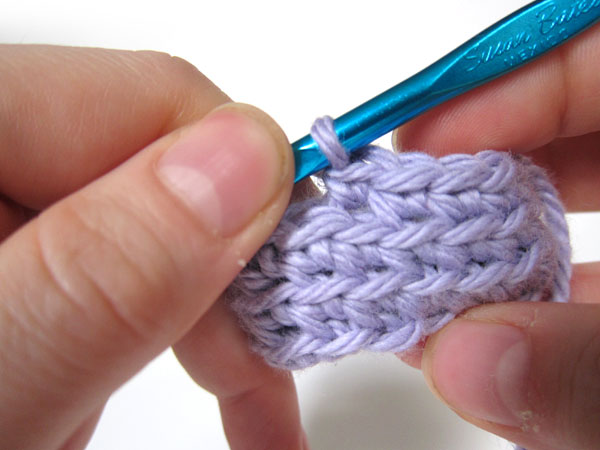
Continue crocheting the two rounds together, stitch by stitch, until you’ve completed the round. If you’re stuffing the shape, it’s easiest to stuff a bit at a time as you go.
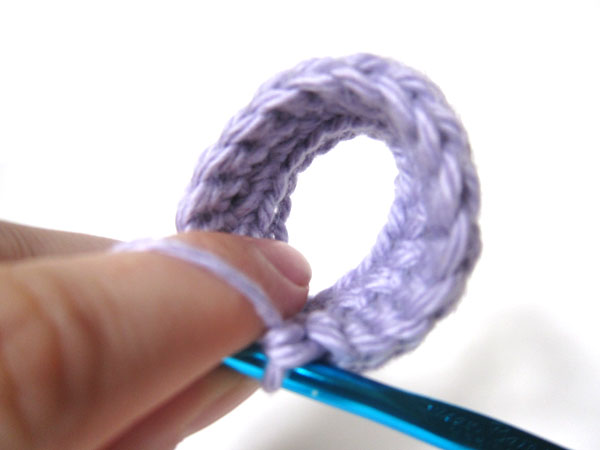
Ta da!
Isn’t that such a great shape?
Here are handy links to all the posts about crocheting more advanced shapes. . .
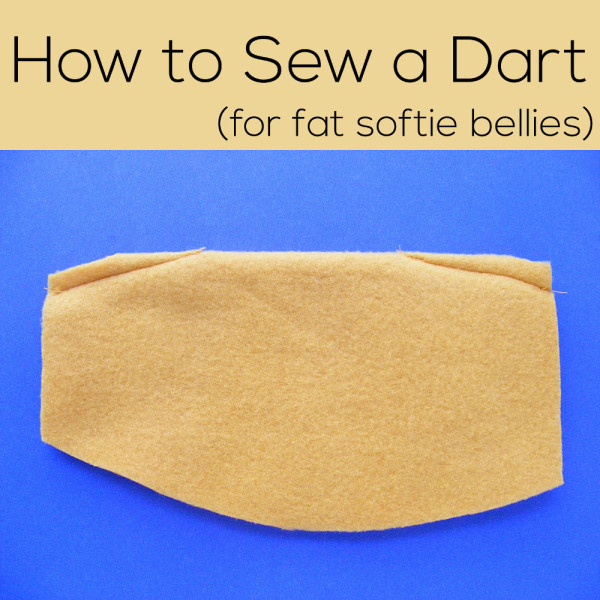
Most people learn how to sew a dart because they’re sewing clothing. Darts are one of several ways to shape the clothes to the body.
But sometimes I use darts in my softie designs. Just like clothing, they can give a softie a nice rounded shape. You can get rounded shapes with curved seams too – but sometimes a dart is just right. Especially if I want to suggest a belly button!
Darts are sort of like partial seams – little tucks in the fabric. I’ve met a lot of folks who find them intimidating, but they’re actually very easy to sew. Watch the video to see how easy.
See? Learning how to sew a dart isn’t hard at all! And – unlike clothing where you really want those tapered ends of your darts to be PERFECT so they lie nice and flat, any imperfections in a stuffed animal’s belly dart just makes it look even more like a belly button. See where I positioned the end of the dart on Munch here?
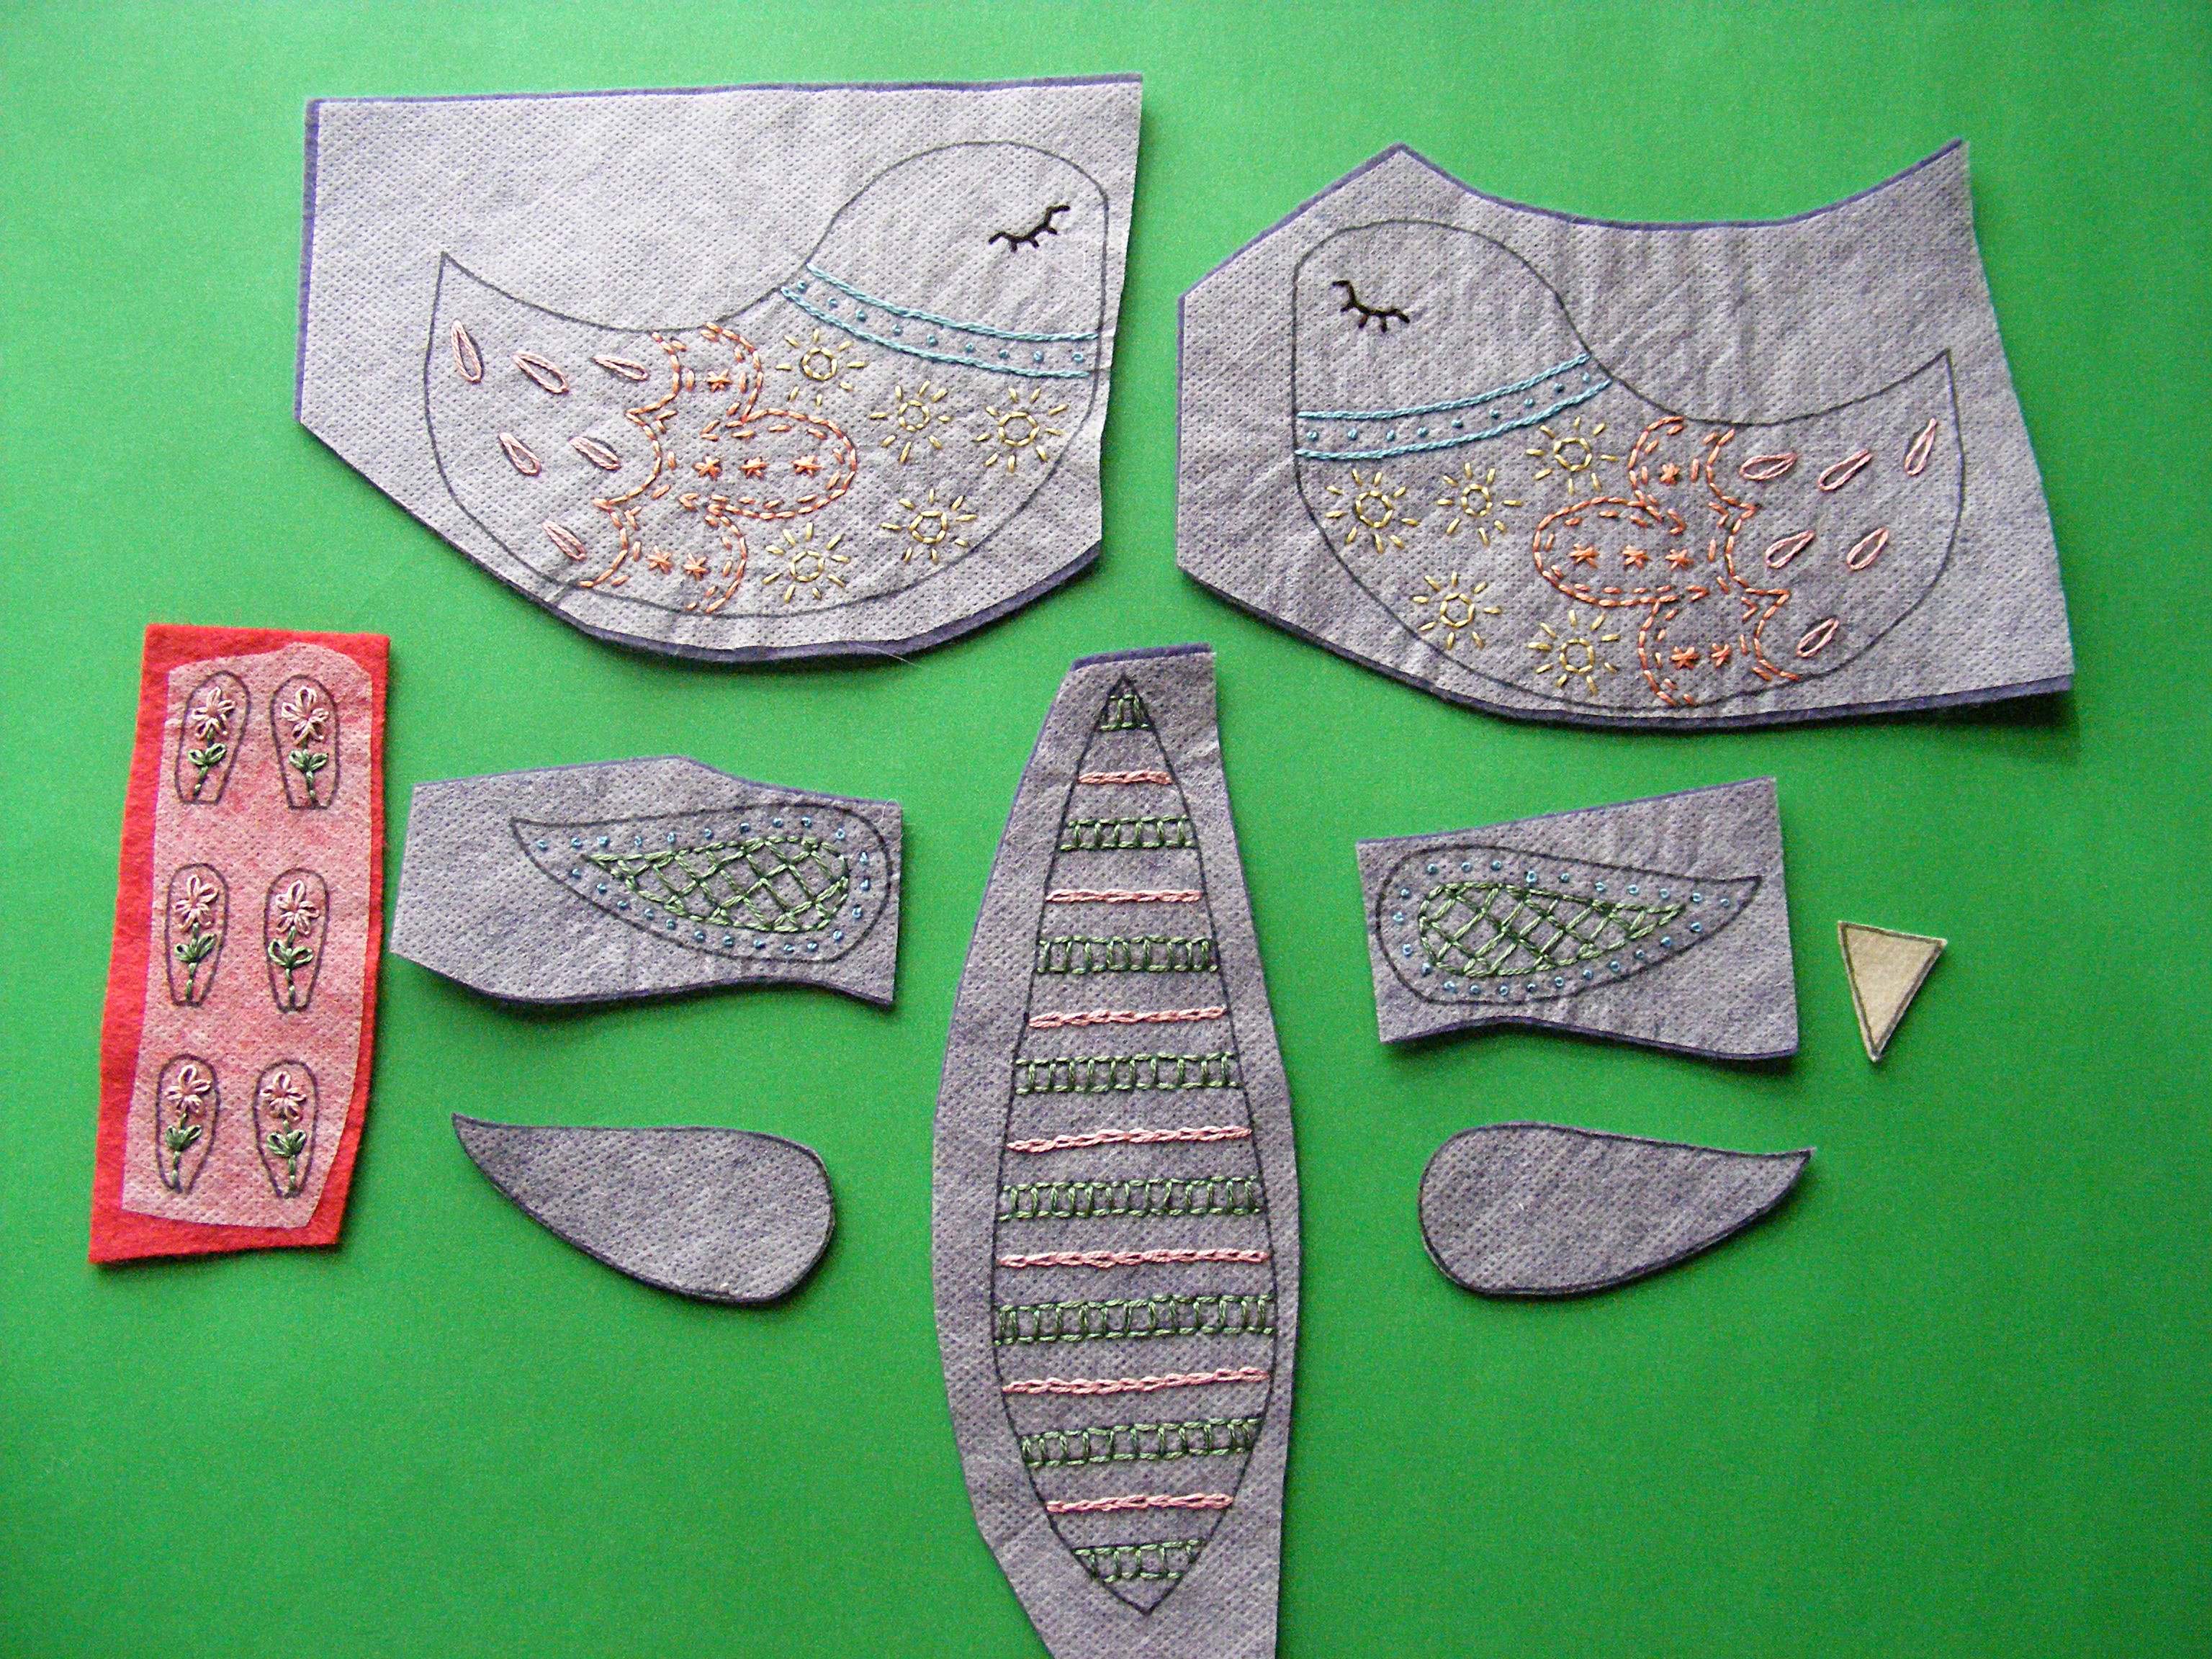
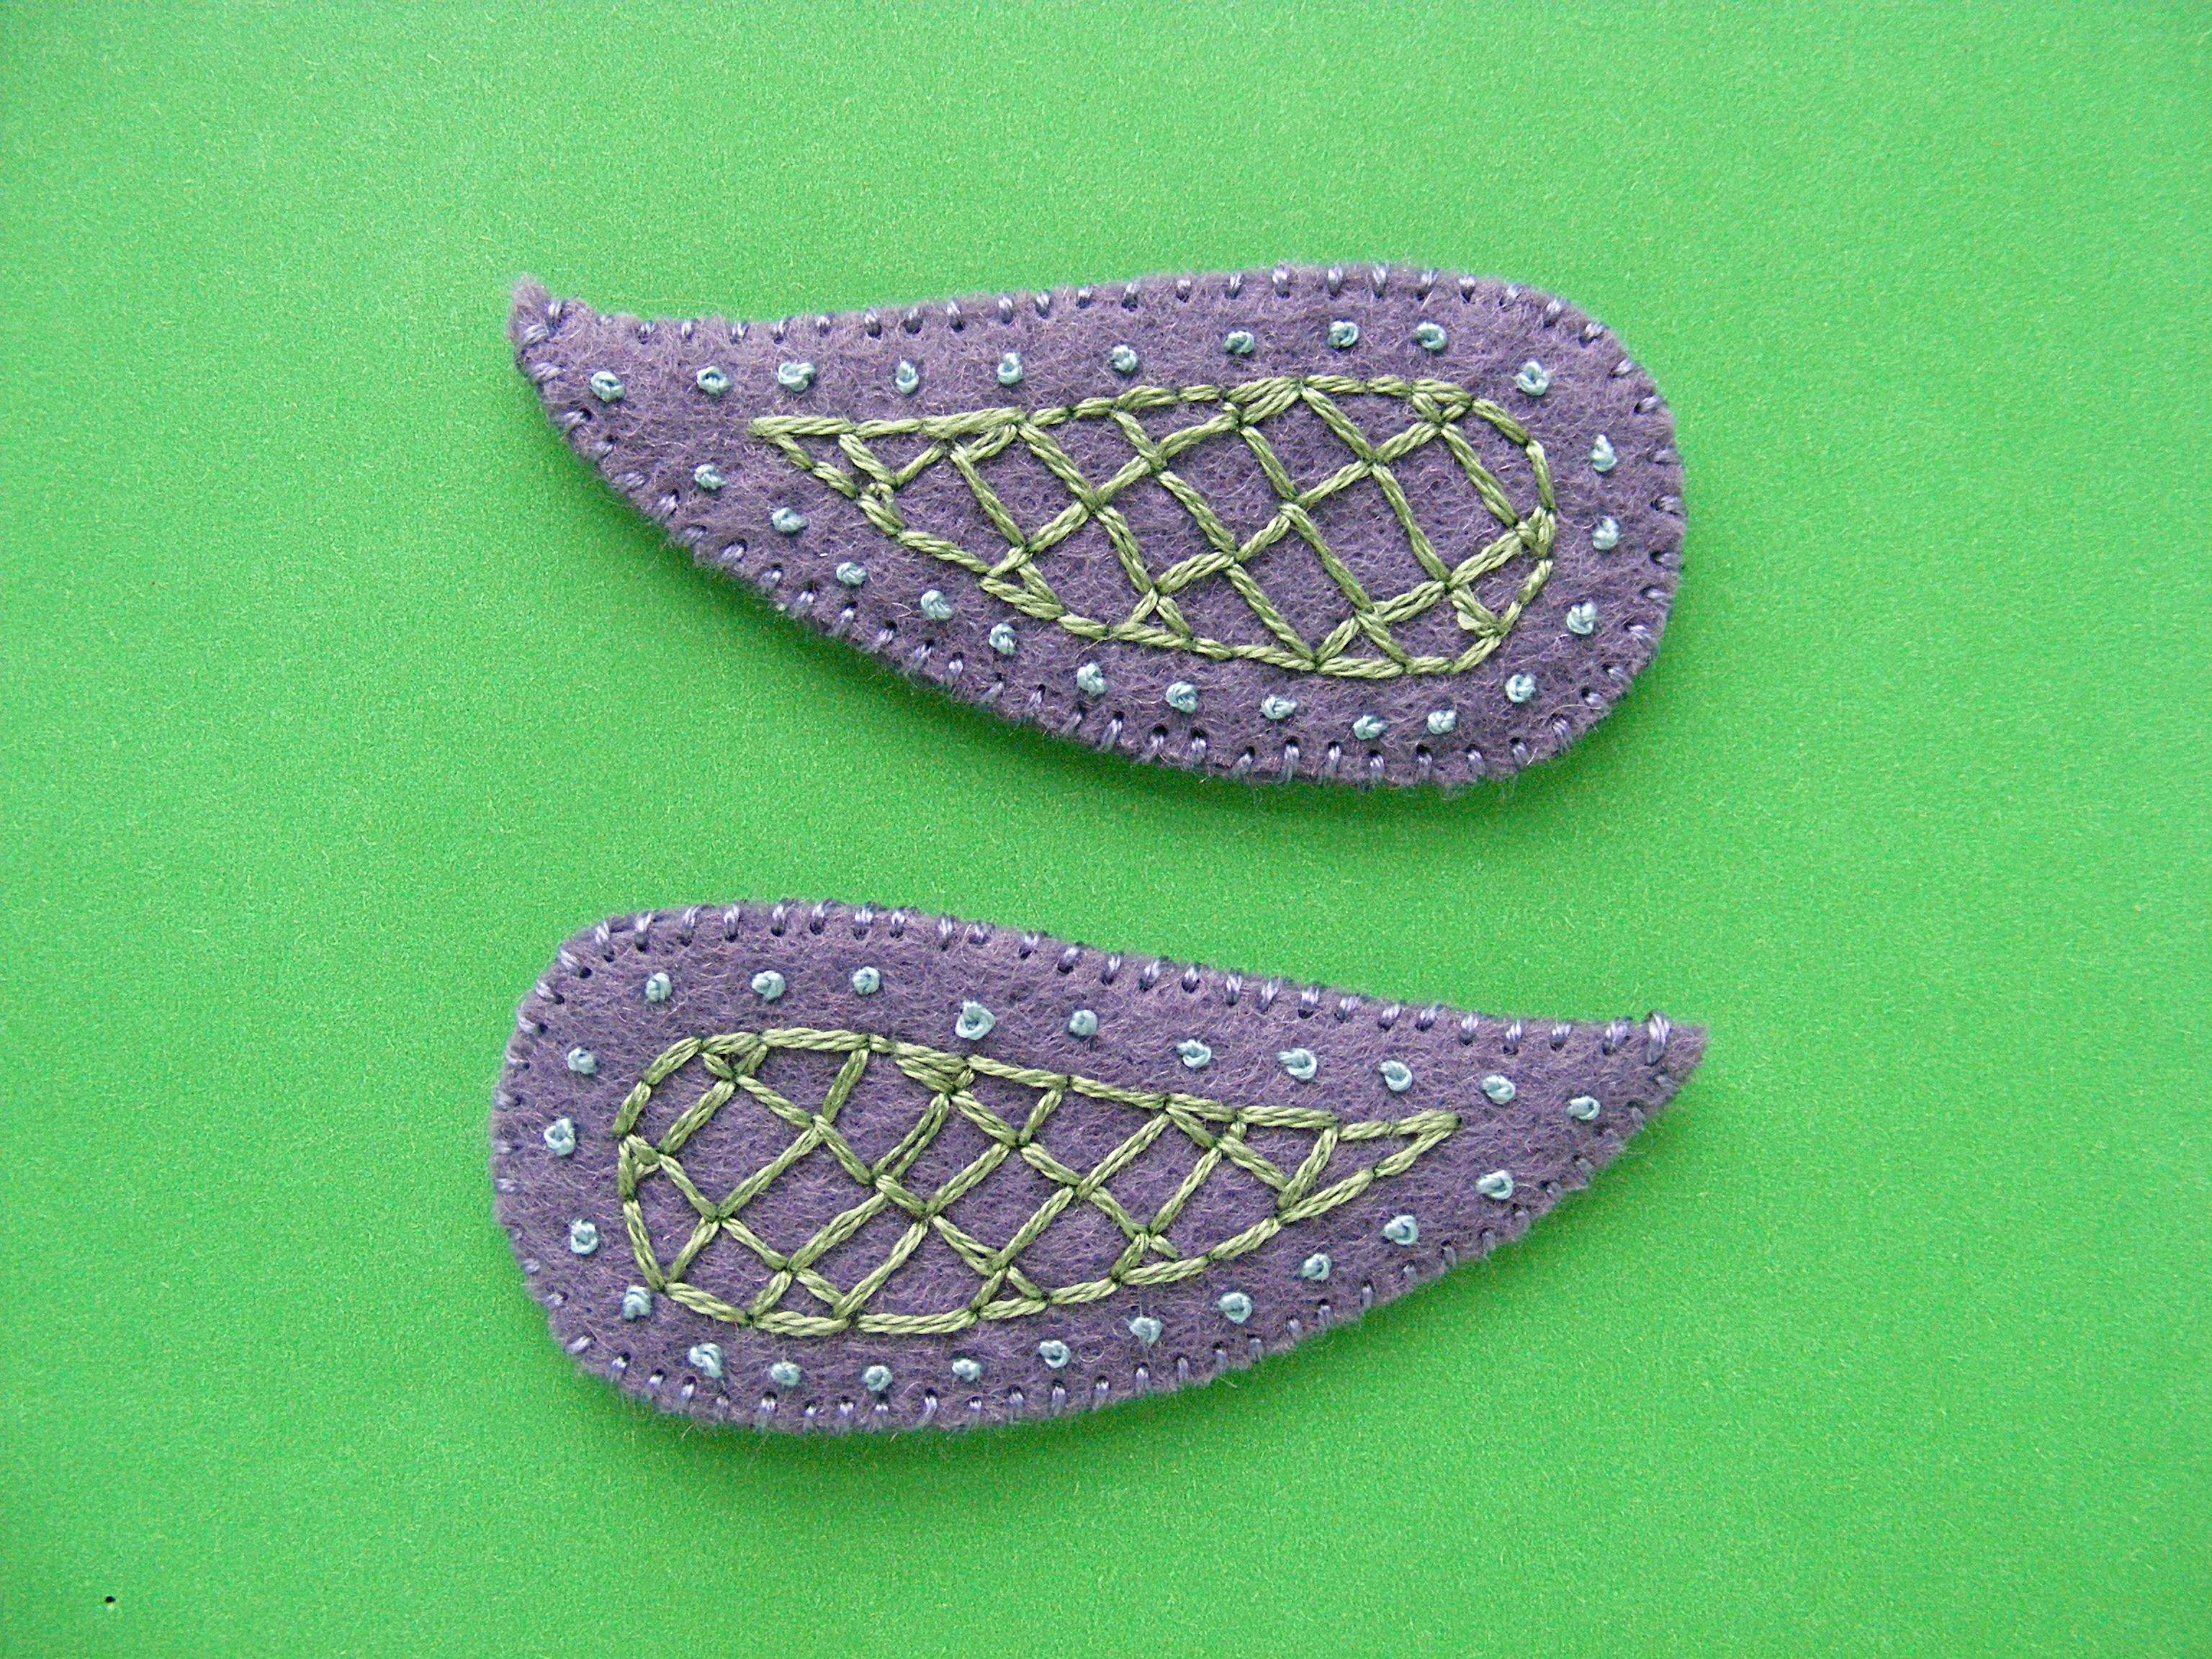
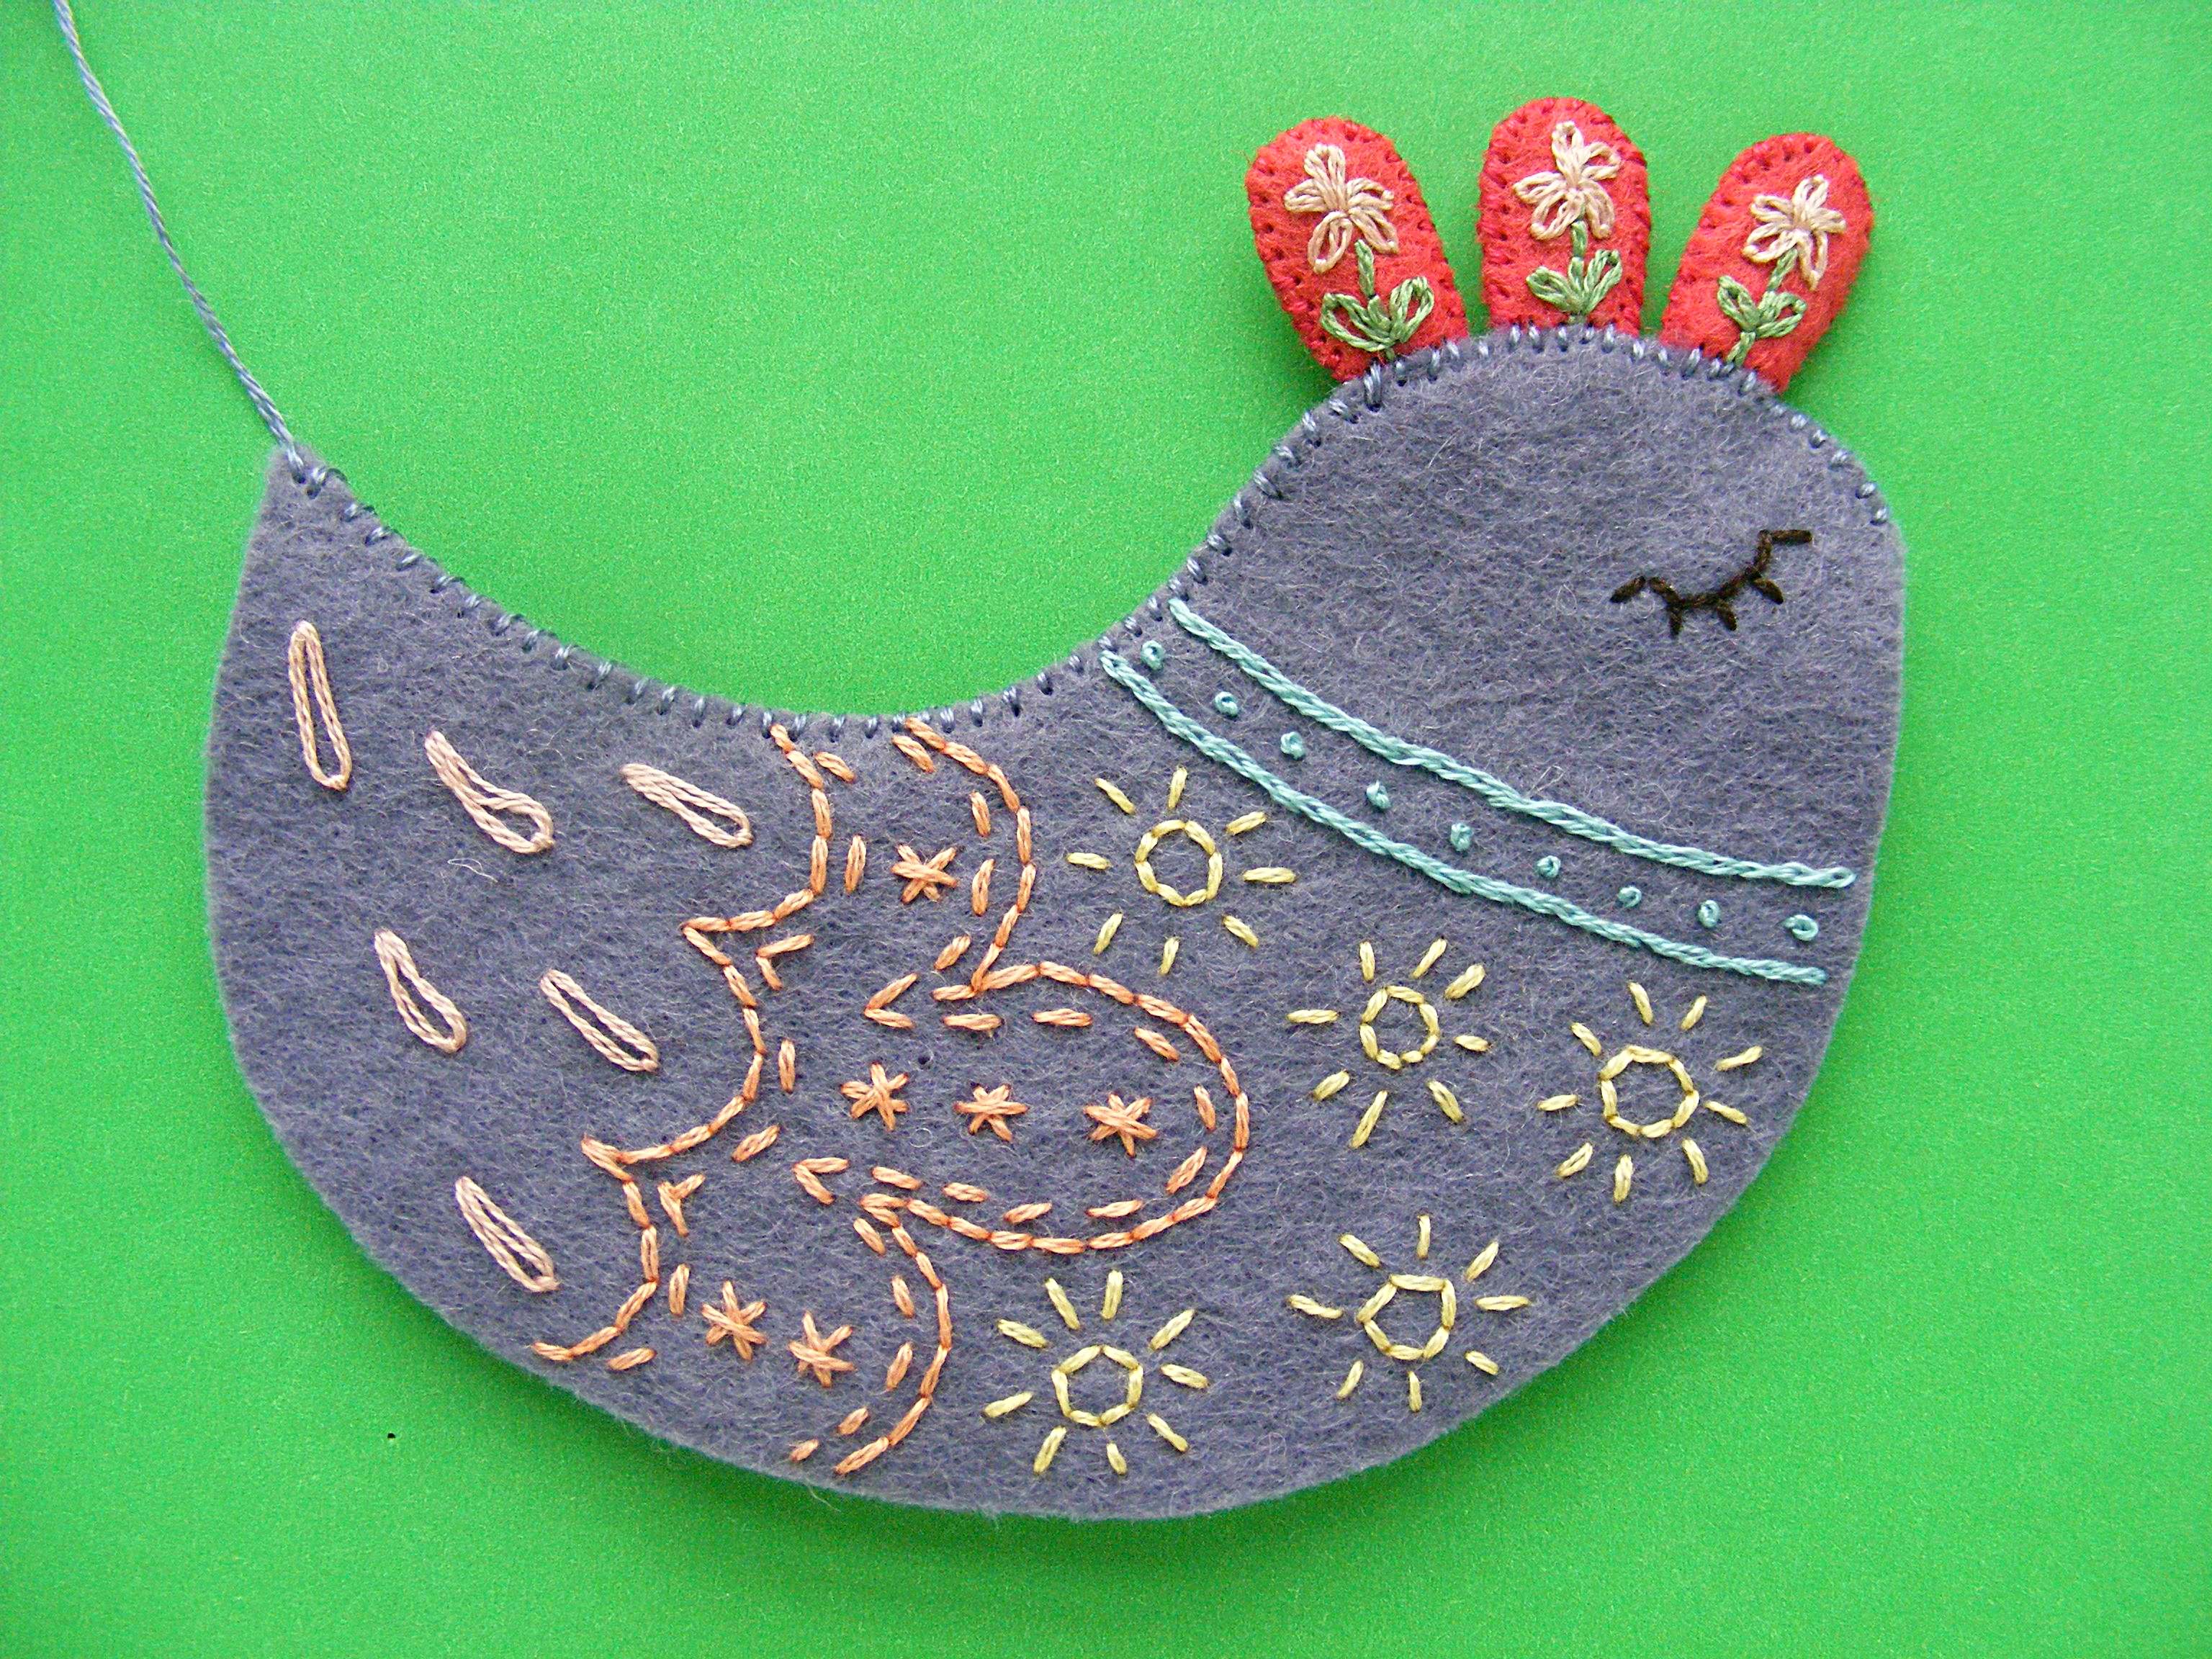
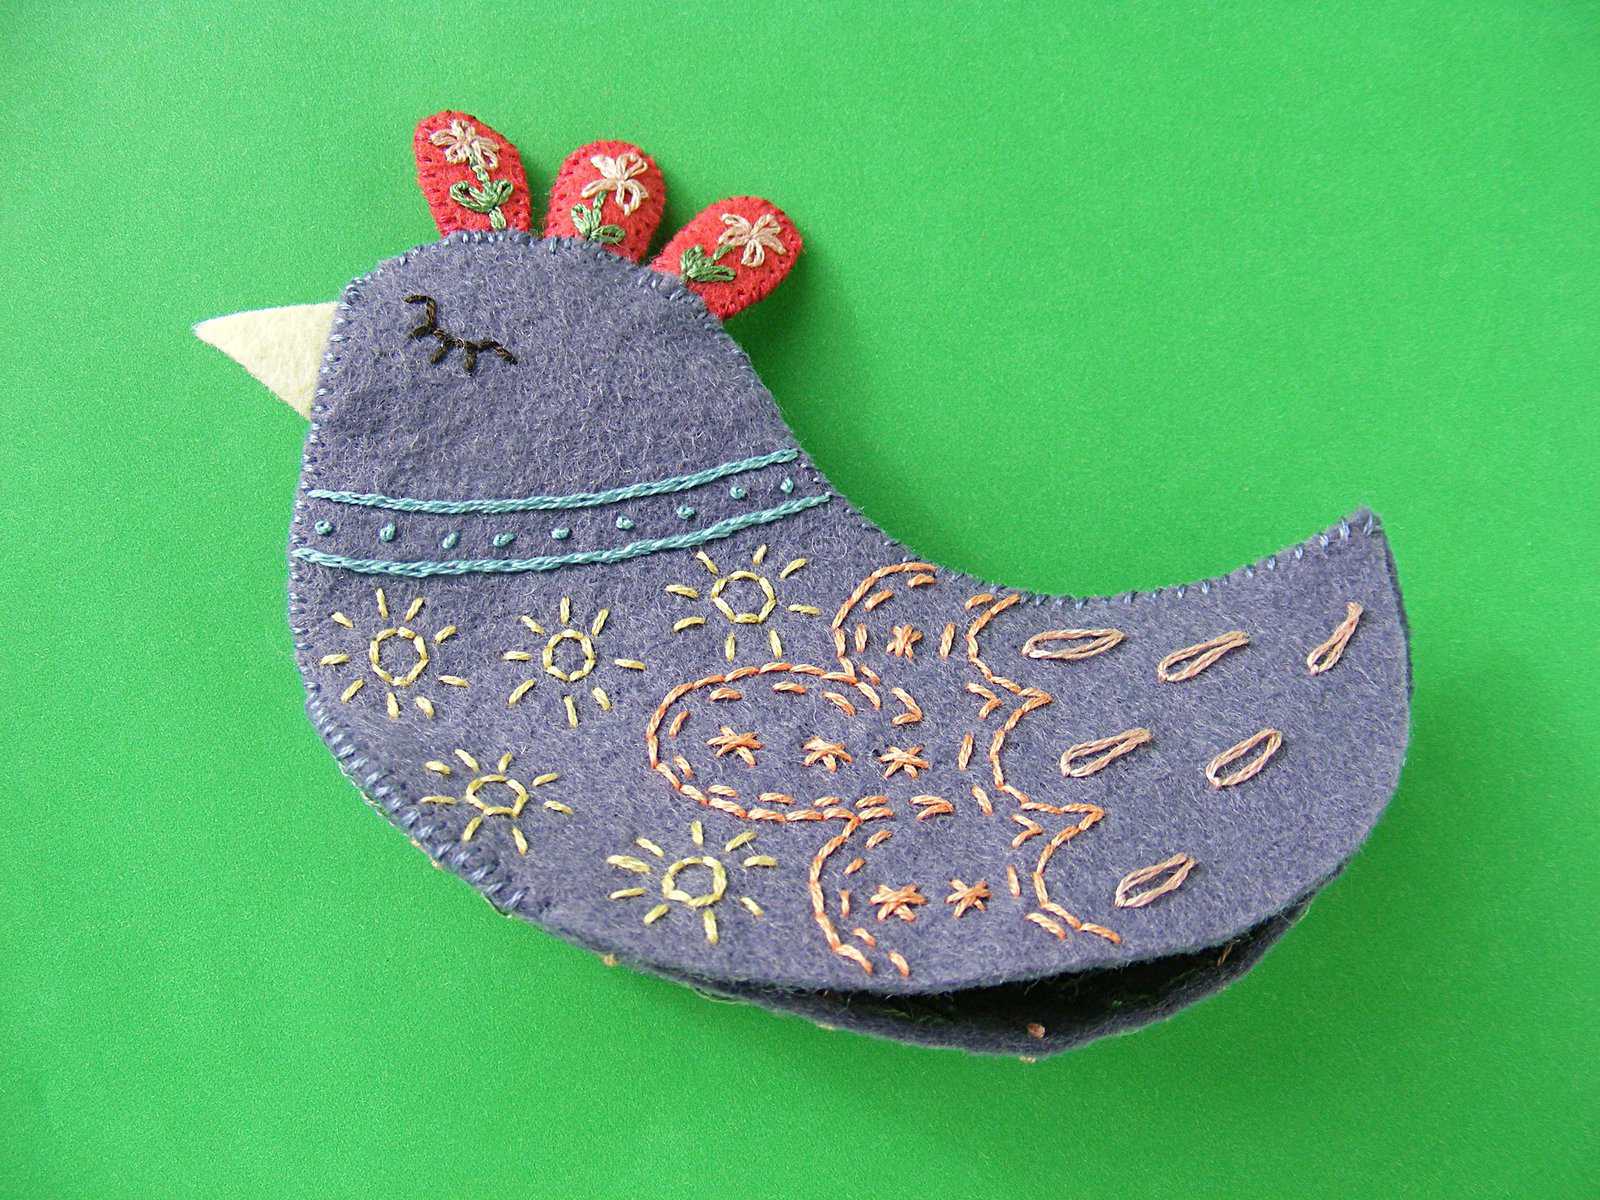
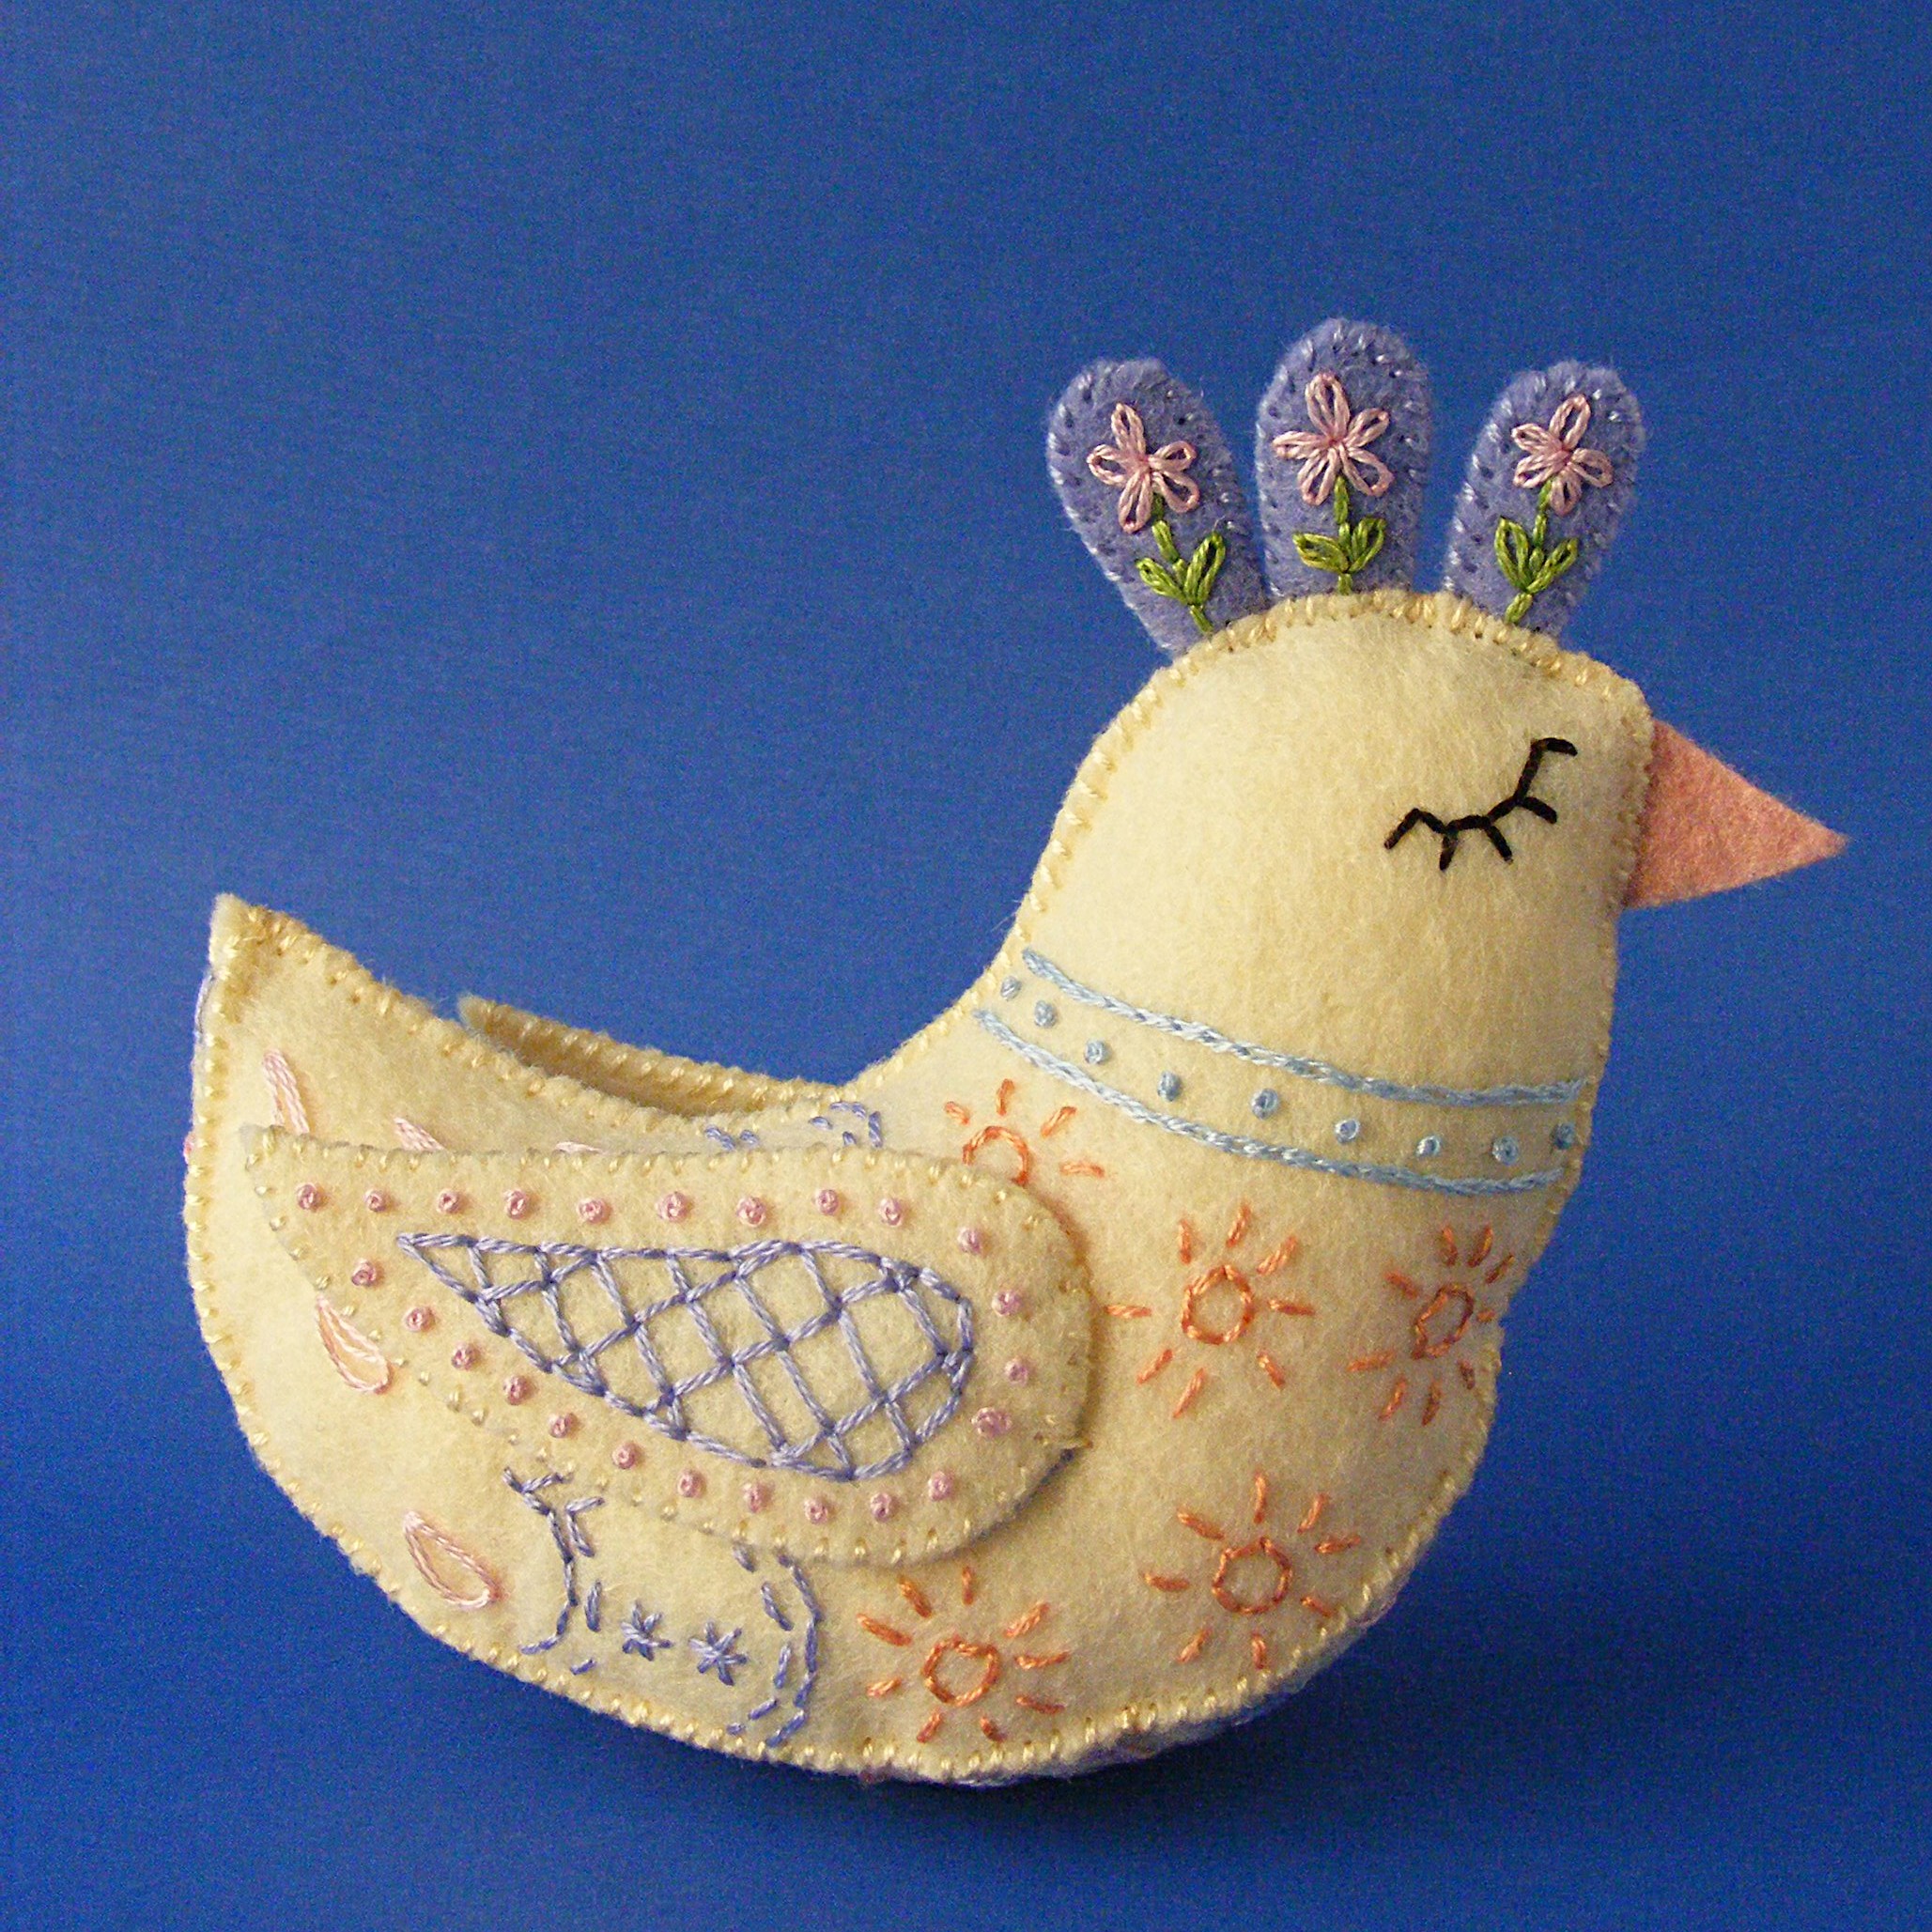
Here’s a free felt bird pattern for you to play with! Her name is Daisy. 🙂
Want to make her? All it takes is some felt, a bit of stuffing, and a few easy embroidery stitches. And a pattern, of course. 🙂
She uses just half a sheet of wool-blend felt for the body (I used purple sage, but it’s since been discontinued), a few small scraps for the beak and comb (I used strawberry dream and straw), and embroidery thread in your favorite colors.
You can find links to sources for all my favorite supplies here.
Comb - lazy daisy for the flower with DMC #152 and the leaves with DMC #320. Backstitch the stem with DMC #320.
Step 3
Cut out each piece carefully on the lines. Be sure not to cut into any of your stitching!
Soak the pieces in cool water to remove the stabilizer. I like to soak them for about an hour, then rinse off the mushy stabilizer under cool running water. Use a kitchen sprayer to get off any stubborn bits. Let them dry flat on a towel. Don’t wring them out - just lay them on a towel dripping wet. They’ll dry overnight.
From here on all the sewing is whipstitch around the edges of the felt. I used two strands of floss for all whipstitching. DMC #326 matches the strawberry dream felt I used for the comb, and DMC #161 matches the purple sage I used for the body.
Step 4
Put comb pieces together, right sides facing out, and stitch all the way around the edge. You’ll end up with three comb pieces.
Step 5
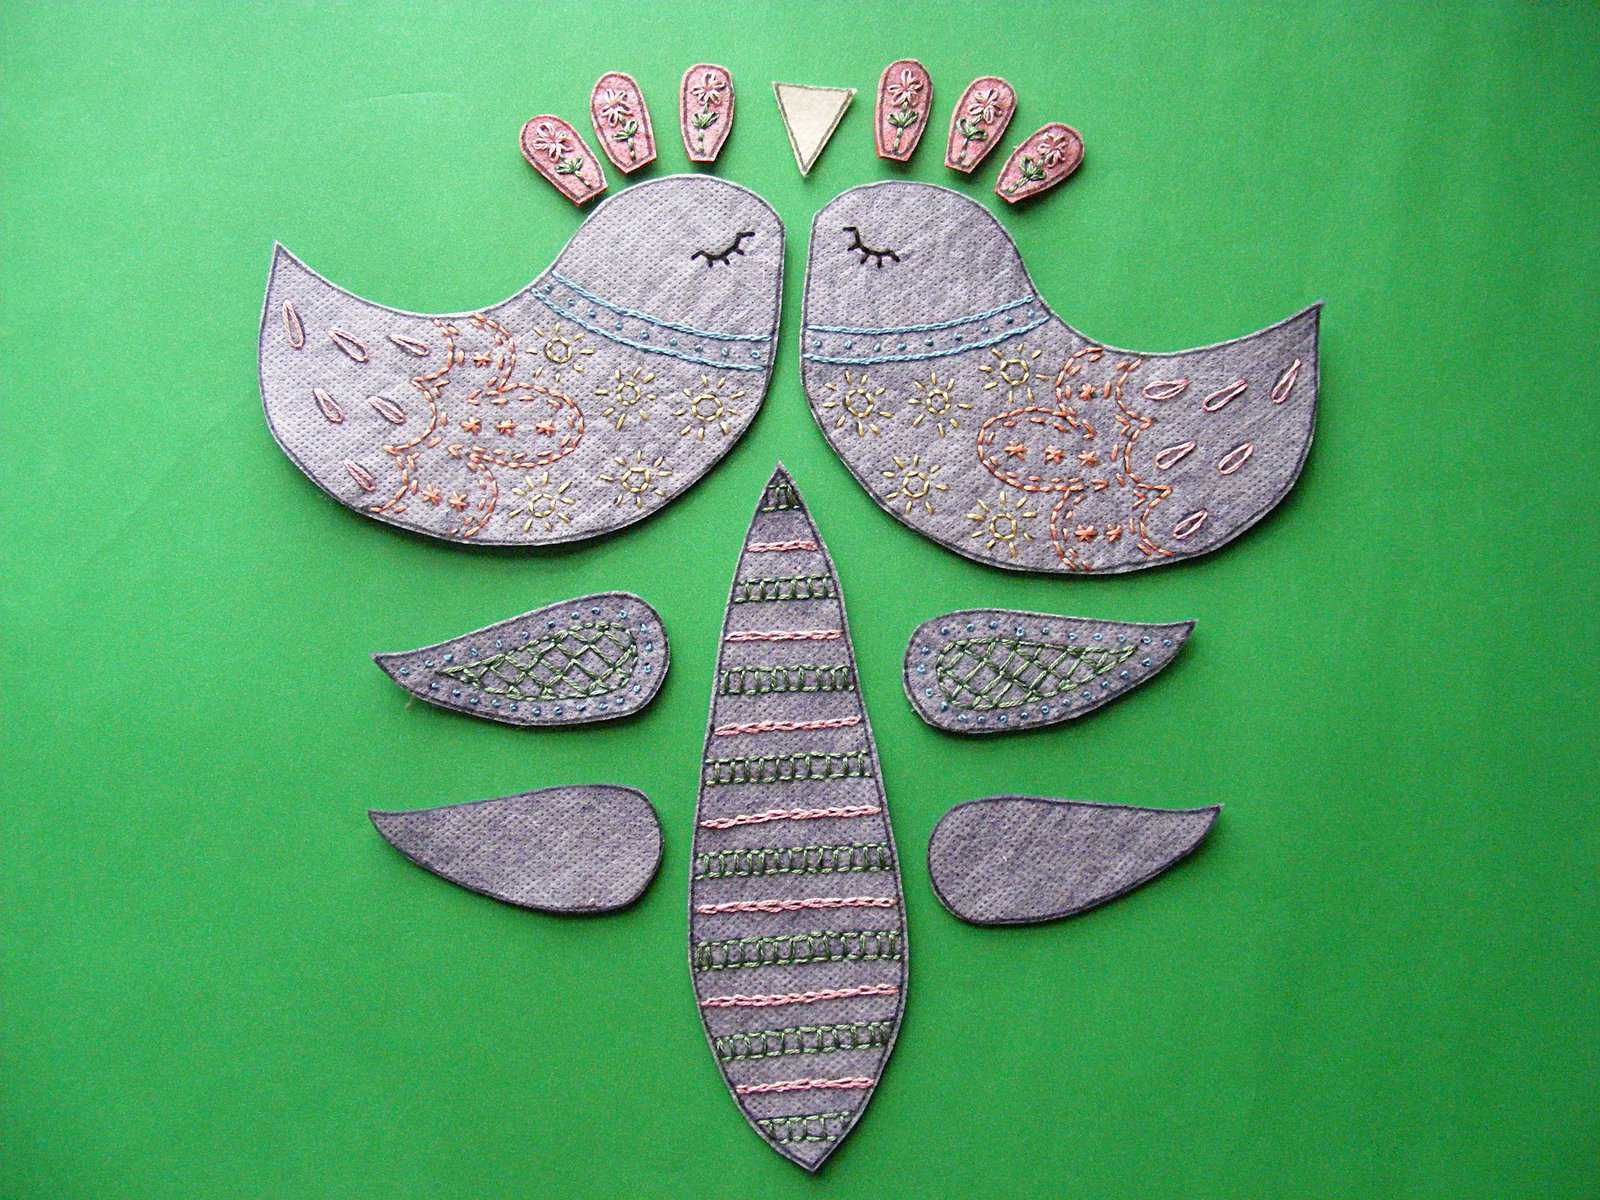
Repeat Step 3 for the wings, pairing one embroidered wing with one blank wing.
The blank sides of the wings will go up against the bird’s body where you can’t see them.
Step 6
Place the two body pieces right sides facing out, with the comb pieces sandwiched between the layers. Stitch the body pieces together along the top edge of the body. Stop when you get to the tip of the tail, but don’t tie off your thread.
When you get to the tip of the tail, slip the belly piece into place. The narrow end is the tail, and the wider end is the breast.
Stitch one body piece to one side of the belly piece. When you get to the front, stop stitching, but don’t tie off your thread.
Step 8
Go back to stitching the two body pieces together, this time stitching up the front of the face.
Slip the beak in between the two layers, right up at the top of the face, and stitch through it as you go.
Tie off your thread when you get to the top of the face.
Step 9
Flip the bird over.
Start a new piece of thread and stitch the free side of the body to the free side of the belly, starting at the front tip of the belly.
Stitch for a few inches, then tie off your thread.
Step 10
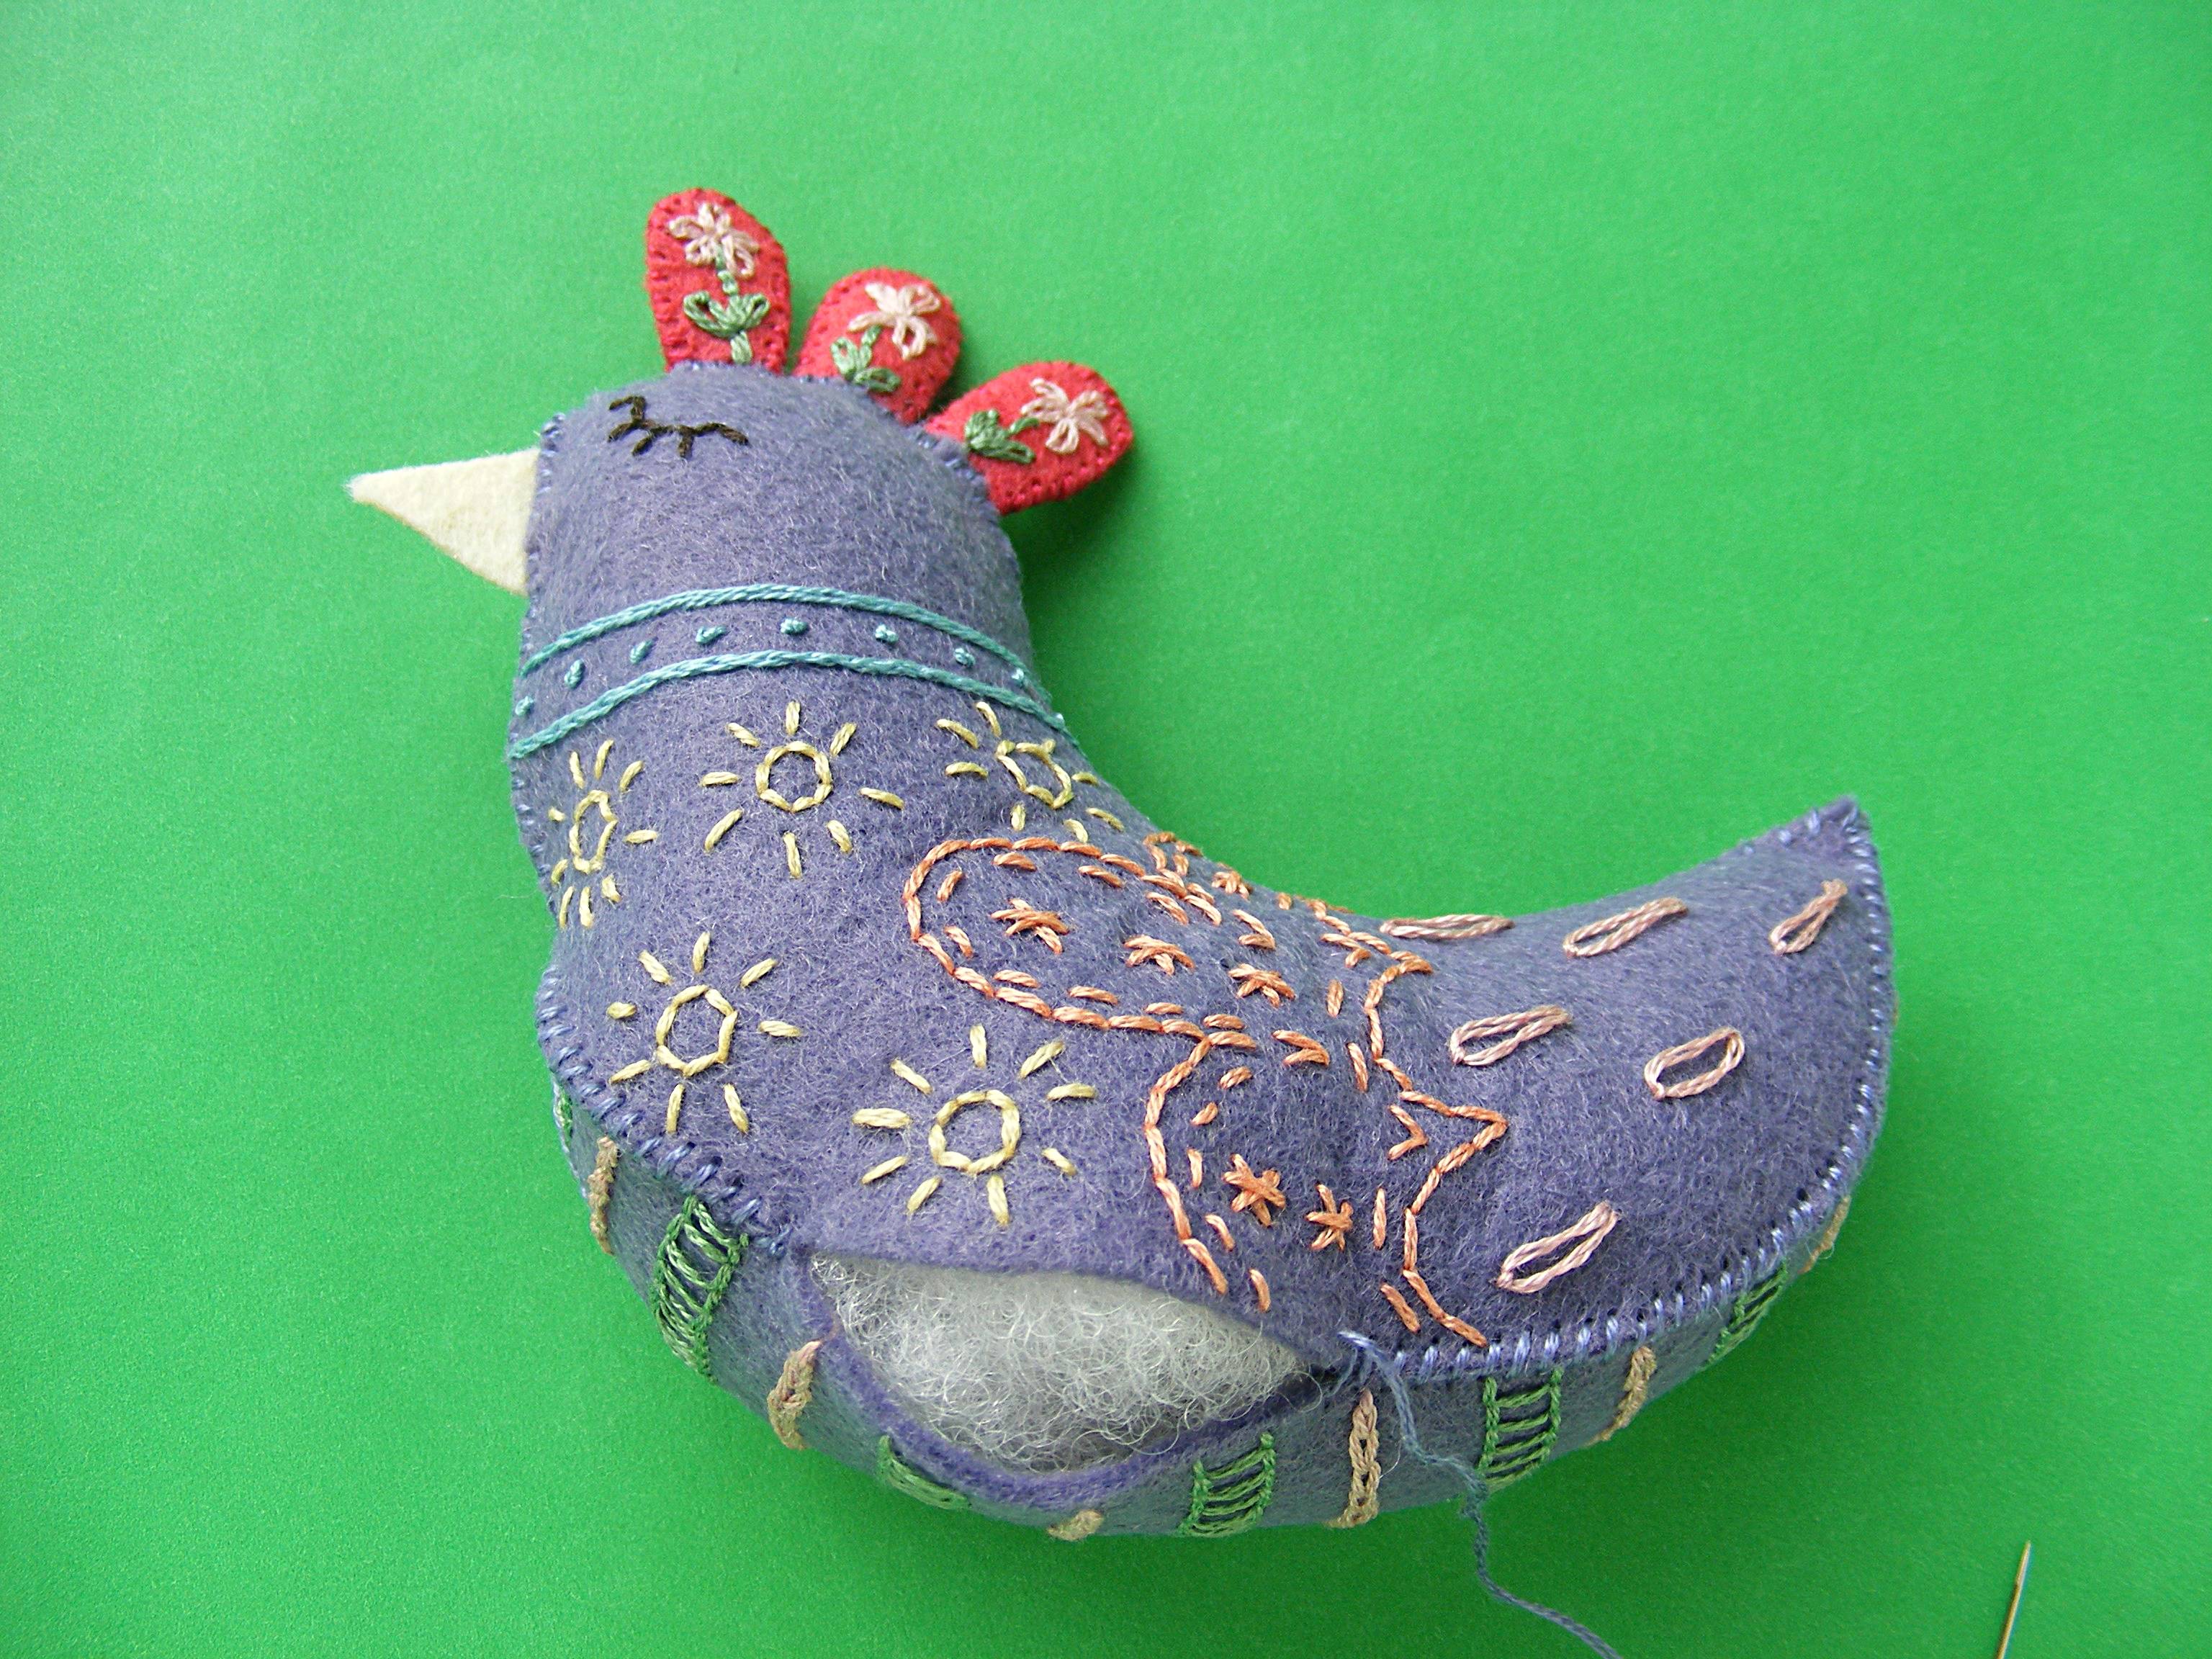
With a new piece of thread, stitch the rest of the body closed from the tail to the other side of the stuffing opening you started in Step 9.
Stuff the body neatly. You can add plastic pellets if you like, for weight, but this shape doesn’t need it for balance.
Step 11
Sew up the rest of the stuffing opening.
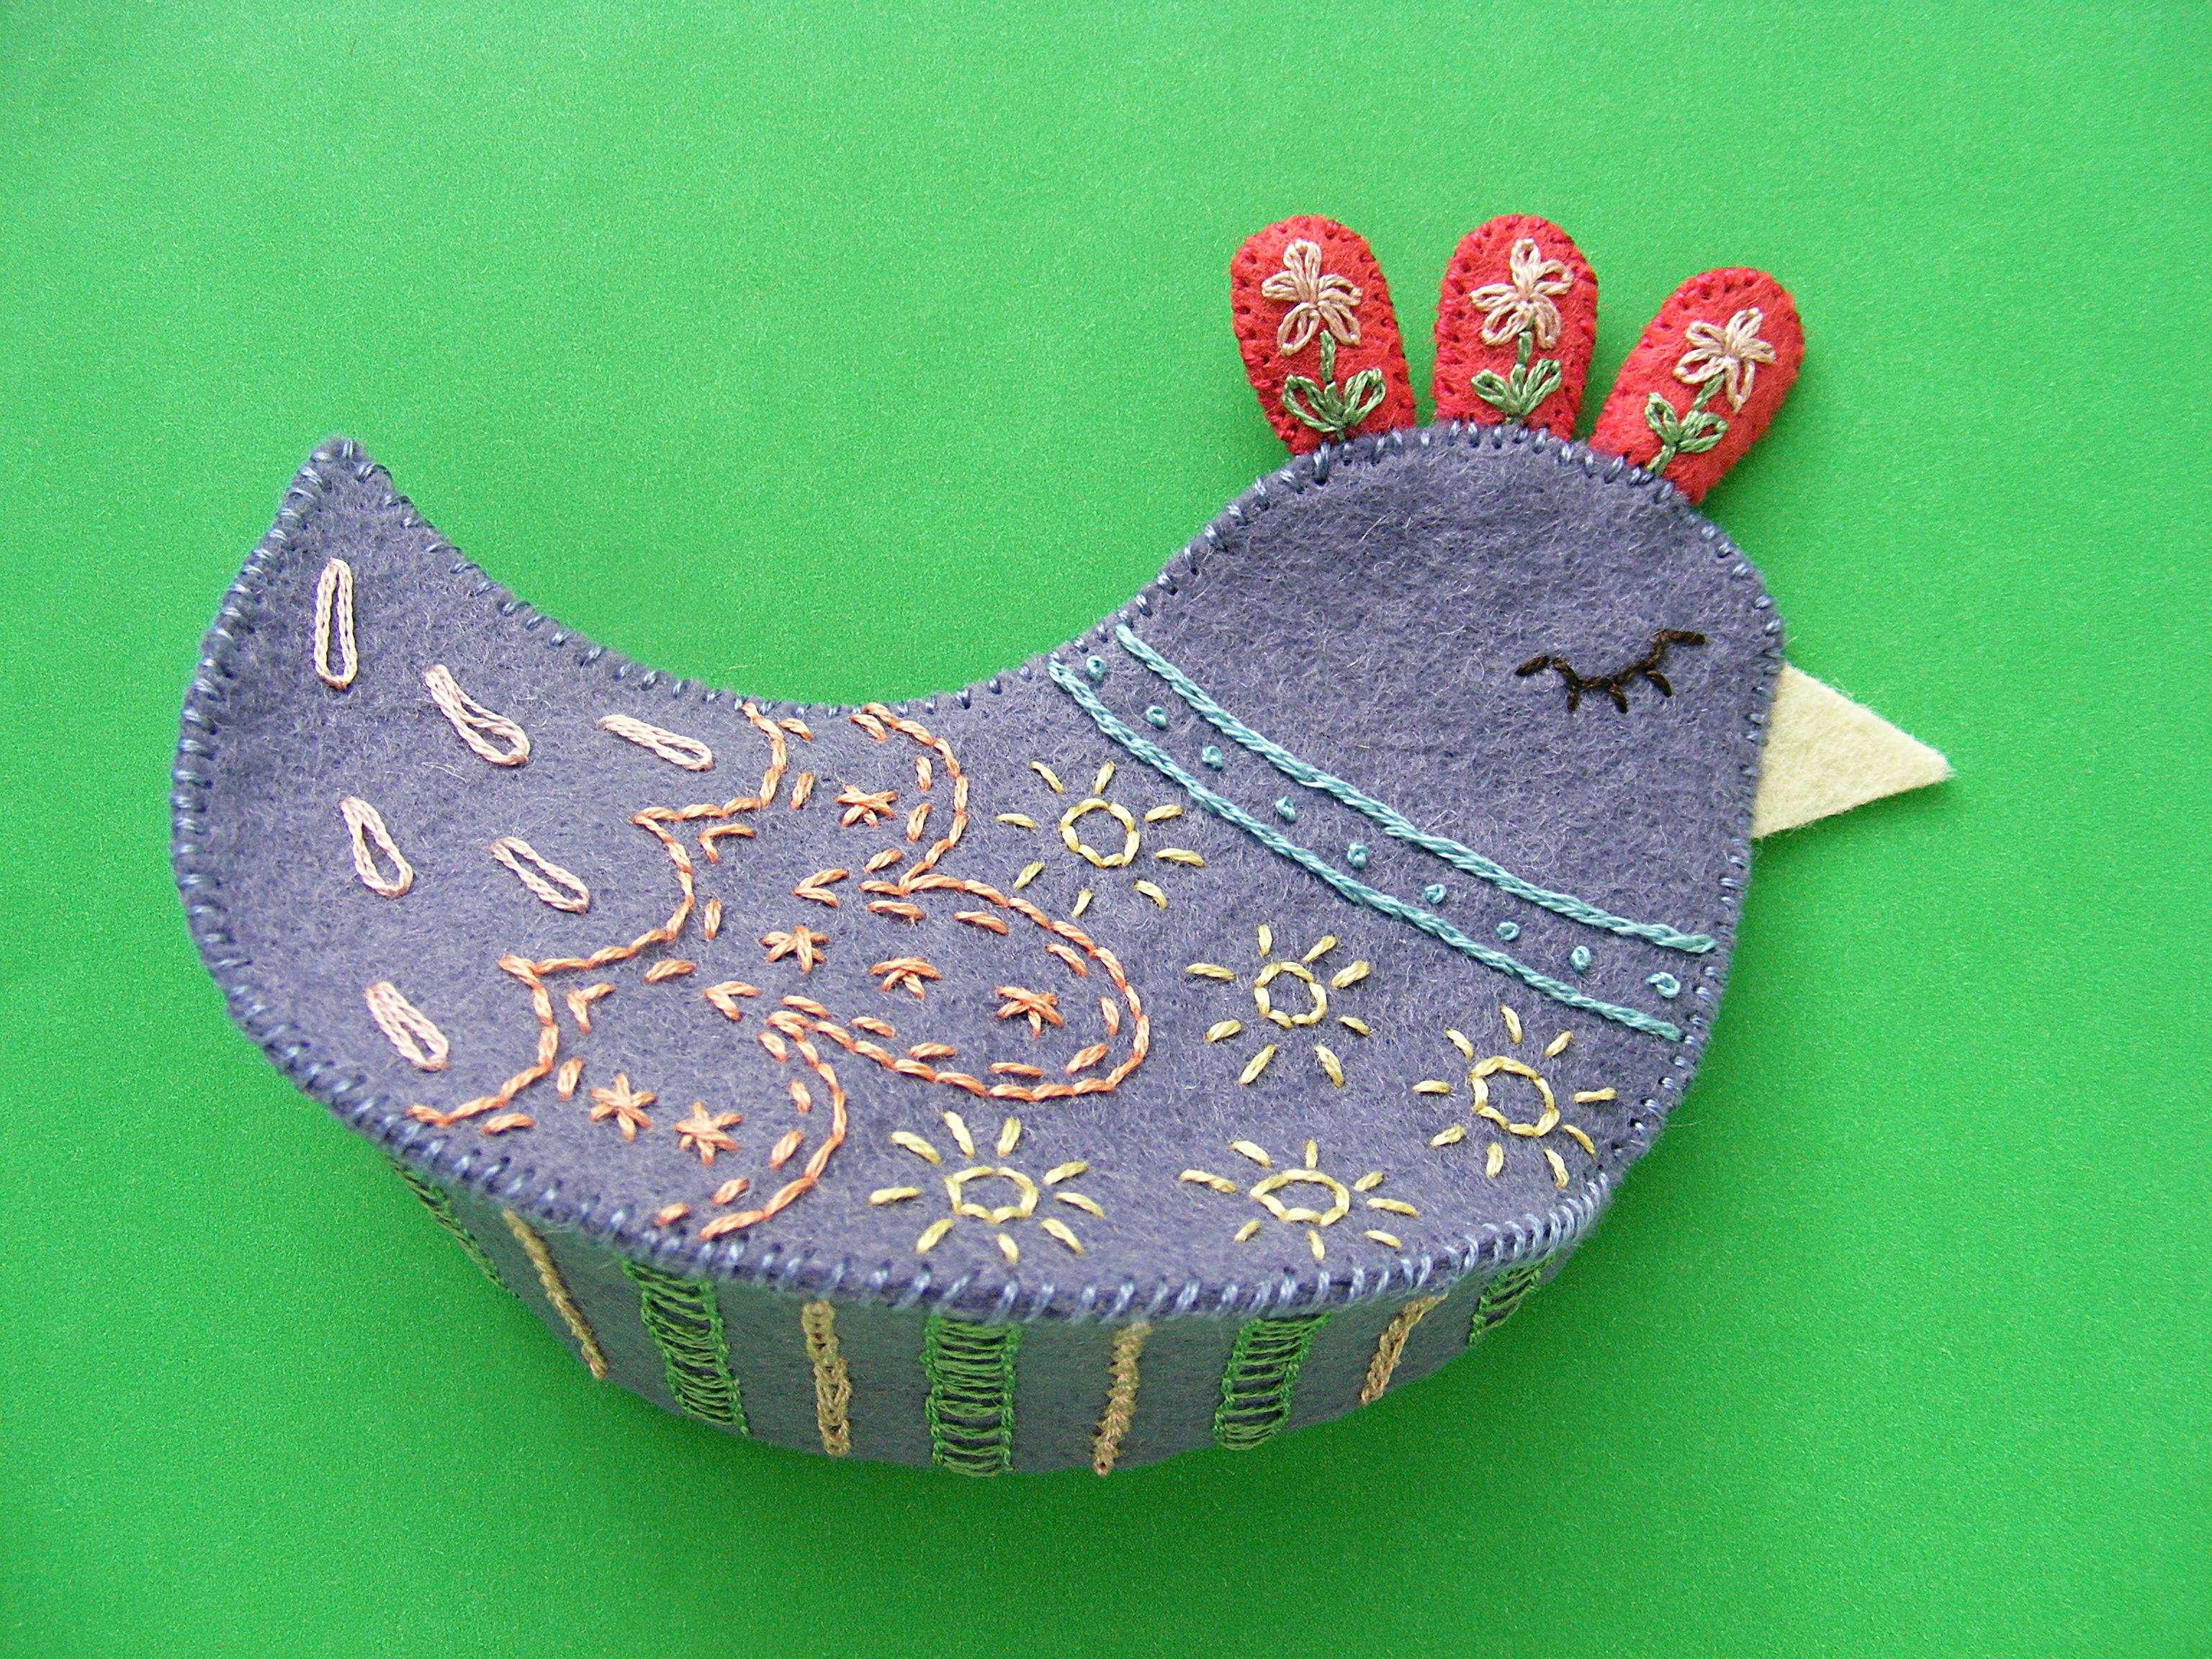
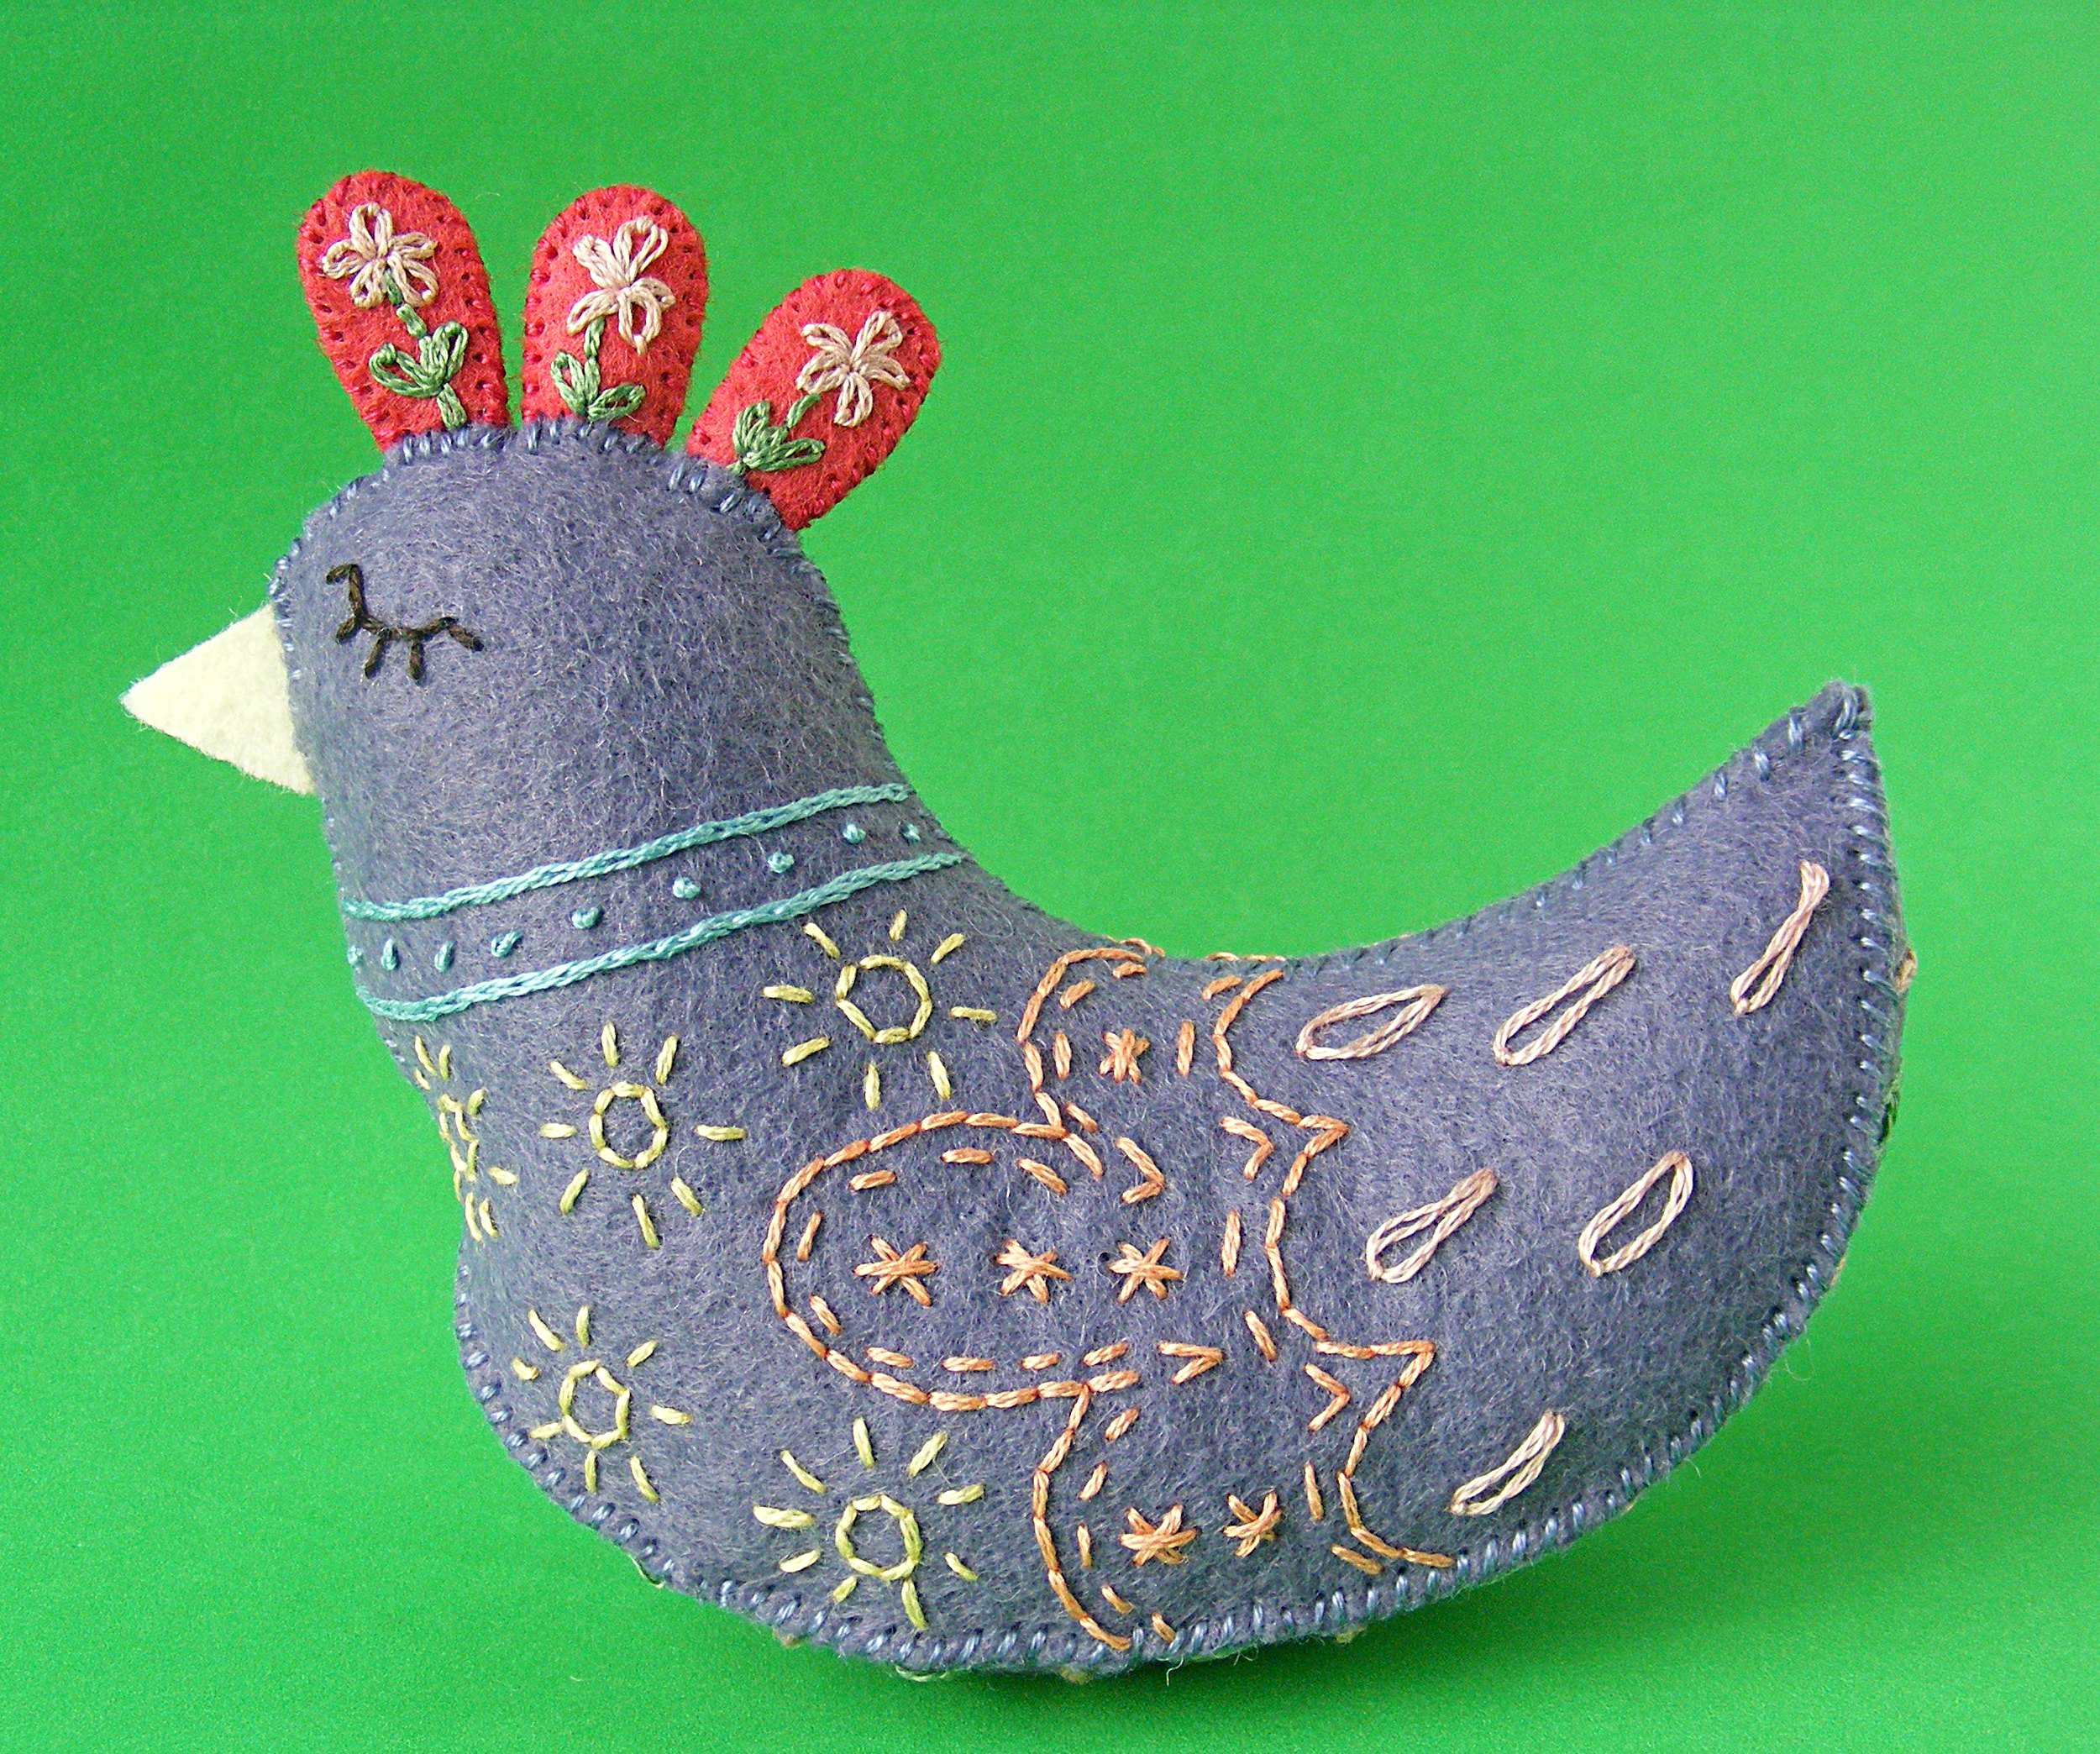
Now she’s just waiting for wings!
Thread a long needle and knot the end. Start sewing underneath one wing, near the front. Sew through the body and out the other side, through the opposing wing. Take a small stitch back into the wing, through the body and out through the first wing. Stitch back and forth like this a few times to secure the wings. Don’t pull the thread too tight or you’ll distort the shape of her body. Knot your thread underneath one wing and bury the tail.
Done!
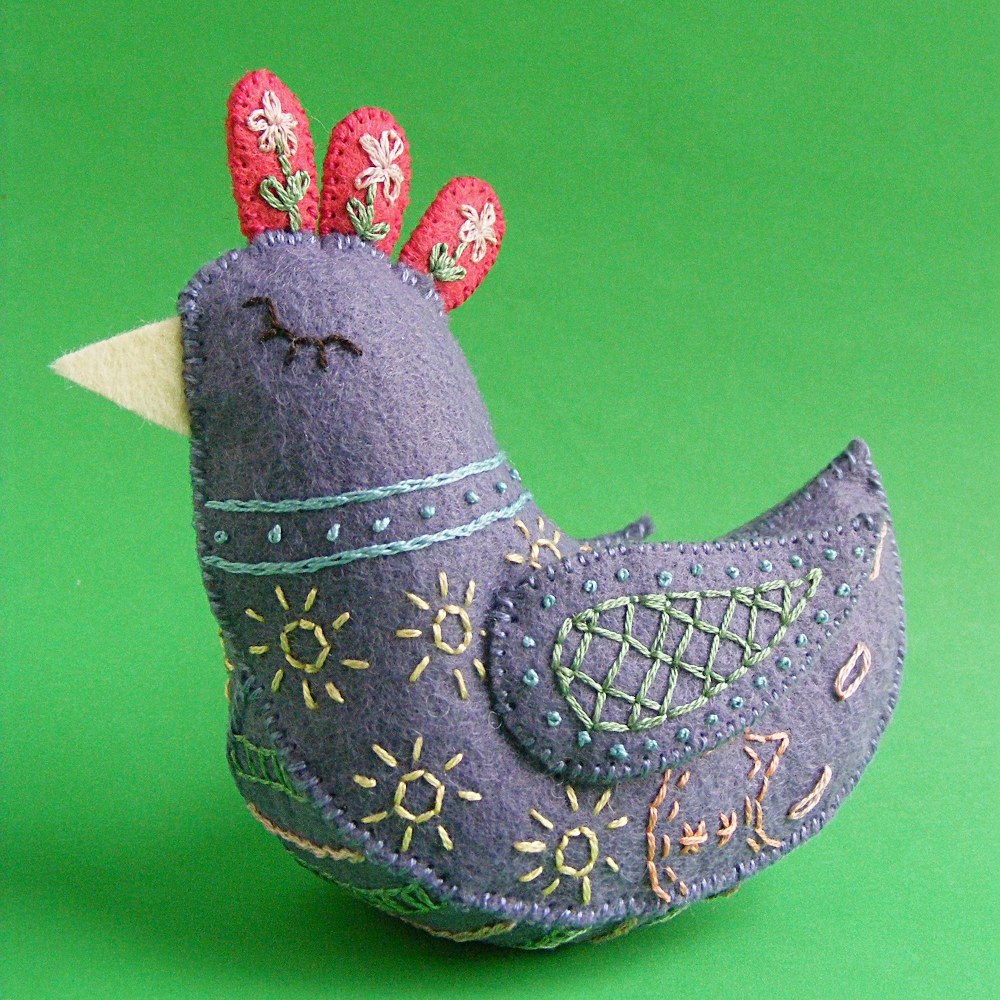
Isn’t she a beauty? I think this design would also be very pretty stitched up with a single color thread on a single color felt. White thread on this purple sage would be lovely! You’ll just have to make another. :)
Update – I decided to stitch up a new version of Daisy with different colors. Look how pretty she is in this cream felt! (It’s actually called straw.)
Since she’s all hand-sewn, this free felt bird pattern is a great portable summer project. Take Daisy to the beach, to the pool, camping, on long car trips – you get the idea. 🙂
Happy stitching!
Play with some felt! Try the Oddballs – a fun pattern for silly monsters.
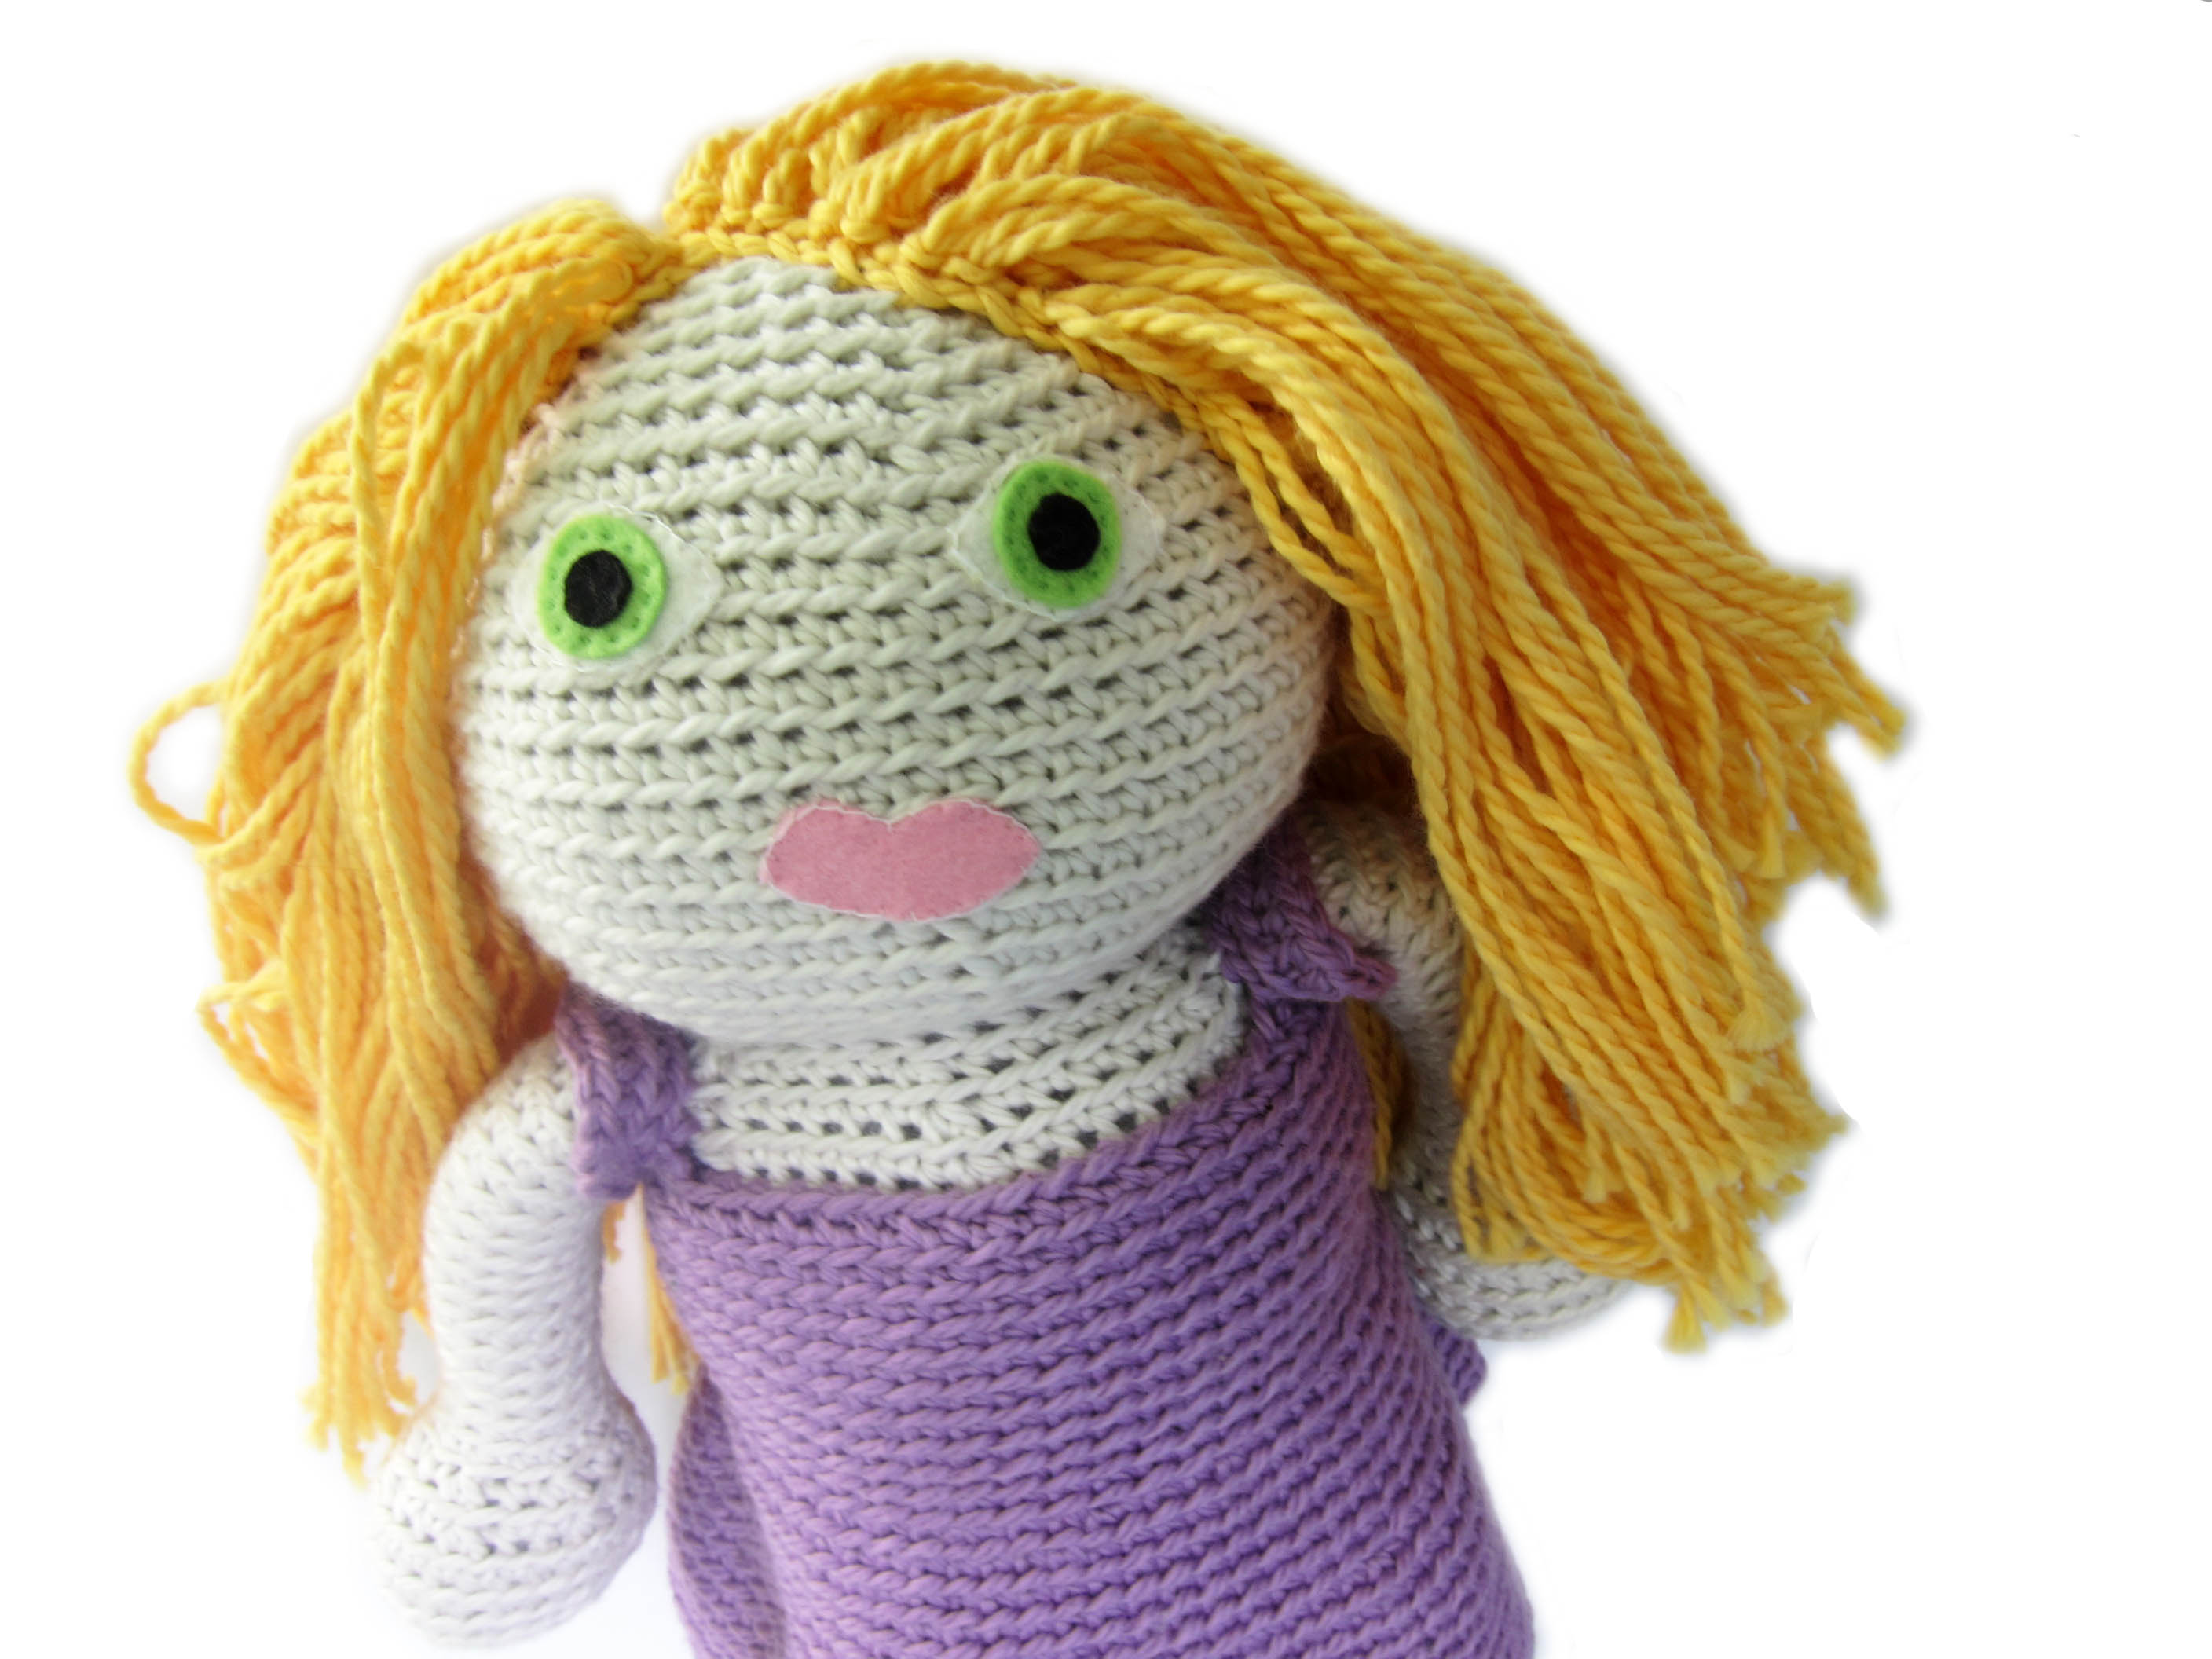
We’re in the final stretches of the doll-a-long… have you added hair to your doll yet?
I think the hair is one of the most exciting parts because there are so many options! For a general how-to for adding hair, check out this blog post.
Let’s chat hair options, shall we?
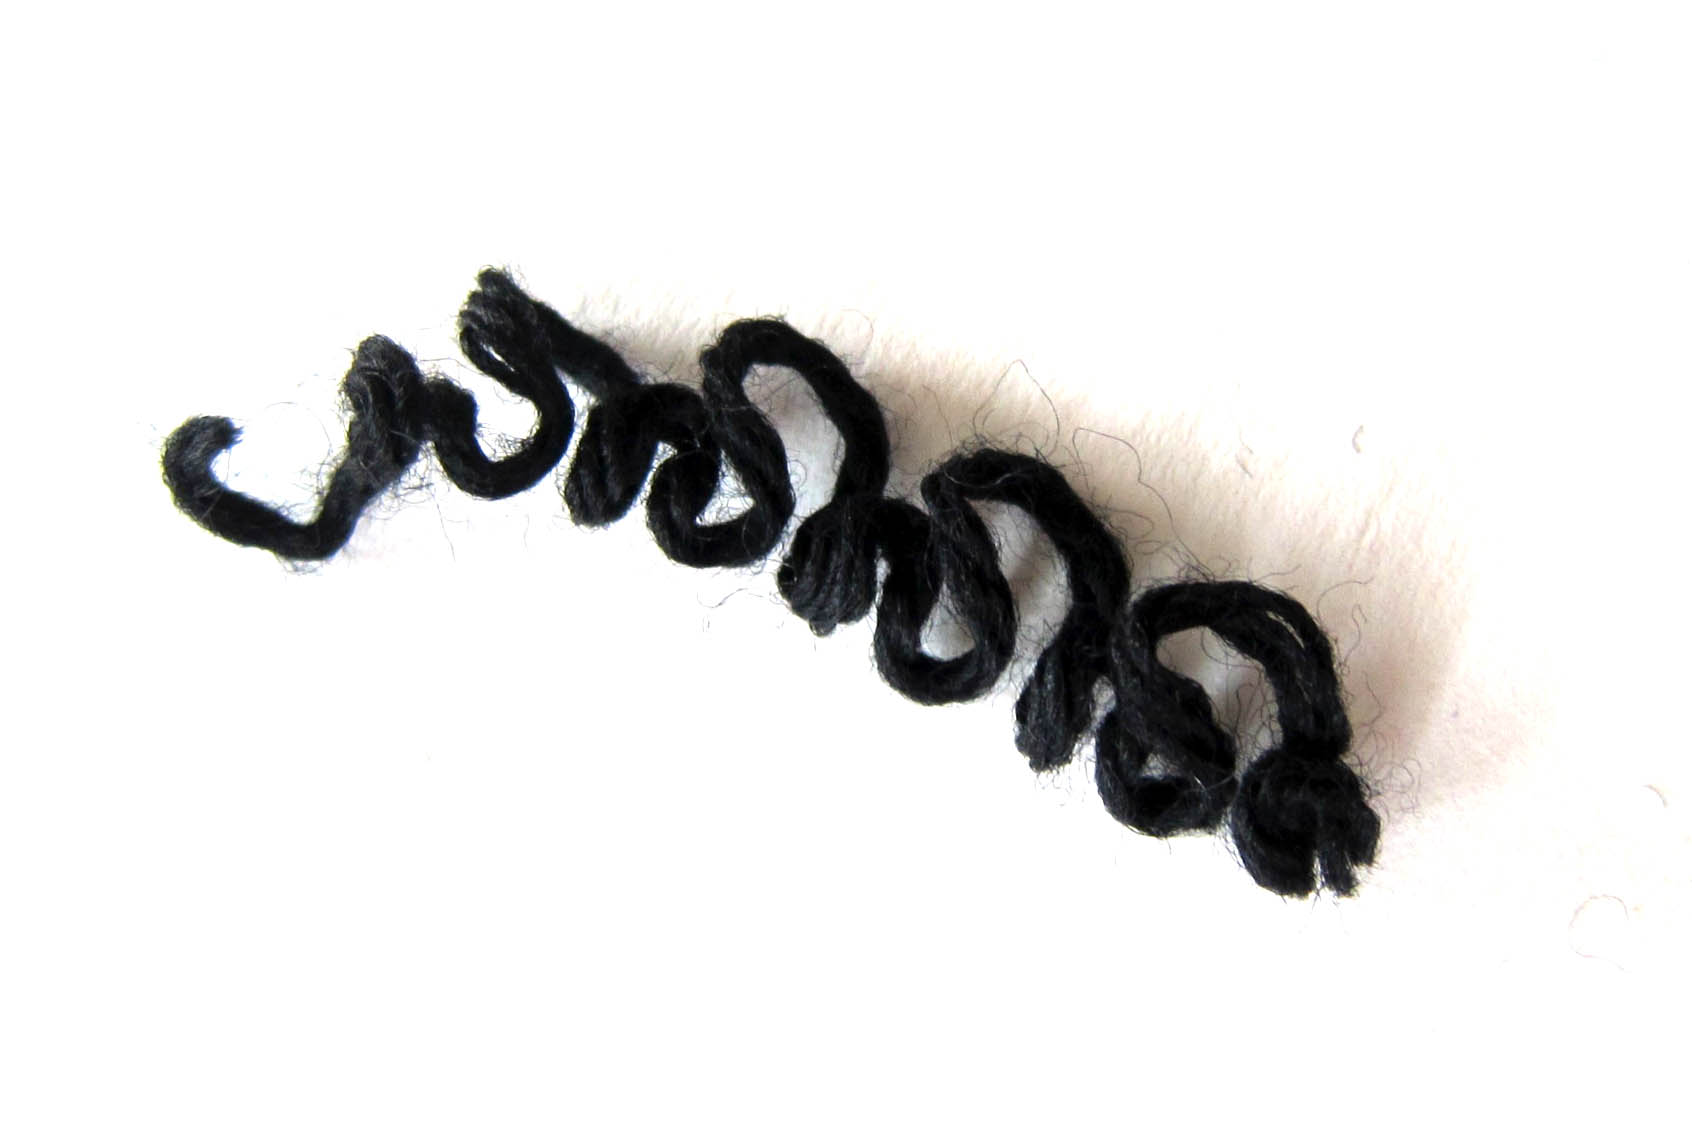
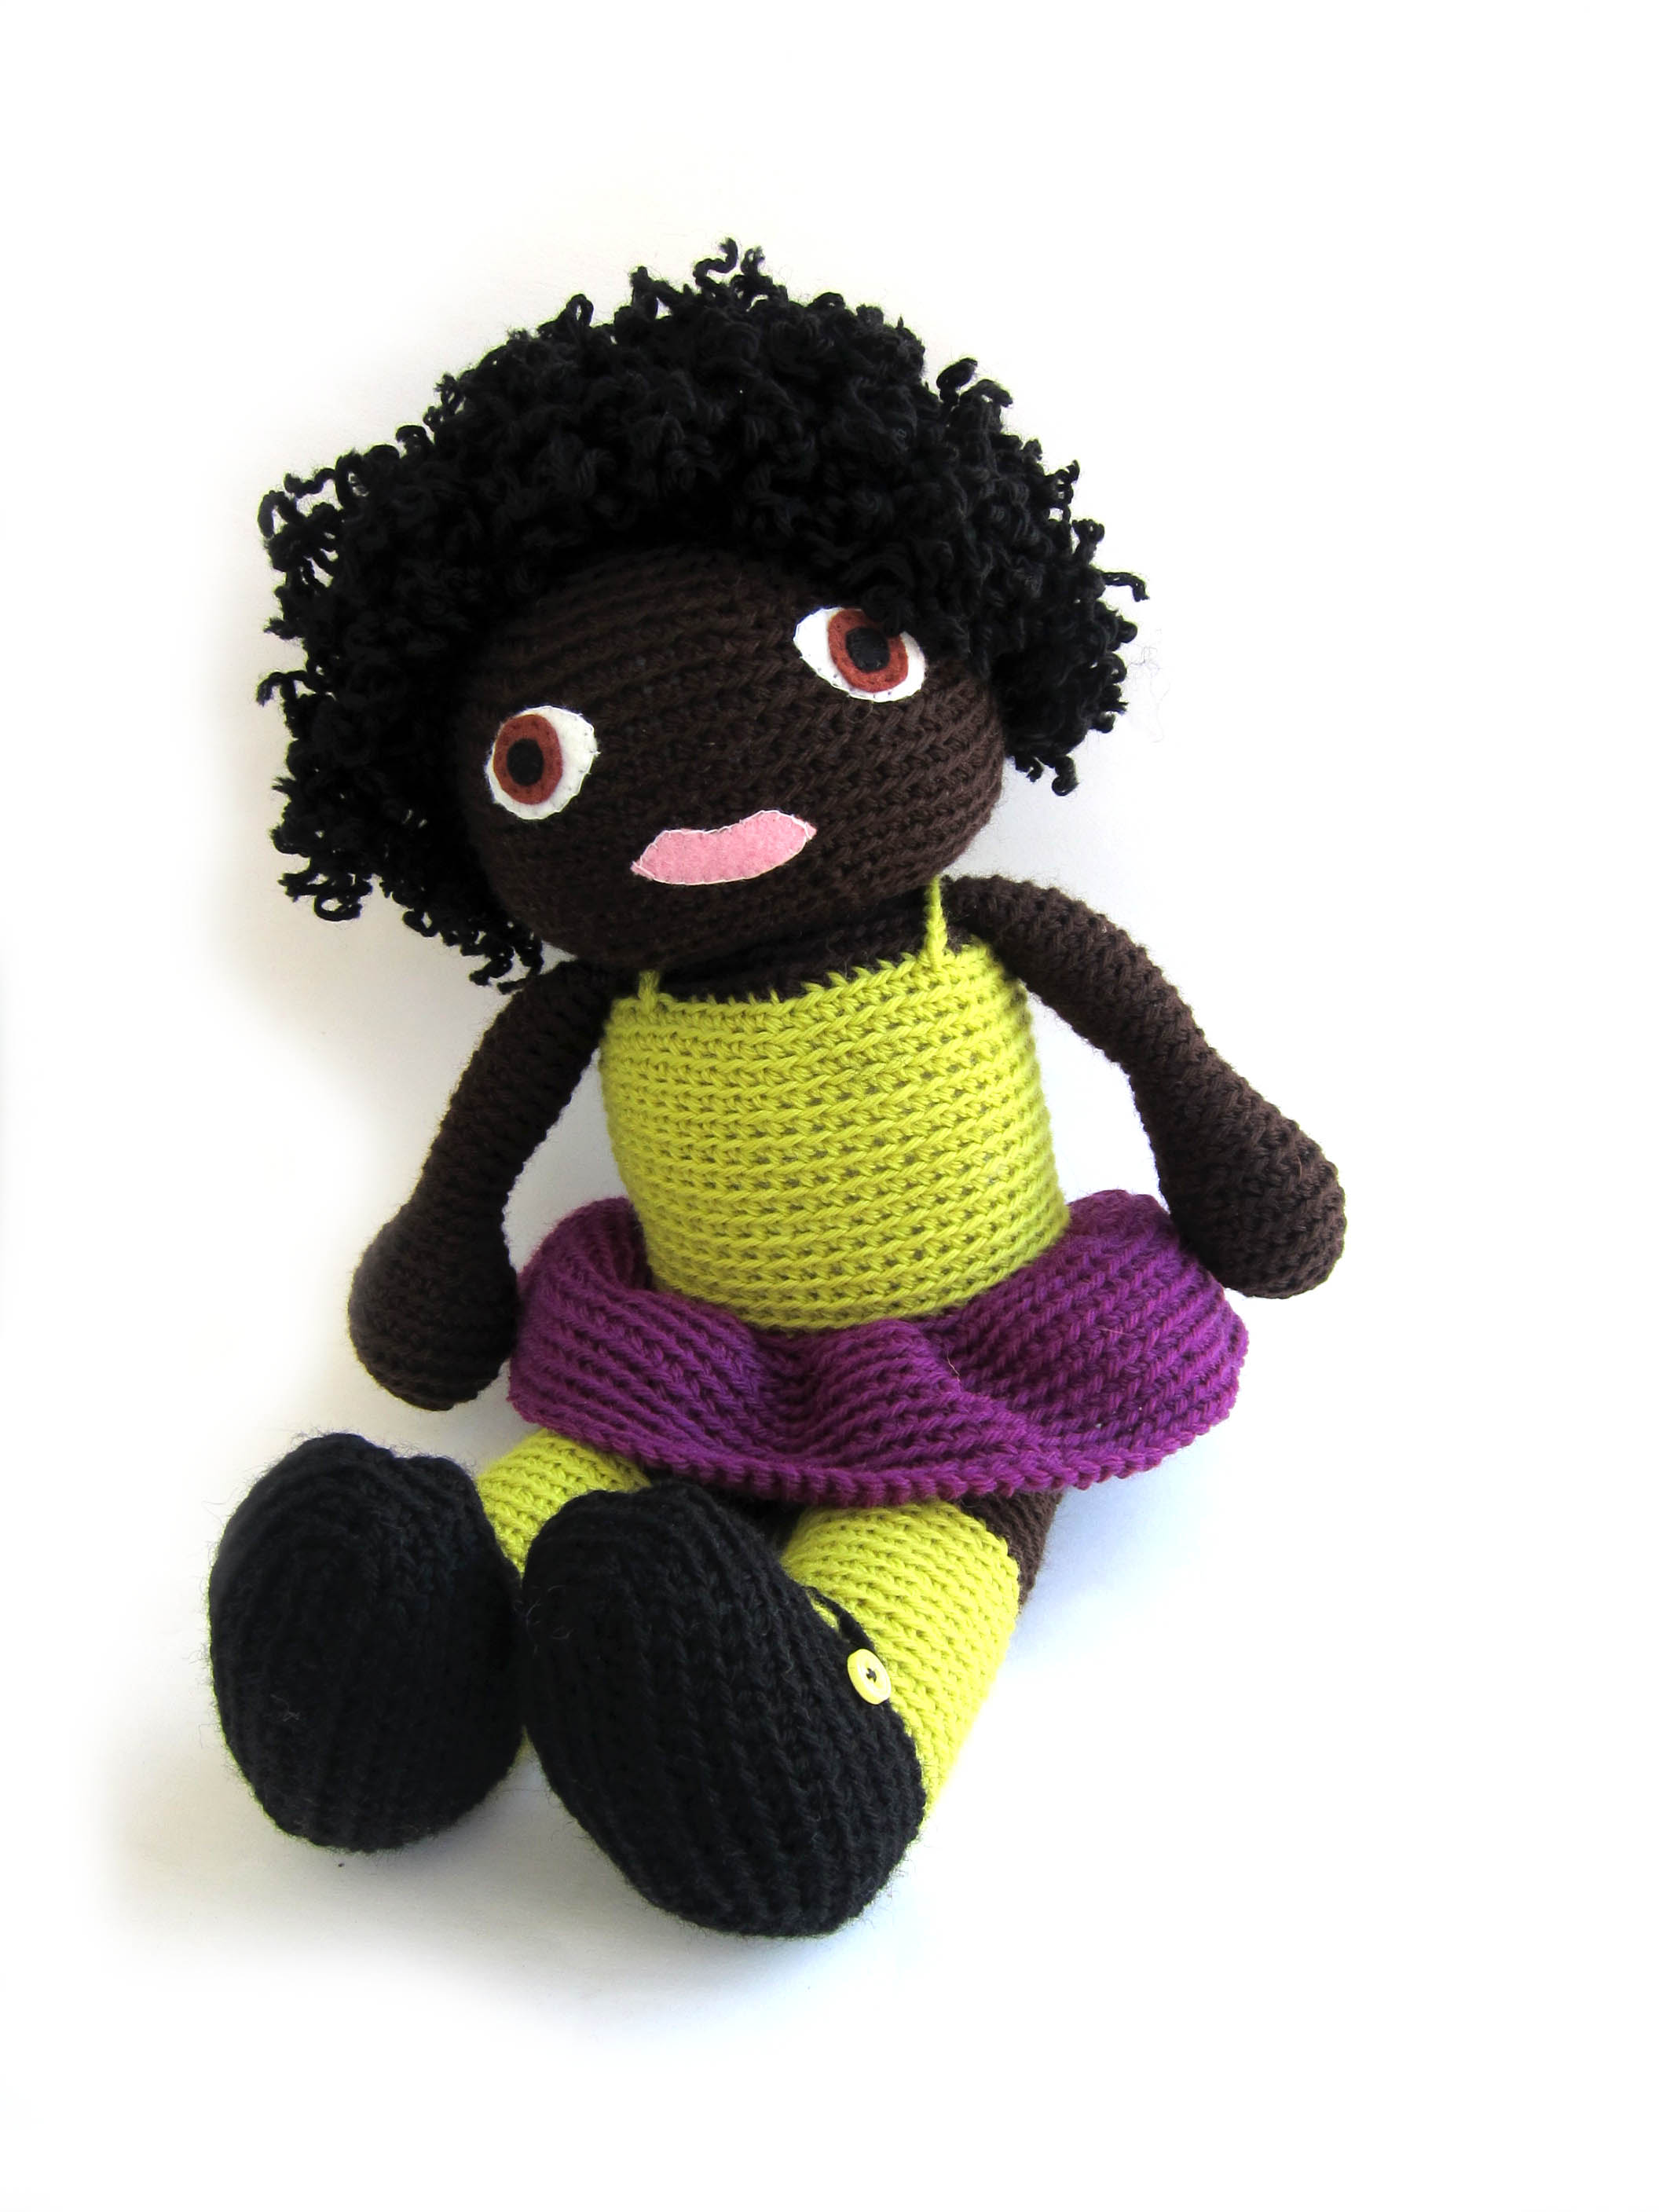
Curly Hair
The A Doll Like Me ebook contains instructions for making curly hair:
Here are a few more tips for working with curly hair for your doll:
Keep in mind that if hair is curly, it will appear shorter than if it were straight (due to the curl). You might want to cut longer strands of hair to compensate.
The curls are obtained by blocking the yarn into place. Yarns that don’t block well (like acrylic) may not end up as curly as wool yarn.
Since the curls are blocked, they will ‘come out’ if you wash/wet your doll’s hair. If you’re planning on machine-washing your doll, go with straight hair.
Straight Hair
Straight hair can be any length or style! Here are some fun suggestions/tips:
If you’d like to add bangs, simply cut some shorter strands and attach at the front of the head.
For highlights, cut yarn in a few coordinating colors of yarn.
For a bob hairstyle, attach the yarn, and then trim along the bottom so all of the hairs end at the same length.
Try putting hair in braids or pigtails!
Which style are you choosing?
The doll-a-long runs until Thursday… still plenty of time to finish yours! Tell me, which hairstyle does your doll have?
I talked about fabric grain in this video about working with polar fleece. Fleece is stretchy across the fabric (when you stretch from selvedge to selvedge) and much less stretchy when you stretch the length of the fabric (along the selvedge). Watch the video to see that stretch in action.
But what difference does the grain of the fabric make when you’re sewing softies?
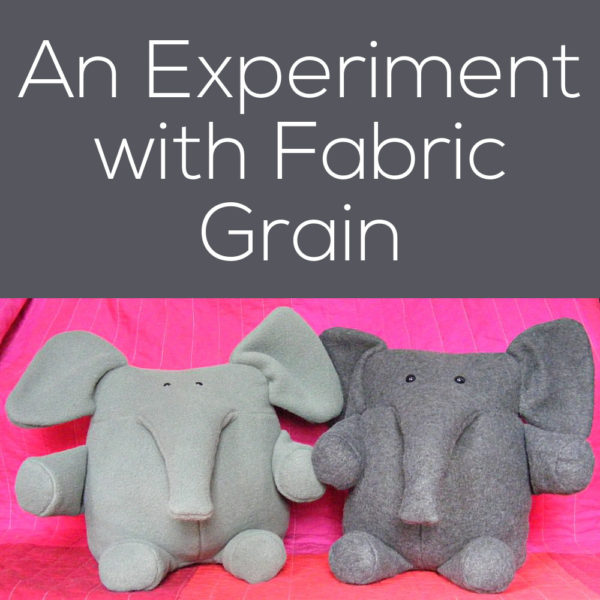
I thought I’d make two softies – one with the pieces cut on the grainline indicated, and the other cut the exact opposite way.
I made both of these elephants from the same pattern. I made them both from similar weight polar fleece. I stuffed them with the same amount of stuffing. The dark grey ones has larger eyes, but other than that they’re identical.
Except for the grain of the fabric.
I made the light grey one exactly as the pattern indicated – with the stretch running across his body. I wanted to emphasize his fatness. 🙂
I made the dark grey one with the grain running opposite of what the pattern indicated – so the stretch was running up and down his body.
Can you see the difference?
Jo said the light grey elephant looks fat, and the dark grey elephant just looks bloated – which I thought was pretty funny. 🙂
The dark grey elephant is clearly taller – that up and down stretch made a big difference there. And there’s a subtle difference in the seam between his face and his body. It’s a tiny bit more defined, because his body bulges a bit more above and below it. It’s also clear in person that the tummy of the light grey elephant bulges out more than the dark grey.
The dark grey elephant is technically made “wrong” but it doesn’t look bad. And if you make a softie (especially a big bulky one like this) with all the grainlines cut wrong you won’t have a disaster on your hands. But your finished softie will look subtly different from the one on the pattern cover.
So now you know! And knowledge is power – so now you can decide how your want the fabric to stretch for YOUR stuffed animal.
Any other fabric mysteries you’d like me to tackle? Leave a comment or send me an email.
Oh – and if you want to make that elephant yourself – you can get the pattern here. It comes with a pattern for her little mouse friend too. 🙂
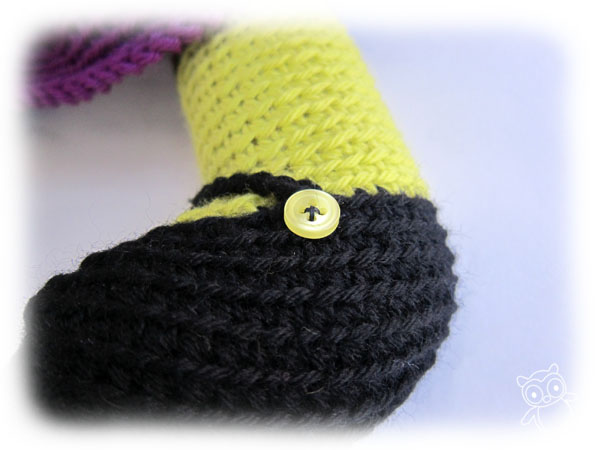
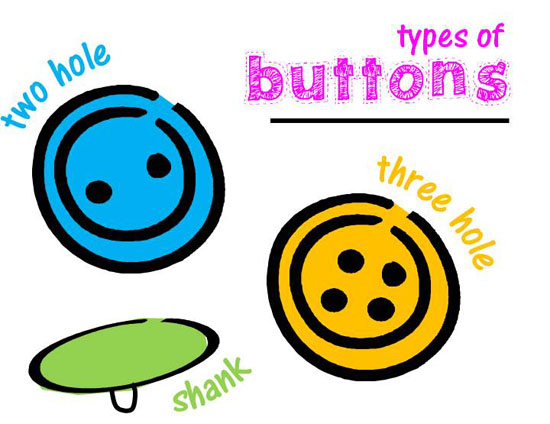
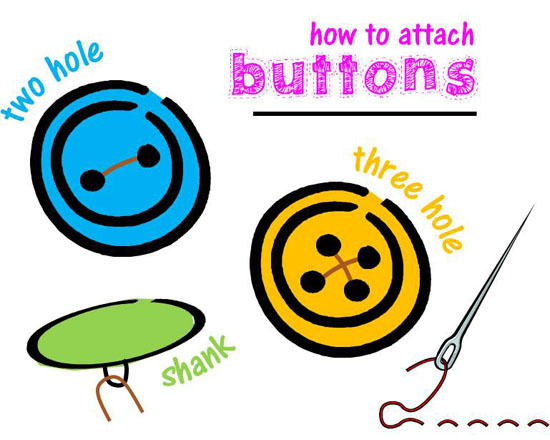
You can even find shaped buttons (like a little duck or fruits)! Use your imagination about which button would make your doll shine!
Start your thread
I begin by attaching my thread to the button. If you’re unfamiliar with sewing, watch the video in my blanket stitch tutorial to see how to get started. Instead of sewing on felt eyes (as shown in the tutorial), you’re sewing on a button!
Sew a nice pattern
How you place your stitches depends on the type of button you have. Check out my suggested stitch patterns (shown in brown thread):
Once you’ve finished firmly attaching the button, tie a knot! Ta da!
Where will you add buttons?
They’d be cute on shoes, on dress straps or even as hem decorations! Go crazy!
Happy Father’s Day!
In the crafting world, moms get a lot of credit. They’re usually the ones to pass down the actual skill of sewing, crocheting or knitting.
I think, especially on Father’s Day, it’s important to reflect on the skills that fathers pass on to their children. Even though the men in my life didn’t teach me any craft skills, they instilled in me a do-it-yourself (and entrepreneurial) spirit, and passed on the value of quality workmanship.
Read my tribute (written last year) to the great guys I have!
I never thought so many people would be interested in my yogurt-making! I make my own yogurt (once a week, if you’re curious), and every time I mention it, I get requests for a tutorial. So… here it is!
It’s not hard to do! And for folks like me (who like plain yogurt, or even flavored yogurt without lots of sugar), making your own can be easier than finding the one you like in the store. Making your own yogurt is also cheaper than buying it, although not by as large of a margin as other homemade items (like bread, for example).
The Equipment
To make yogurt, all you need to do is add a culture (ie. friendly bacteria) to warm milk and keep it at 120 degrees (f) for 6-8 hours.
There are various pieces of equipment available to help you achieve the required temperature. You can use:
a crock pot
your oven (if the temperature setting goes low enough)
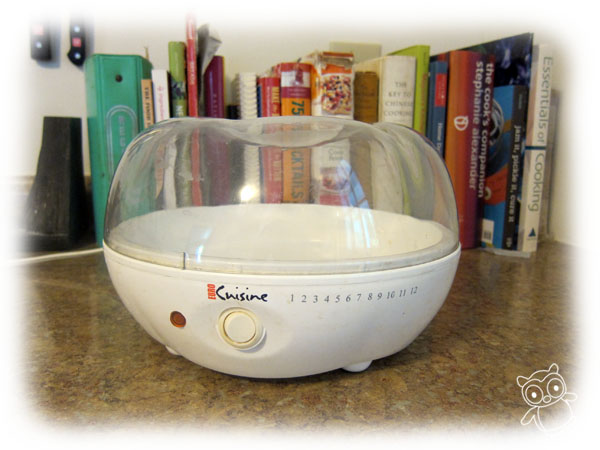
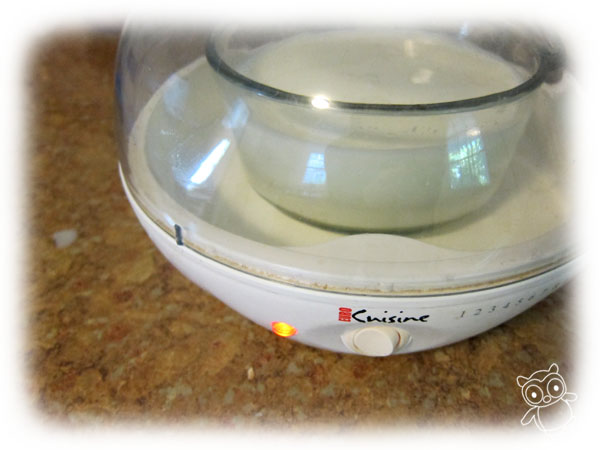
a yogurt maker
I use a Euro Cuisine Yogurt Maker, and I love it. It keeps the temperature just right (as well as the humidity) and it doesn’t use much energy to run.
It’s important to note that a ‘yogurt maker’ doesn’t ‘make’ the yogurt (in the way that you dump ingredients into a bread machine and get a finished loaf of bread), it just keeps the mixture you’ll make at the right temperature for it to turn into yogurt.
Some people balk at having a yogurt-making appliance, but I don’t have a crock pot and my attempts at using the oven have been unsuccessful. So, it works for me. You’ll have to find what works for you!
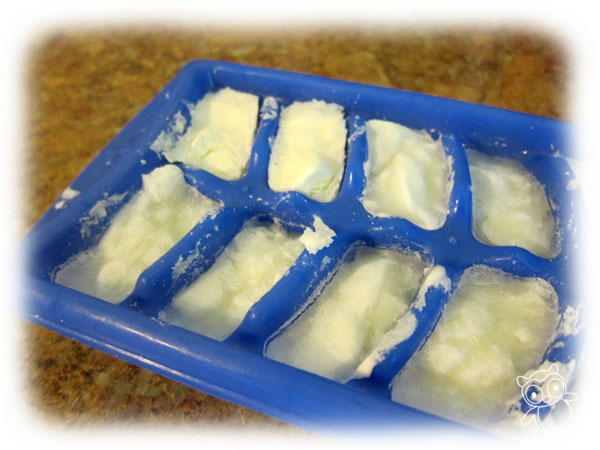
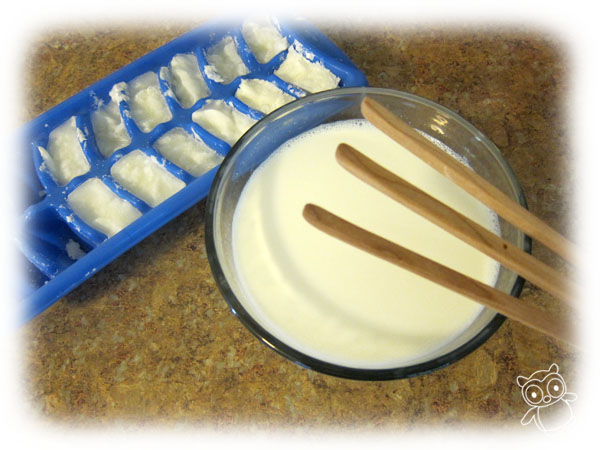
The culture
You also need some happy bacteria to start your yogurt. The easiest thing to do is buy a small plain yogurt from the store, and divide it up into ice-cube trays and freeze:
You can also find culture in powder form, but I haven’t personally tried that approach.
How to make yogurt
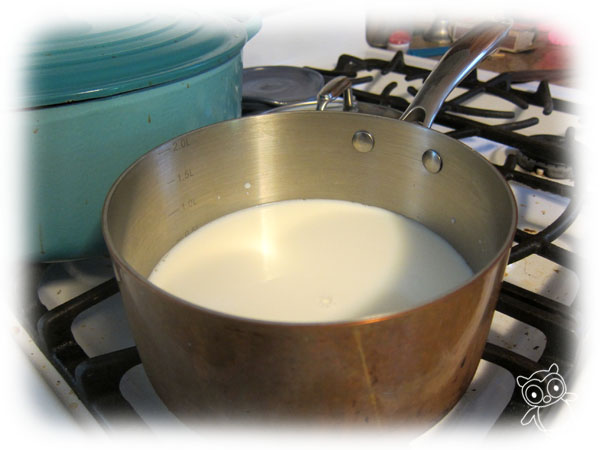
Step 1: Heat your milk to almost boiling
Heat the volume of milk that you want to become finished yogurt (which probably depends on the size of your vessel).
If the milk boils a little, it’s okay. But, try to turn the heat off before it becomes a rolling boil.
Step 2: Let the milk cool
Now, let the milk cool to 120 degrees. Some folks use a thermometer, but I just stick my finger in and see if it feels like a nice bath temperature. If you skip this step, the too-hot milk will kill your bacteria.
Step 3: Add your culture
Whether you’re using the ‘ice cube’ method, fresh yogurt or powder, add the culture in and stir with a whisk. Use about 1 tablespoon (or two ice cubes) if using yogurt as a starter.
Pour the mixture into your vessel. I, personally, found the little jars that came with my yogurt maker too difficult to clean, so I use a glass storage bowl that fits inside my yogurt maker.
Step 4: Keep warm for 6-8 hours
Using a yogurt maker, this is easy. Turn it on and wait!
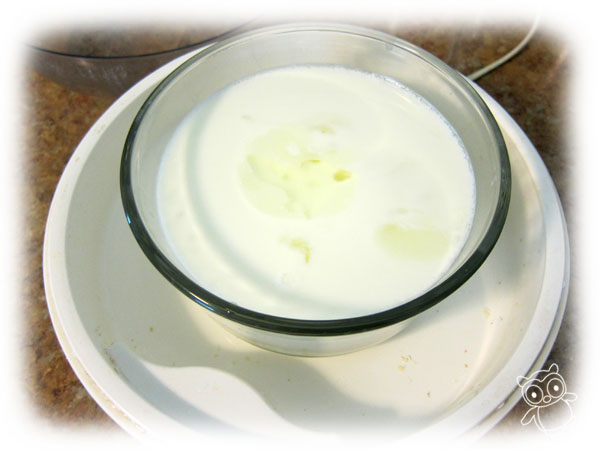
Step 5: Refrigerate and enjoy!
When your yogurt is done, it should look like yogurt. You know, solid-ish stuff with some liquid on top:
Draining the liquid is how you make Greek yogurt, but I like mine just this way. Refrigerate, and then enjoy!
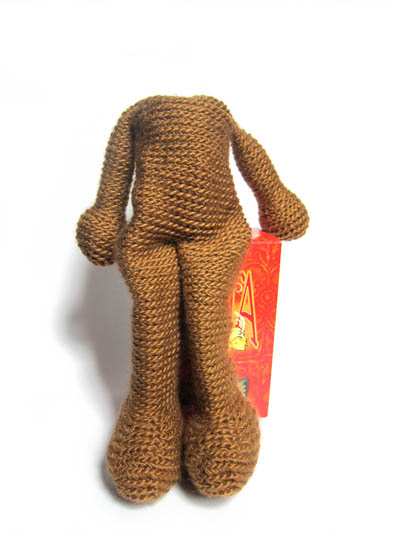
Hadley is a real cutie, made of super soft cuddle fleece with a snappy red bandana around his neck.
But look!
Make him up in black and white fabric and you have a zebra!
Oooh! Look again!
Change the fabrics again and add a twisty horn and you have a unicorn!
Do you have three children or grandchildren? Make all three versions of this one pattern! Or just do it because it’s fun. 🙂
I think I’m going to make myself a blue horse in honor of Eric Carle – one of my very favorite artists.
Want to make your own? Join the club! Everything you need is right here. Sign up now and you’ll get instant access to all four patterns released so far.
I’ve been seeing some fabulous works-in-progress and finished dolls in the Ravelry Doll-a-long thread… have I seen yours?
Today, I’m going to share some tips for crocheting on the dress/skirt/tutu for your doll!
Tip 1: Start without a head
The dress can be added after your doll has been stuffed and assembled, and many people prefer doing this because they can ‘envision’ what clothing will look best.
However, it’s actually easiest to crochet clothing on before the doll has been stuffed.
In doing it this way, you can crochet on the dress (and easily maneuver the body) without the bulk of stuffing or the head getting in the way.
Tip 2: Join the new yarn with a sc, in the back
Okay, so this ‘tip’ is written in the pattern, but I thought it was worth repeating!
It may look like the doll’s body doesn’t have a front/back… but take a look at the feet! The toes point forward to the front!
Attach your new yarn with a sc, at the center back of the body. This way, any jog in the rounds will be hidden at the back.
Tip 3: Hold your doll upside down
When attaching the dress, you want the right side of the dress fabric to face outwards.
This means holding the doll ‘upside down’ (head towards you, feet away) when you attach your new yarn.
Notice how the right side of the dress is now facing outwards? That’s important! It will continue to do so as you crochet:
Tip 4: Weave in that end!
When you finish the dress/skirt, you’ll have an end that needs to be woven in. Whip out your tapestry needle, and zig-zag it through the wrong side of the fabric!
How’s your dress coming?
Well… if you’re doing one of the girls, that is! I know a number of you are crocheting Ethan, so you don’t need a skirt… but the same tips apply to attaching the sleeves!
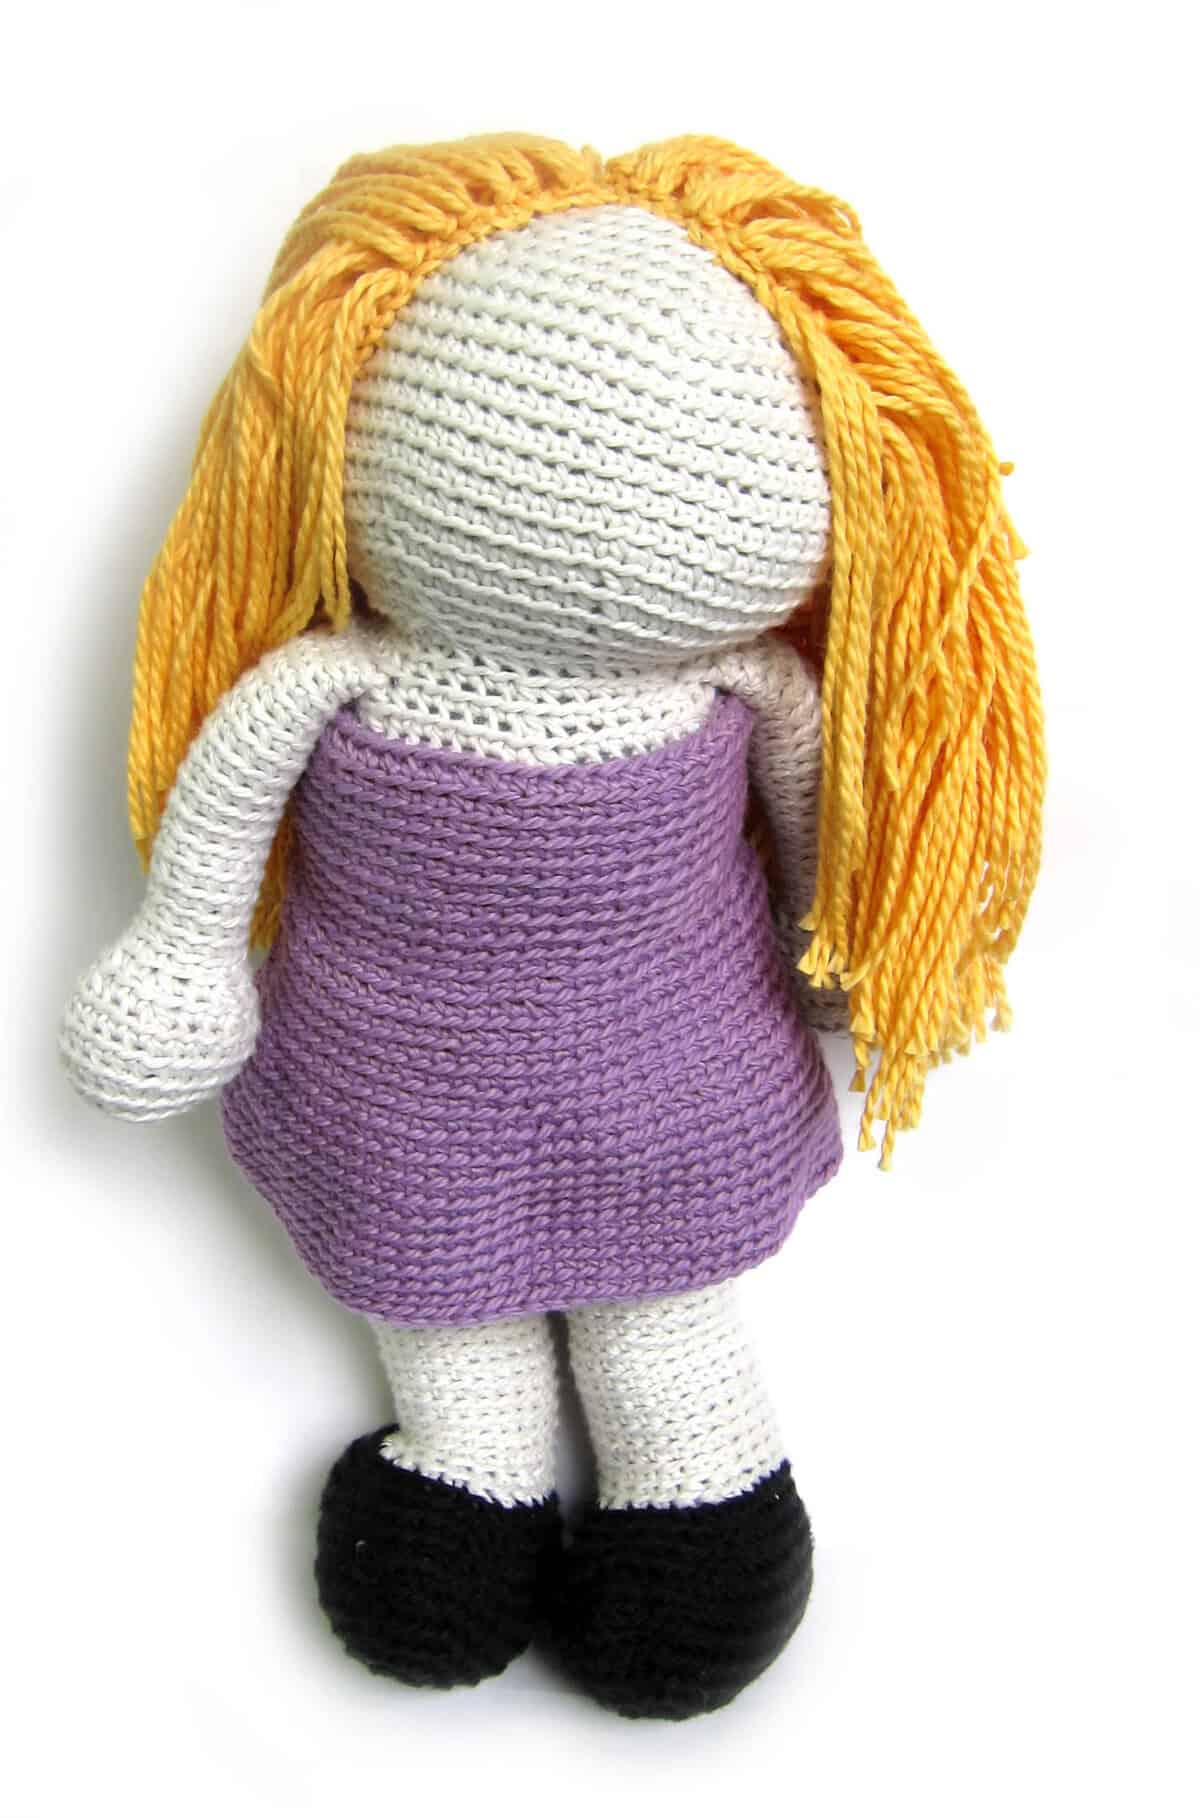
Here’s how my Avery looks:
She’s almost done! Now to make choices about her eye color…


 I usually sew my prototypes from plain white cotton. It’s easy to draw on that with a soft pencil. I can even erase and redraw it several times until I like what I see – though the surface gets a bit grubby after a few erasings. For Caterpillar Phil I tried features positioned very high on the face (to make him look chubby), very low (to make him look younger), and centered (even though I almost never like plain centered). I finally settled on something just a bit below the center line. (If you want to learn how to draw faces read Ed Emberley’s Drawing Book of Faces. It’s awesome.)
 After I’m happy with the face I go over it with a black marker, Then I unpick all my stitches to remove the face piece(s) from the prototype. I iron it flat again and trace the face onto my final pattern piece. That way you’re getting the pattern and the placement exactly like what I worked up in my sample.