I’ve gotten a lot of emails asking for a help piecing triangles. Your wish is my command!
This video isn’t a how to – that’ll come tomorrow. This one walks you through the two kinds of triangles we’re going to learn – half-square triangles and quarter-square triangles. These are the most common triangles you’ll find in quilting – you could make gorgeous quilts for the rest of your life, never repeating a pattern and never moving beyond these two basic blocks. Learning them is like learning back stitch, split stitch, lazy daisy and French knot – you can embroider any design knowing these four stitches.
In addition to teaching you the difference between the two basic triangle units, I also show you a couple of tools it’ll be handy to have when you start piecing triangles. They’re inexpensive and easy to find and they will make your life sooooooo much easier. Get them.
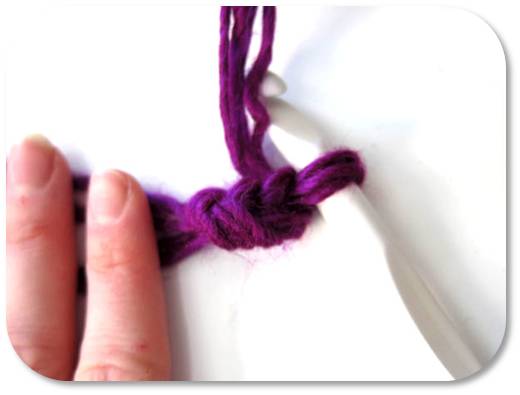
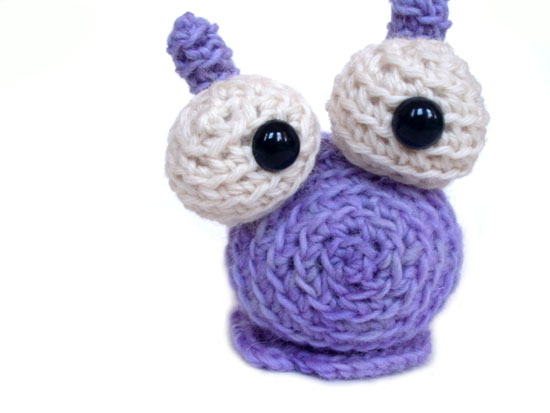
We’re right in the middle of the slug-a-long, so you can guess what I’m crocheting… a slug!
Actually, I’m making two. I’m making a yellow one, like the slug pictured in the pattern and I’m also making a giant slug:
Yarn: Vickie Howell Sheep(ish) in Magenta, 4 strands held together
Hook: size N
So much fun!
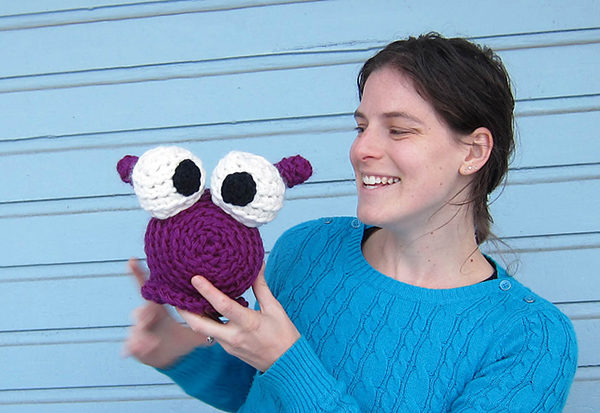
How to count the stitches in the first round
For those of you who are crocheting-a-long (or slugging-a-long?) with me, I’ve made a video to show you how to count the stitches in your first round.
In my opinion, counting the stitches in the first round is the trickiest, because there’s a weird little extra bit hanging around from your initial chain two. If you accidentally crochet into that weird bit, you’re count for the second round will be off, too!
So, have a peek at the video!
To view the video in full-screen, click play, then click on the rectangle in the bottom right-hand corner!
Of course, this tip will help you out with any amigurumi you’re crocheting… hope you’ll find it useful!
Are you working on a fun slug?
I can’t tell you how excited I am about my giant slug… it’s going to be so big!
That’s what I’ve been up to this week… how about you? I hope you have an awesome Wednesday, and get some great knitting/crocheting done this week!
If you want to check out more Work-In-Progress posts, please check out Tami’s Ami’s Blog, who’s been organizing a great WIP Wednesday blog theme! And, don’t forget to come back for FO (Finished Object) Friday!
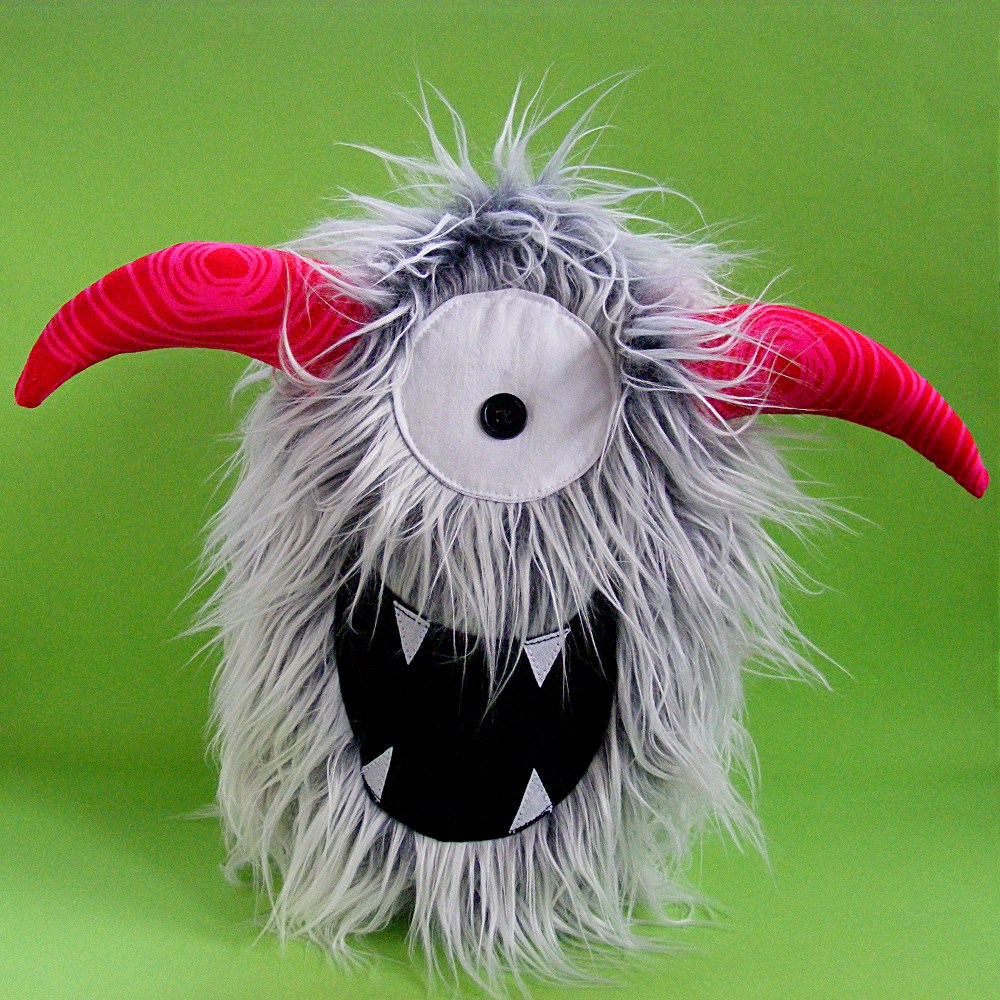
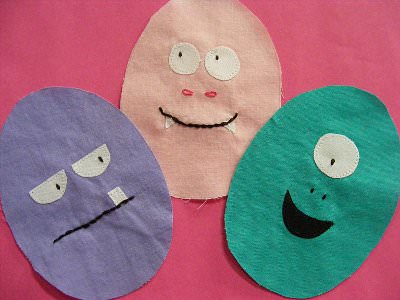
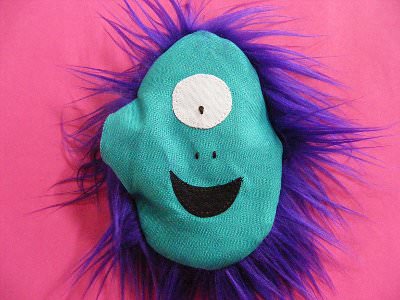
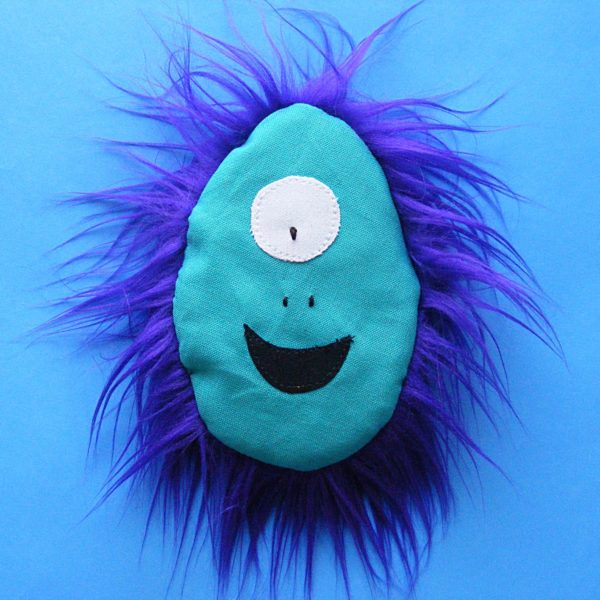
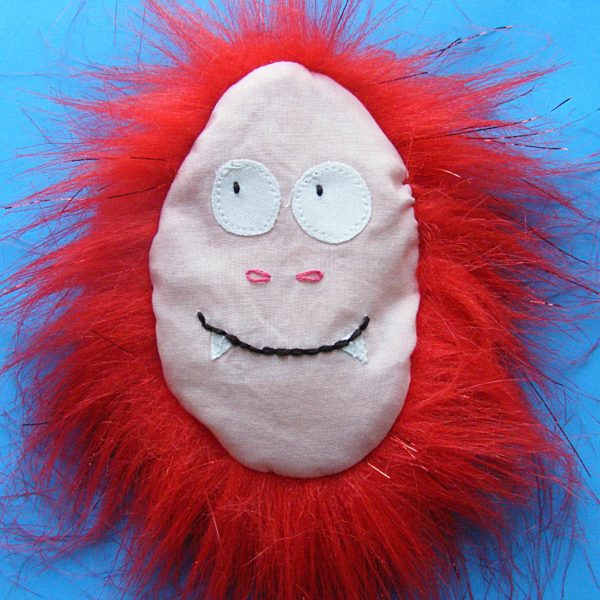
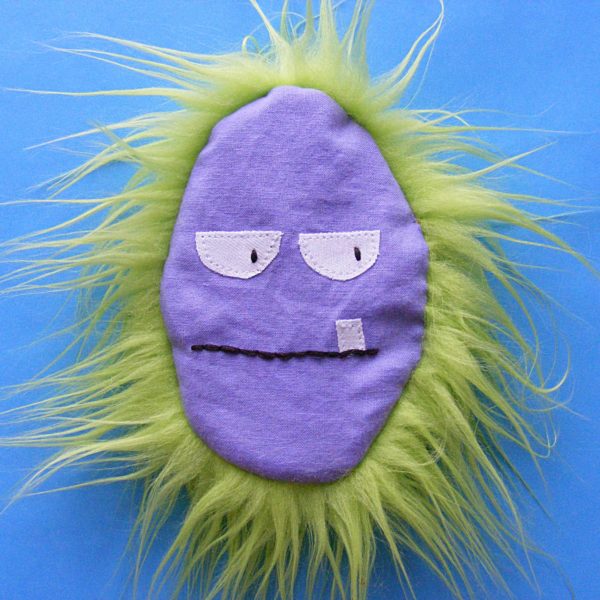
I love to use a bit of fake fur in my quilts and stuffed animals, but I get a lot of questions about how to make the eyes and other features work. How do you applique ONTO fake fur?
See the eye on the crazy blue bird monster, above? Or the giant eyeball on this monster made with the Eggheads softie pattern?
That’s the kind of thing people are asking about.
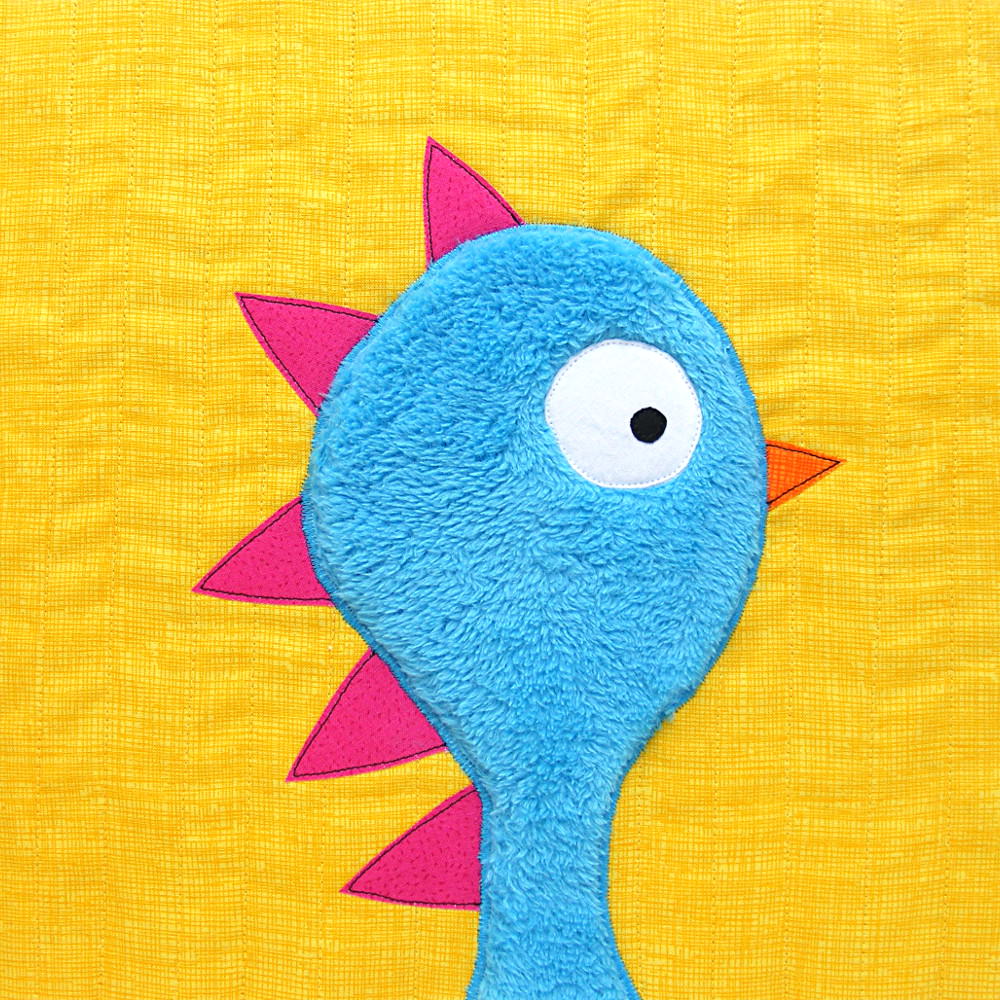
I get the same question about working with fleece, like the eye on this fleece bird/monster.
All of these use appliqué onto fake fur or fleece to sew on those eyeballs.
This video showed you how to cut faux fur without leaving your sewing space looking like a Muppet abattoir, and how to sew the pieces together so all the lovely fur ends up on the outside of your softie (without tedious seam-picking).
Now I’m showing you how to appliqué directly onto the fake fur. This is a good way to attach eyes, mouths, bellies, spots, stripes – any smooth surface you want on top of all that fur. It’s surprisingly easy!
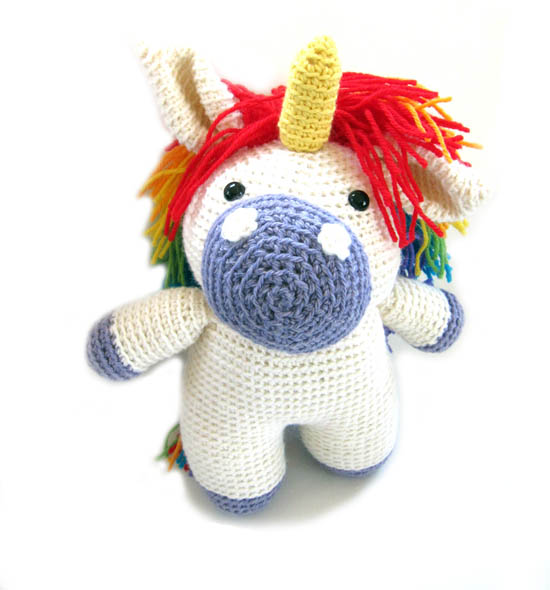
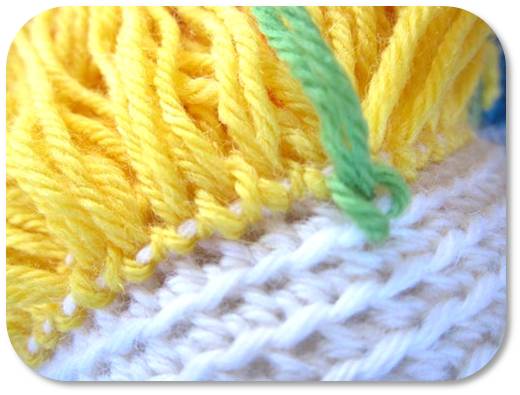
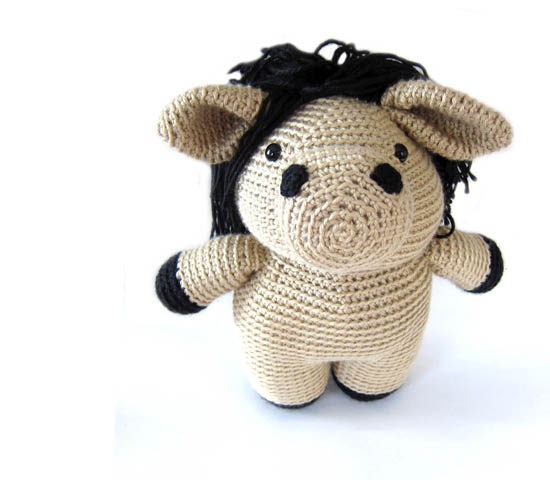
I’ll be frank. I was scared of adding hair to my amigurumi designs. It seemed complicated.
But not adding hair was limiting me… I mean, what’s a horse without a flowing mane? So, I decided to break out of my shell… and do you know what? Adding hair isn’t that hard.
This process is done after all of the crocheting & stuffing & assembly has been completed.
Step 2: Cut your yarn into pieces
The pattern will specify the length of your hair pieces. If you’re making it up as you go along, just remember that each ‘hair’ will be folded in half. So, if you want your piece to have 3″ long hair, you’ll need to cut 6″ long pieces of yarn.
The easiest way to cut multiple pieces of yarn (and you’ll need a lot!) is to find a book/box that has a circumference the length of your pieces. Wrap your yarn around oodles of times, and then cut through them all at once. Presto!
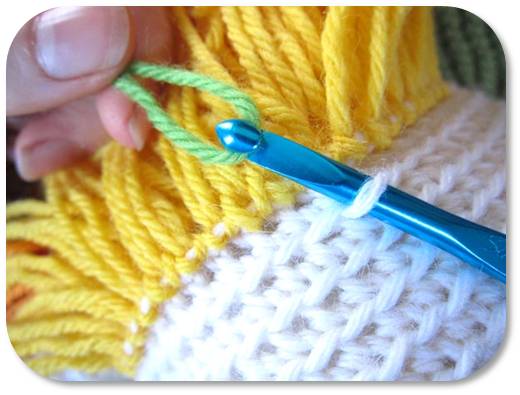
Step 3: Add your first piece of hair
Fold your yarn in half, so that there’s a U-shaped bend on one side and two ‘tails’ on the other side.
Now, look at your amigurumi. If you crocheted through the back loop, there’s lots of ‘front loops’ left behind, which are perfect for attaching hair to. They’ll also guide you to keep your hair in nice rows.
Insert your hook into a front loop, and catch the bend in your hair piece:
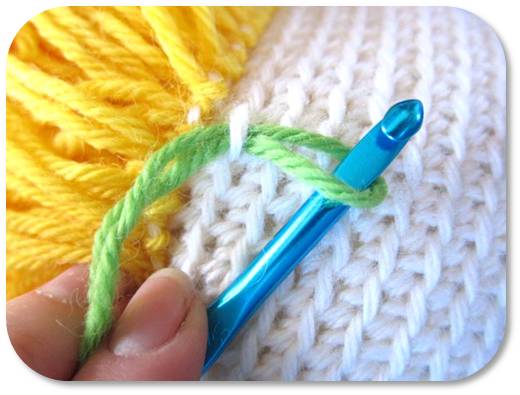
Pull the bend through the front loop, until about an inch is pulled through:
If you accidentally pull the hair all the way through… don’t worry. Just start again!
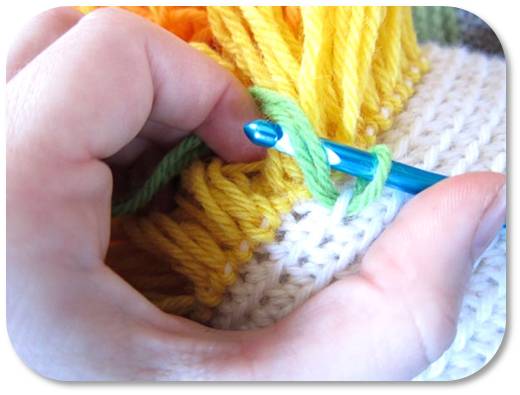
Now, your aim is to pull the two ‘tails’ of the hair through the bend.
I’m doing this by using my hook, but you might find it just as easy to use your fingers.
Pull the tails and… ta da!
Step 4: Repeat until your cutie has lots of hair!
I’m not going to fib… it’s a little slow-going (especially to obtain a lush head of hair!), but it’s the perfect easy-thing to do while watching TV!
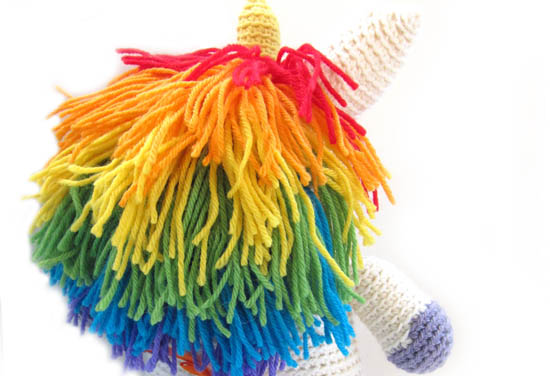
Lots of options!
For the unicorn, I made a rainbow-mane… but this technique looks just as adorable in a solid color:
Once the hair’s in place, you can feel free to style it, add a bow, or even trim the hair into a certain ‘do. I can picture this technique being used on amigurumi dolls, long-haired dogs, horses… you name it!
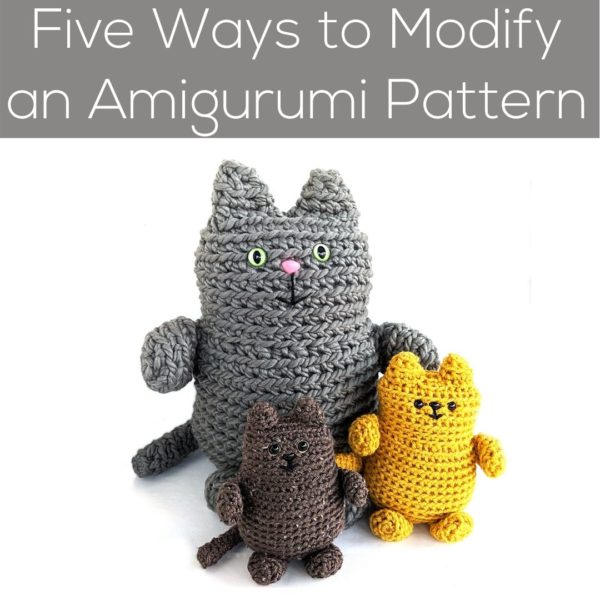
You can make the same pattern a hundred times and have a hundred different critters that all look different from each other.
Of course, you can follow the pattern exactly. There’s no shame in doing this! Use the recommended yarn, recommended hook size and follow the instructions to the letter. That way you’ll get exactly what you see on the pattern cover.
But try these fun ideas to modify an amigurumi pattern. . .
1. Change the color.
Pick any color you like! And remember – it doesn’t have to be realistic. It’s especially fun to pick seasonal colors to make a holiday version of a pattern you already have.
The easiest way to modify an amigurumi pattern is to change the color.
2. Make a giant amigurumi
To make a super-big amigurumi, pick a thick yarn and use a larger size hook. Then, follow the pattern!
I adore this giant slug that Stacey made!
If you can’t find a thick yarn, hold two strands of yarn together. It’ll be double the thickness of the original!
Don’t know what size hook to use? Don’t fret. Check the yarn label for hook recommendations, or (if you don’t have a label) guess and try a swatch. As long as your fabric doesn’t have holes, it’s a fine hook!
I like using a fingering weight yarn (i.e. sock yarn) and a size C hook… but I’ve seen others go even smaller! Try crochet thread and a steel crochet hook for a super-tiny guy!
Update: If you want more info about modifying an amigurumi pattern by changing the size, Planet June has a great post here. She actually created a conversion table showing what kind of increase or decrease to expect with which yarn sizes!
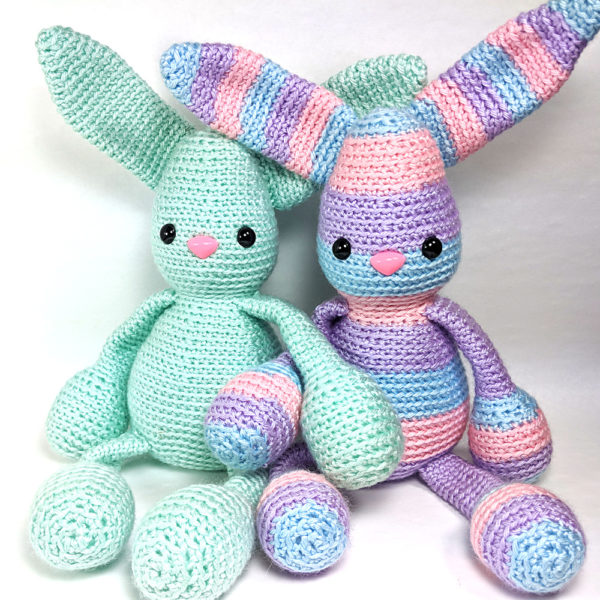
4. Add stripes or a gradient
It’s easy to add stripes to your amigurumi… just change yarn colors every few rounds. This is a fabulous way to use up all those little odds-and-ends of yarn!
I used several different colors to make a striped Easter bunny version of the Ringo Rabbit pattern.
Finding good quality and interesting faux fur can be tricky. None of the big box stores carry anything really fun, and it can be hard to shop online because you really want to touch the stuff. Plus a lot of online shops make you buy a minimum of 1 yard. That’s a LOT of fur – especially since it’s usually 60 inches wide – and can get expensive quickly.
So today I’m sharing my favorite source for faux fur. It’s called Luxury Faux Fur and it’s an Etsy shop.
Update – That shop has closed – but there are lots of other sellers on Etsy. Just search fake fur or faux fur.
Here are some things I liked about them that you may want to look for.
They sell 1/2 and 1/3 yard cuts. And they’re not cut the long way! This is HUGE. A long 1/3 yard cut would be 12 inches tall and 60 inches wide – not very practical. A 1/3 yard cut from Luxury Faux Fur would typically be 20 inches wide and 36 inches tall. That’s a much more usable cut – very nice!
The quality of everything I’ve bought from them has been great. My favorite has to be the Mongolian Shag. It has a nice shaggy 3 inch pile and comes in great colors, like this hot pink.
Jo really likes the sparkle shags – like this yellow one. The pile is longer (4 inches) and more fluffy than shaggy, with metallic mylar-ish threads scattered through it.
Unless you have these fire-breathing hand warmers, of course!
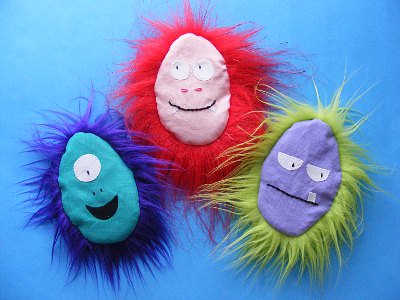
These pocket-sized monsters are easy to whip up, use scraps of fabulously fun faux fur, and are filled with rice so you can pop them in the microwave for hand-warming goodness. Add a few drops of essential oil or a bit of herb or spice to the rice and you get scented breath from your fire-breathing beasts!
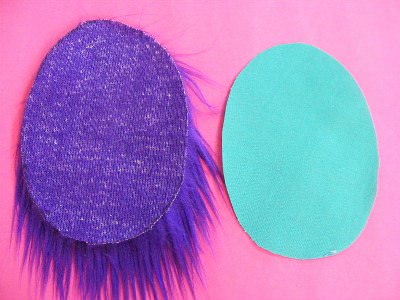
Trace around the pattern template (I like to glue mine to cereal box cardboard before I start) and cut out one oval from from the woven fabric and one from the faux fur. If you’ve never worked with faux fur before, watch this video before you cut to eliminate the flying furry bits.
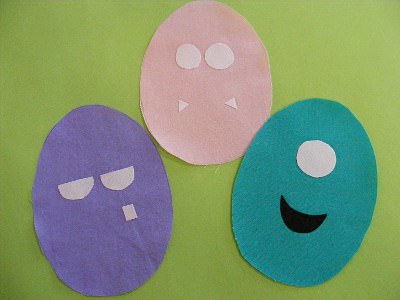
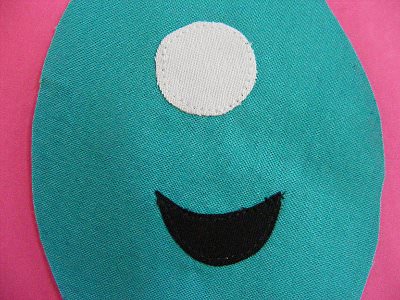
Trace the face onto the non-furry fabric. Use paper-backed fusible adhesive to applique eyes, teeth and/or mouth onto the face. If you’ve never used paper-backed fusible adhesive, you can see how to use it in this video.
You’re going to heat these babies up, so be sure to stitch around them so the pieces don’t come unstuck when they get hot. I just straight stitched around all the edges in matching thread.
Use embroidery thread to hand stitch the pupils of the eyes, the line mouths and the nostrils. I used 6 strands of DMC #3371– a very, very dark brown.
Just take simple straight stitches for the pupils of the eyes and the small nostrils. Use lazy daisy stitches for the pink nostrils (this video shows how) and backstitch the mouths. Watch this video if you don’t know how to backstitch.
If you don’t want to fuss with hand embroidery, no problem. You can use satin stitch on your machine or even use a fabric marker. It’s all good.
Pin the face to the furry back, right sides together. Tuck all the fur to the inside of the layers so you get a nice furry halo around the edge of your monster. Watch that Intraux to Faux Fur video to see how and why.
Sew the two layers together around the edge using 1/4 inch seam allowance. Leave a small opening on the side to turn it right side out. Keep that opening as small as possible – the faux fur is not fun to sew up by hand. I left about two inches.
That opening won’t be fun to hand sew, but the fur is totally worth using because…
Holy Wow! Look at that fur explosion! Tell me that’s not fun and totally worth the swearing you’ll do in a few minutes!
Fill him up with 1/4 cup of uncooked rice and any scents you want to add. This guy got 1/2 teaspoon of dried rosemary leaves (my daughter’s current favorite scent).
Sew up the opening. I think ladder stitch is the easiest to do on faux fur; watch this video to see how. Make sure you stitch through the backing of the faux fur, not just the furry pile.
Done!
This fiery redhead has two drops of orange essential oil stirred into the rice, along with a few bits of broken cinnamon stick and some whole cloves. My favorite.
This guy looks grumpy so I gave him a less pleasant scent: a few peppercorns mixed in with the rice. Mustard seed is a good angry option too.
Recommended microwave times to heat them up will depend on the strength of your oven. I do mine for 15-30 seconds each.
Using faux fur (or fake fur) can add a really special – and professional – look to your handmade stuffed animals and quilt. Furry dogs! Furry cats! Furry monsters! They’re all wonderful!
But fake fur is not an everyday fabric, and a lot of people feel like it must require a lot of special knowledge or skill to use it, so they avoid it. That’s such a shame because it’s actually fairly easy to use – if you know just a couple of simple tricks.
So here’s the first in a little series of videos showing you some tips and tricks for working with faux fur. This video covers the most basic basics – how to cut it out without having fur fly all over your sewing room, and how to sew it together so the fur ends up on the outside of your softie, instead of hidden inside your seams. 🙂
Here are a few more helpful posts about working with faux fur. . .
And here are some of my favorite patterns that can be used with fake fur. . .
Spot the Dog – that’s Spot made up in a fabulous scruffy grey fur in the top photo. He’s actually a dressable rag doll, so you do need to be careful when making him with fur. If your fur is too full and shaggy, his clothes will be quite tight. 🙂
I know you’ve been gearing up for the next crochet-a-long! This one’s a… slug-a-long!
That’s right! This month, we’re crocheting Hannah the Slug. She’s a great pattern for those of you who have conquered your first amigurumi, and are looking for a fun project where you’ll learn something new, but isn’t too difficult.
Isn’t she cute?
And of course… Hannah looks great in any color. And, since she only uses 35 yards of yarn, this is a great project for using up a little bit of leftover yarn from your stash!
Ready to join in? Grab the pattern and get started crocheting with us!
Join the CAL!
Joining in the CAL is easy! Get yourself a copy of the the pattern, grab your materials and read all the slug-a-long posts here to get all of the helpful crochet/amigurumi tips that will guide you along the way!
If you’d like, you can even stick this adorable badge on your blog (right click and save, then link the photo to this post!) to let folks know you’re joining in:
Are you in?
It’s going to be a blast… and I really hope you join us! Go ahead and leave me a comment… and tell me about your slug-a-long plans!
When my daughter was little I made her a fabulous pair of pants. They were a super simple pattern, made of deep green velvet. What made them extra special was the pink rickrack I embedded in the side seams so the little waves peeked out between the two layers. That turned them from nice, soft velvet pants into Dragon Pants – and she wore them All The Time. Such a simple addition – and so much fun.
In this video I show you how to embed rickrack in a seam. Use it to make some Dragon Pants of your own – or add it as an easy (and sturdy) embellishment to all kinds of things.
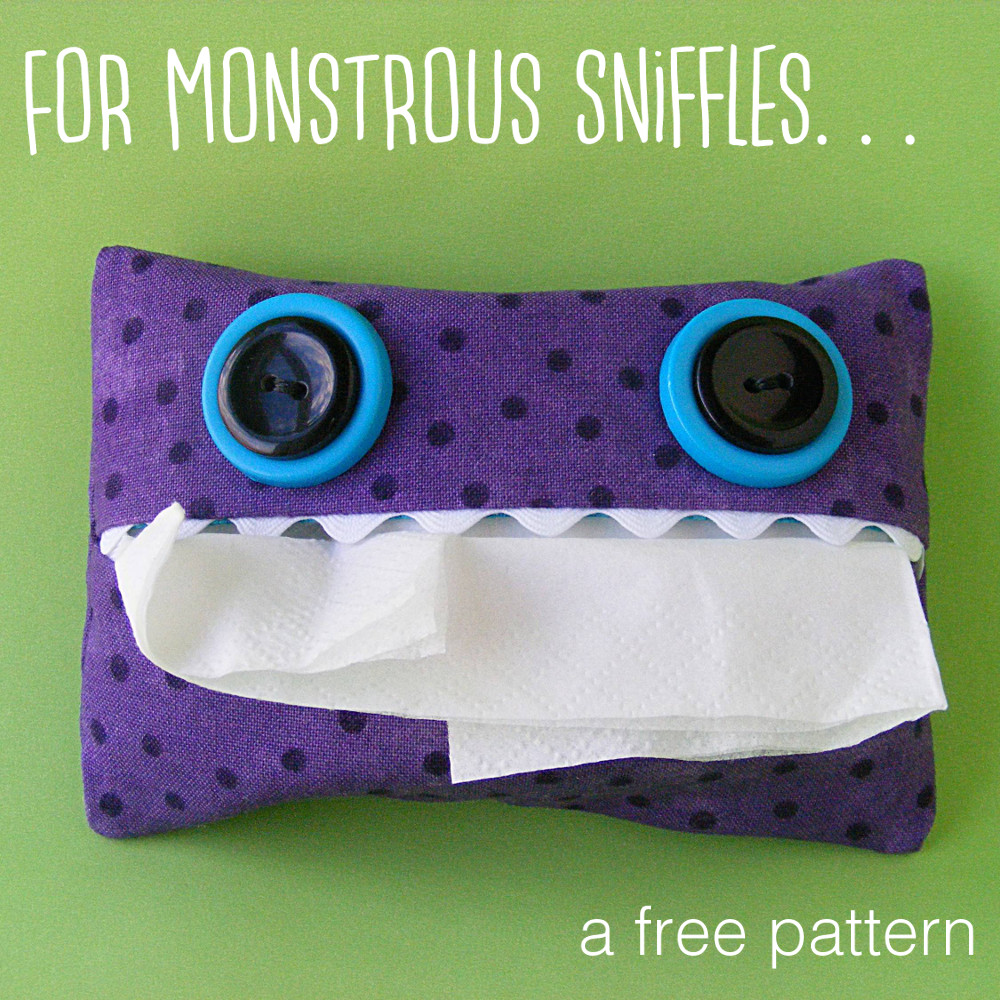
Using rickrack this way makes a great trim at the top of a lined purse or tote bag – and it makes perfect monster teeth in lots of projects – like this tissue pack. . .