Couching is the process of using embroidery stitches to stitch a cord (or yarn or decorative thread) to the surface of your fabric. It’s a fun way to add some nice dimension to your work and it can give you a really unique effect.
A receiving blanket is a baby staple – a lightweight blanket perfect for swaddling, for warmth or shade, for impromptu diaper changes, for a nursing cover-up – you can’t have too many.
Luckily, they’re really easy to whip up.
On my sample I decided to add an appliqued bear. Recognize him? It’s the Anywhere Bear applique pattern, enlarged just a bit. This pattern is currently being redesigned and is due to reappear June 2016. In the meanwhile, please check the Shiny Happy World store for many single block applique patterns that will add that extra adorable factor to your receiving blanket.
In the pattern I give instructions for three finishing techniques – one quick and easy technique for making a stack of utilitarian blankets, one slightly fancier, and one heirloom-quality.
You decide how much time you want to invest.
What you’ll need
• 1 yard each of two fabrics
• 13 feet of purchased double-fold binding (optional)
• 1/4 yard of fabric to make double-fold binding (optional)
• materials for embellishing (optional)
• sewing machine, thread, basic sewing tools
Difficulty
Very easy. Even the fancy heirloom-quality technique is very easy. It’s not harder – it just takes more time.
This is a longish video for me – but it shows you in tremendous detail how to bind a quilt.
You won’t find me being judgmental about many things – but I’m pretty dang picky about quilt bindings. It kills me when I see a quilt that’s beautifully pieced, meticulously quilted. . . and sloppily bound. All that work! All that money (fabric isn’t cheap, you know)! It’s like buying a beautiful piece of art and sticking it to the wall with masking tape.
Binding a quilt the “right” way is NOT hard – but it does involve some hand work. There’s just no way around it. I’ve tried lots of all-machine binding techniques and I’ve never liked the results of a single one of them. So pop in a movie, get comfy, and give your beautiful quilt the binding it deserves. Don’t you know it’s going to be an heirloom?
If you remember how to bind a quilt but you just popped back over for a reminder of how wide to cut your strips – I cut mine 2 1/4 inches wide. I cut mine on the straight grain – there’s no need to cut on the bias unless you’re going to go around curves.
Use all your favorite embroidery stitches to make mending patches prettier AND stronger. First watch the video for the how and why – and then scroll down for some detailed examples of finished patches from a pair of my jeans.
And now for the samples. These are all from one pair of jeans. 🙂
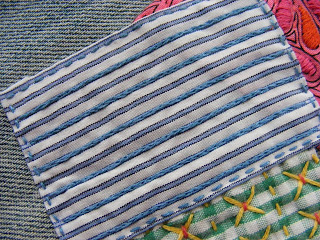
This one is super easy. I used a running stitch around the edge of the patch, and then I used split stitch over every other stripe.
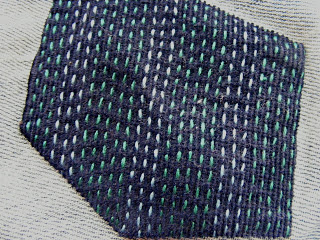
This is just running stitches – lots of running stitches. It’s stitched on corduroy so I was able to use the space between the ridges to as a guide to keep my rows of stitching straight and parallel. I used a two different shades of blue thread.
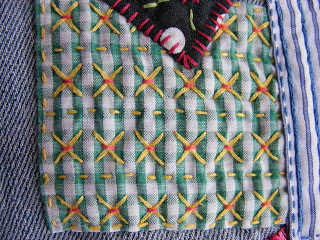
On this one I used the gingham print of the fabric as a grid to make nice, even cross stitches and running stitches. The stitches of my Xs were pretty big – possible to snag on things – so I took tiny little straight stitches in pink at each intersection to strengthen the whole thing and add a fun accent.
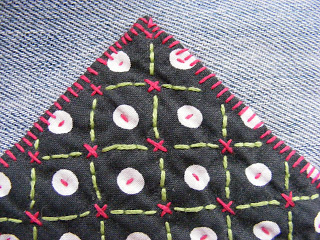
This started as a plain black fabric with white polka dots. First I took little straight stitches in the polka dots and made cross stitches in the spaces between them. That didn’t make the stitching as close as I wanted so I added a grid of backstitches in green.
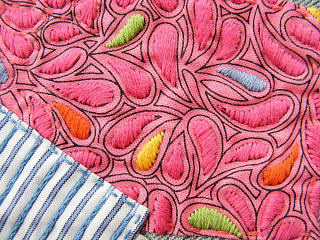
And finally – this one was a real labor of love. I satin stitched over each drop shape in the fabric print – matching the color of the printed drop. It took a long time but the texture is luscious.
If the tear is in a tricky spot – like when the rip is at the edge of a pocket – take a look at this post.
Have fun with some patches! Soon you’ll be looking for an excuse to mend!
Here are all the posts about finishing embroidery projects.
Cross stitch is really easy. It truly is just a little stitched X. But there are a couple of tricks that will make your stitching look good – especially if you’re using cross stitches to fill an area – and that’s what I show you in this video.
I recommend using safety craft eyes (the ones with little ridges on the post) for my amigurumi because they’re difficult to remove (meaning they’ll withstand the pulling and prodding of small children). The downside, however, is that they’re difficult to remove – especially when you make a mistake in positioning them.
The best defense, obviously, is to be sure you like them before putting them in (check out my tips on positioning eyes for help!), but we all make mistakes. Ashley recently asked how to remove a pair of eyes… so Ashley, this post is for you!
First, you’ll need your toolbox… here, you’ll see my amigurumi owl head (with eyes that I needed to remove because I didn’t like where I positioned his orange eye-circles) and a pair of pliers.
Now, this part can be a little scary… you’re going to have to cut the post, above the washer. Alternatively, you can use a utility knife to cut the washer off of the post (if you’re desperate to save the eye itself), just make sure you don’t let that knife nick your fingers!
Ta da! Now you can remove the eye with ease. Yes, you lost an (amigurumi safety eye) in the process… but you saved your stuffed animal! Hooray!
Here are handy links to all the posts about amigurumi eyes. . .
This week we’re continuing work on my little doll quilt. Last week I showed you how to layer and baste the quilt, this week I show you how to quilt it on the machine.
I forgot to mention it, but I always use a walking foot when I quilt. I don’t think about it because I use it for almost all of my sewing, but it’s important, especially on a bigger quilt. The walking foot helps to feed the top and bottom layers through evenly.
I didn’t show the process of actually changing the tension on the machine, adjusting it up or down, sewing a few inches, checking the results, adjusting some more, etc. I showed the final results (so you can see how many tries it can take to get it right) but it occurred to me that I should tell you where and how to adjust the tension. On MOST machines (though certainly not all – that would make things too easy) there is a numbered dial on the left hand side – the side where the needle is. The numbers usually run from 1-10 and you normally sew with it somewhere in the 4-6 range. It doesn’t hurt anything to play around with the tension setting, so do some experimenting with two colors of thread and you’ll see how it works.
Here are all my posts about layering and basting your quilt, and the final round of quilting.
Here are all my posts about hand quilting and Big Stitch quilting. I don’t use these techniques with fusible applique or Quilt As You Go, but I LOVE using Big Stitch Quilting with my cheater fabric.
A lot of amigurumi are made by crocheting in the round. When teaching classes, I’ve noticed that counting rounds is something that gives a lot of crocheters trouble… I mean, who wants to count every stitch? In this post, I’ll show you the shortcut that I use for counting rounds.
Let’s do a little example.
I’ve been following my pattern instructions for the first three rounds (read this post if reading patterns baffles you!), and now my pattern says:
Rounds 4-6: sc in each st (18)
How can we do this without counting?
I take a locking stitch marker (the orange thing in the photo above), and lock it onto the last stitch of the round. Then, I’m just going to keep crocheting around and around until I’m exactly 3 rounds above my marker!
Check out the photo above… and you’ll also see why I prefer crocheting through the back loops- each round leaves behind a little horizontal ridge that makes each round super-easy to count!
So, give this trick a try, and you can probably ditch your row counter!
Once you’ve pieced your quilt top, you need to know how to baste that quilt. That’s the step that turns your quilt top into a quilt, and it’s what I show you in this video.
Technically, basting a quilt is just temporarily pinning or stitching or glueing the layers together to help them in place while you do the quilting – but in this video I’m going to show you how to make a quilt sandwich (layering together the backing, batting, and your quilt top) and how to baste those layers together.
If you’re making a Quilt As You Go quilt, the batting is already quilted to your quilt top, so all you’re layering together is that quilted top and the backing.
In the video I showed how to baste a quilt with pins – but you can also baste with thread (sewing really big running stitches through all the layers) or with spray adhesive. Pins are my favorite method and these are the curved safety pins I use to baste all my quilts.
Want some quick instructions on how to piece together the simple scrap quilt I use in the demo? It’s super easy.
I dug through my scraps and cut 2-inch strips out of anything at least 2 inches wide. The strips were all different lengths – just what I wanted.
I joined all the pink strips together, all the orange together, and all the yellow together so that I had a long strip of pinks, a long strip of oranges, and a long strip of yellows.
Then I cut those long strips into shorter strips, 18 inches long. I used 11 of these 18-inch strips.
Arrange them in a way that looks good to you. I thought the yellow really popped out, so I alternated yellow strips with pink or orange strips. Play around with what you have until it looks good to you.
Sew the 18-inch strips together, press it all nice and smooth – and voila! You have a quilt top!
I did the same thing for the back with blues, greens, and purples. I cut those strips 20 inches long and used 13 of them so that the back would be a bit bigger than the quilt top.
By the way – this is just the right size for an American Girl doll or any of the Dress Up Bunch rag dolls. 🙂
Here are all my posts about layering and basting your quilt, and the final round of quilting.
Here are all my posts about hand quilting and Big Stitch quilting. I don’t use these techniques with fusible applique or Quilt As You Go, but I LOVE using Big Stitch Quilting with my cheater fabric.
Want to learn the basics of hand embroidery with an easy online workshop – totally free?
Sign up for Embroidery 101 here. You’ll learn how to get started, the tools and supplies you’ll need, the four most basic stitches, how to transfer your pattern and how to display your work.
If you already know the basics – sign up for Embroidery 201. It’s also free! You’ll learn how to stitch on specialty fabrics like felt and stretchy T-shirts. Plus you’ll learn lots and lots and LOTS more stitches – all my favorites!
Here’s a free cat embroidery pattern for you to play with!
My daughter has been drawing cat faces all over the place.
It’s her new favorite doodle.
She drew one recently in chalk on a slate stone in our yard and I loved the effect – so that’s what I was going for with this simple line drawing.
The image is just under 6 inches square. It would be cute on a tote bag or T-shirt – or a towel. It also fits perfectly into a 7″ hoop.
This is a great pattern for beginners. You only need one stitch and there’s nothing too fussy or detailed about it.
I stitched it in a pale (chalky) color on a dark background and with a slightly thicker thread than I usually use.