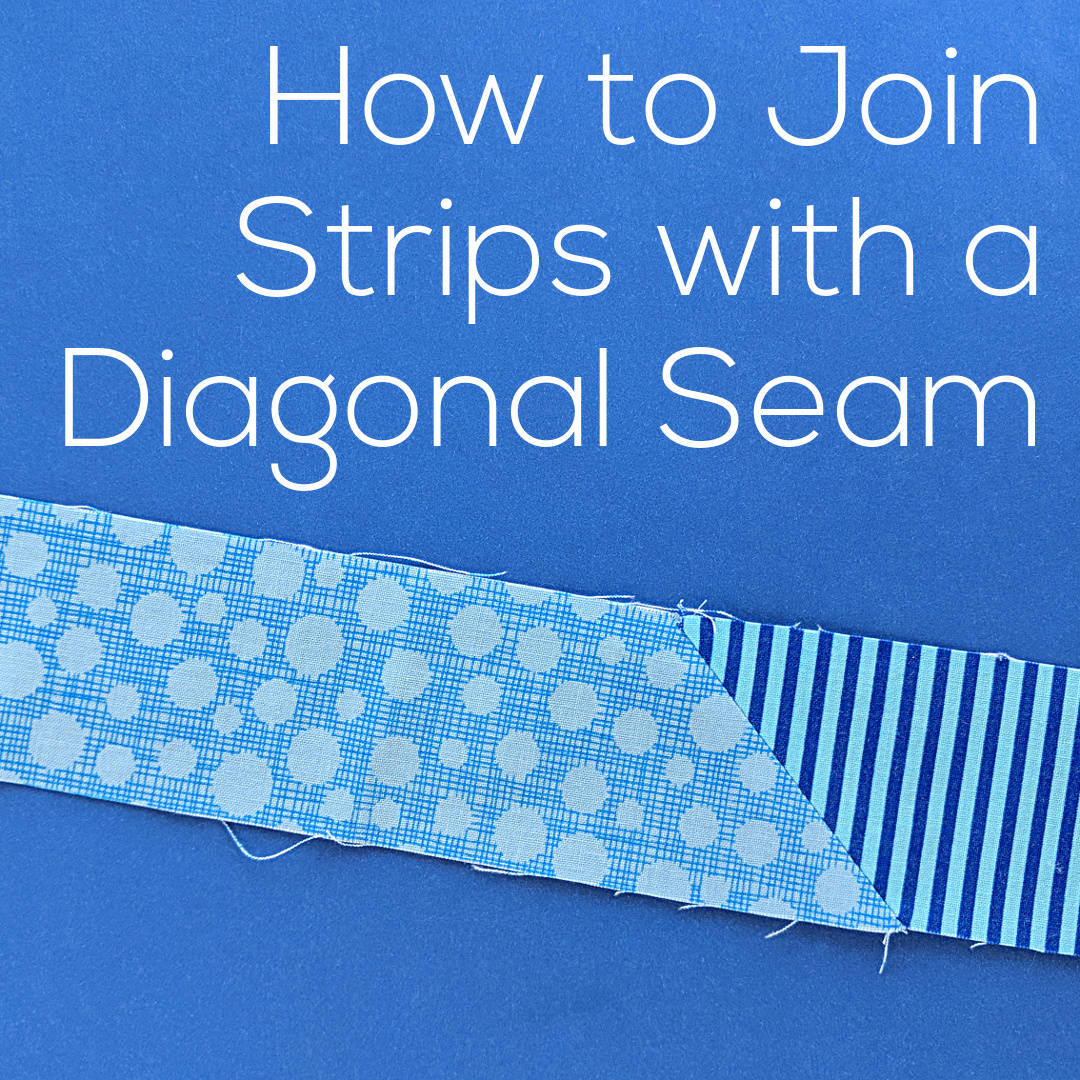
I almost always use scrappy bindings in my quilts and I get a lot of questions about how I get those diagonal seams.
I show the diagonal seam in my video How to Bind a Quilt – but I never actually showed how to do it.
Until now.
See how easy that is?
I use this method any time I’m joining strips together. For me that’s usually binding a quilt, but it can also be for bias strips on bags, clothing, and any other application.
Make an easy baby gift with this free receiving blanket pattern.
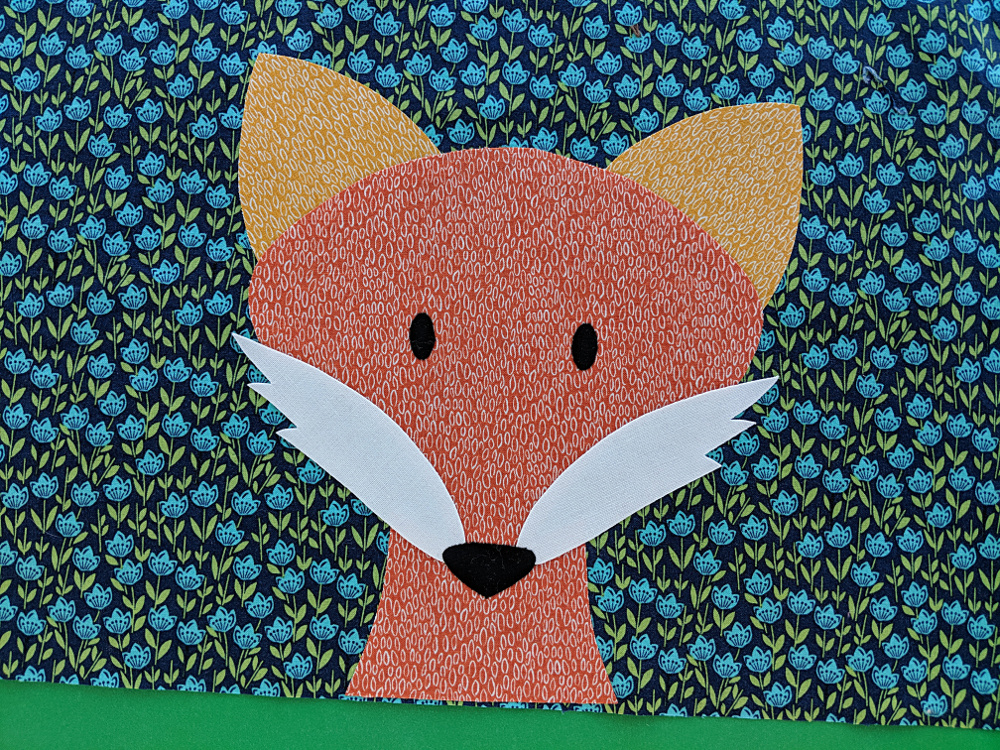
A receiving blanket is seriously the easiest baby gift you can make. Choose fabulous fabric and no embellishment and you can make one in 15 minutes. Even if you add an applique (like the fox shown) you can still make it in less than an hour.
Here’s how. . .
Step 1
Cut two squares of fabric about 36 inches square.
Any kind of fabric is fine. I’m using quilting cotton here (from the GORGEOUS Into the Woods collection from Michael Miller Fabrics) but I’ve also used flannel, terry cloth, baby corduroy, and more. Just about anything goes.
I like to use one fabric for the front and a different fabric for the back, but you don’t have to.
And when I say “about” 36 inches I really mean it. I bought one yard cuts of fabric, but by the time I washed them and squared off the cut ends they were more like 34 inches. So I cut two 34 inch squares. No problem.
Step 2
Put the two squares of fabric right sides together and pin all the way around the edge.
Take a little care here and make sure you get everything laid out and pinned neatly. If your squares aren’t really lined up, it will show in the finished blanket – and make the pressing in Step 5 hard.
Step 3
Sew almost all the way around the edge, leaving an opening big enough to fit your hand for turning right side out. I usually leave 4-5 inches. Use a quarter inch seam allowance – or something close. I use the edge of my favorite presser foot as a guide which makes a seam more like 3/8 inch and that’s just fine. 🙂
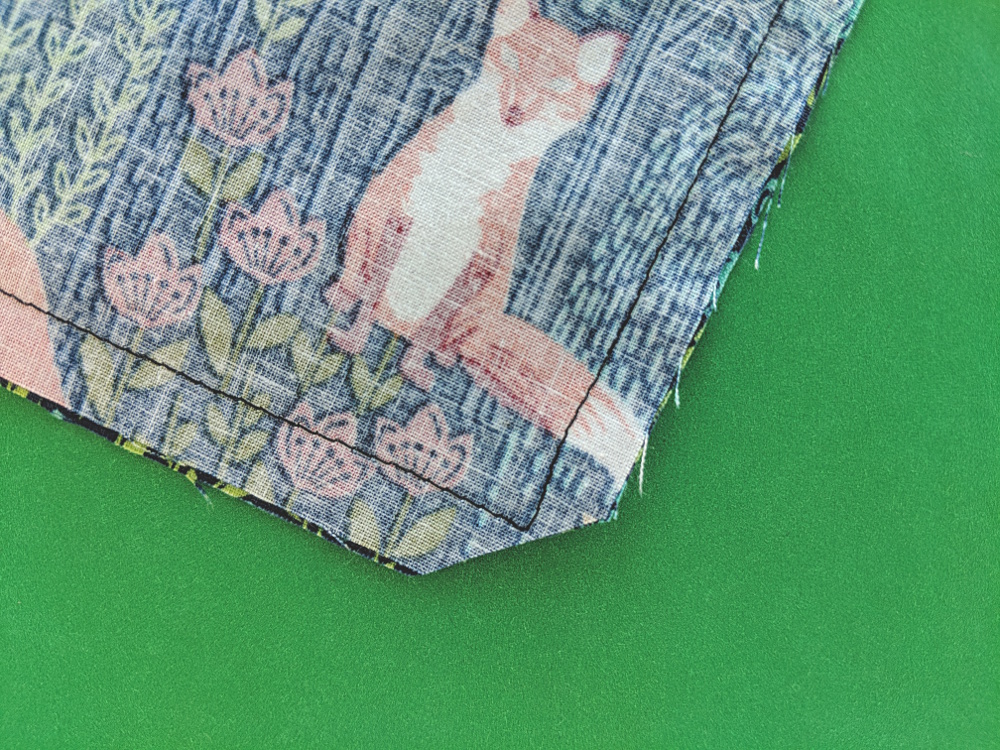
Step 4
Clip the corners right up close to the stitching.
This will eliminate bulk in those corners when you turn it right side out.
Step 5
Turn the blanket right side out – taking care to poke out the corners and smooth all the edges. Press the edges flat.
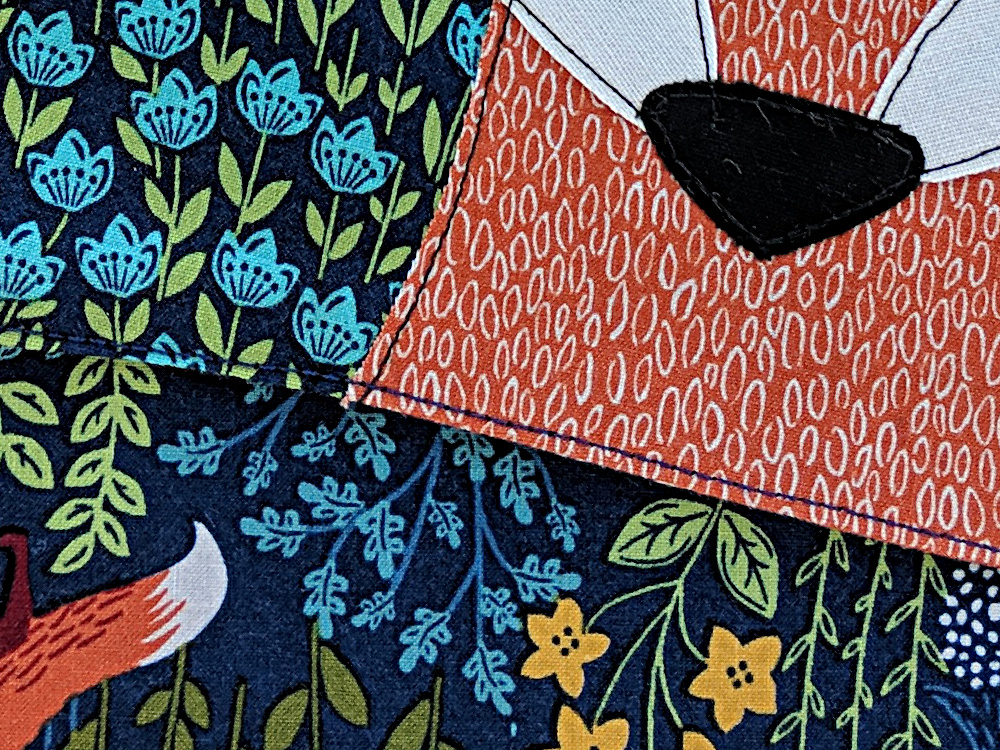
Step 6
Now you have a choice. You can leave the edges as they are and hand sew the opening. I like to use ladder stitch (that links to a video tutorial) for invisible stitching.
Or (if you want a no-hand-work project) you can topstitch your blanket all the way around the edge. That will make your seams extra secure and sew up that opening at the same time.
Here’s how close to the edge I typically stitch.
Finished!
But that’s not all. This receiving blanket pattern is basically a blank slate for you to play with.
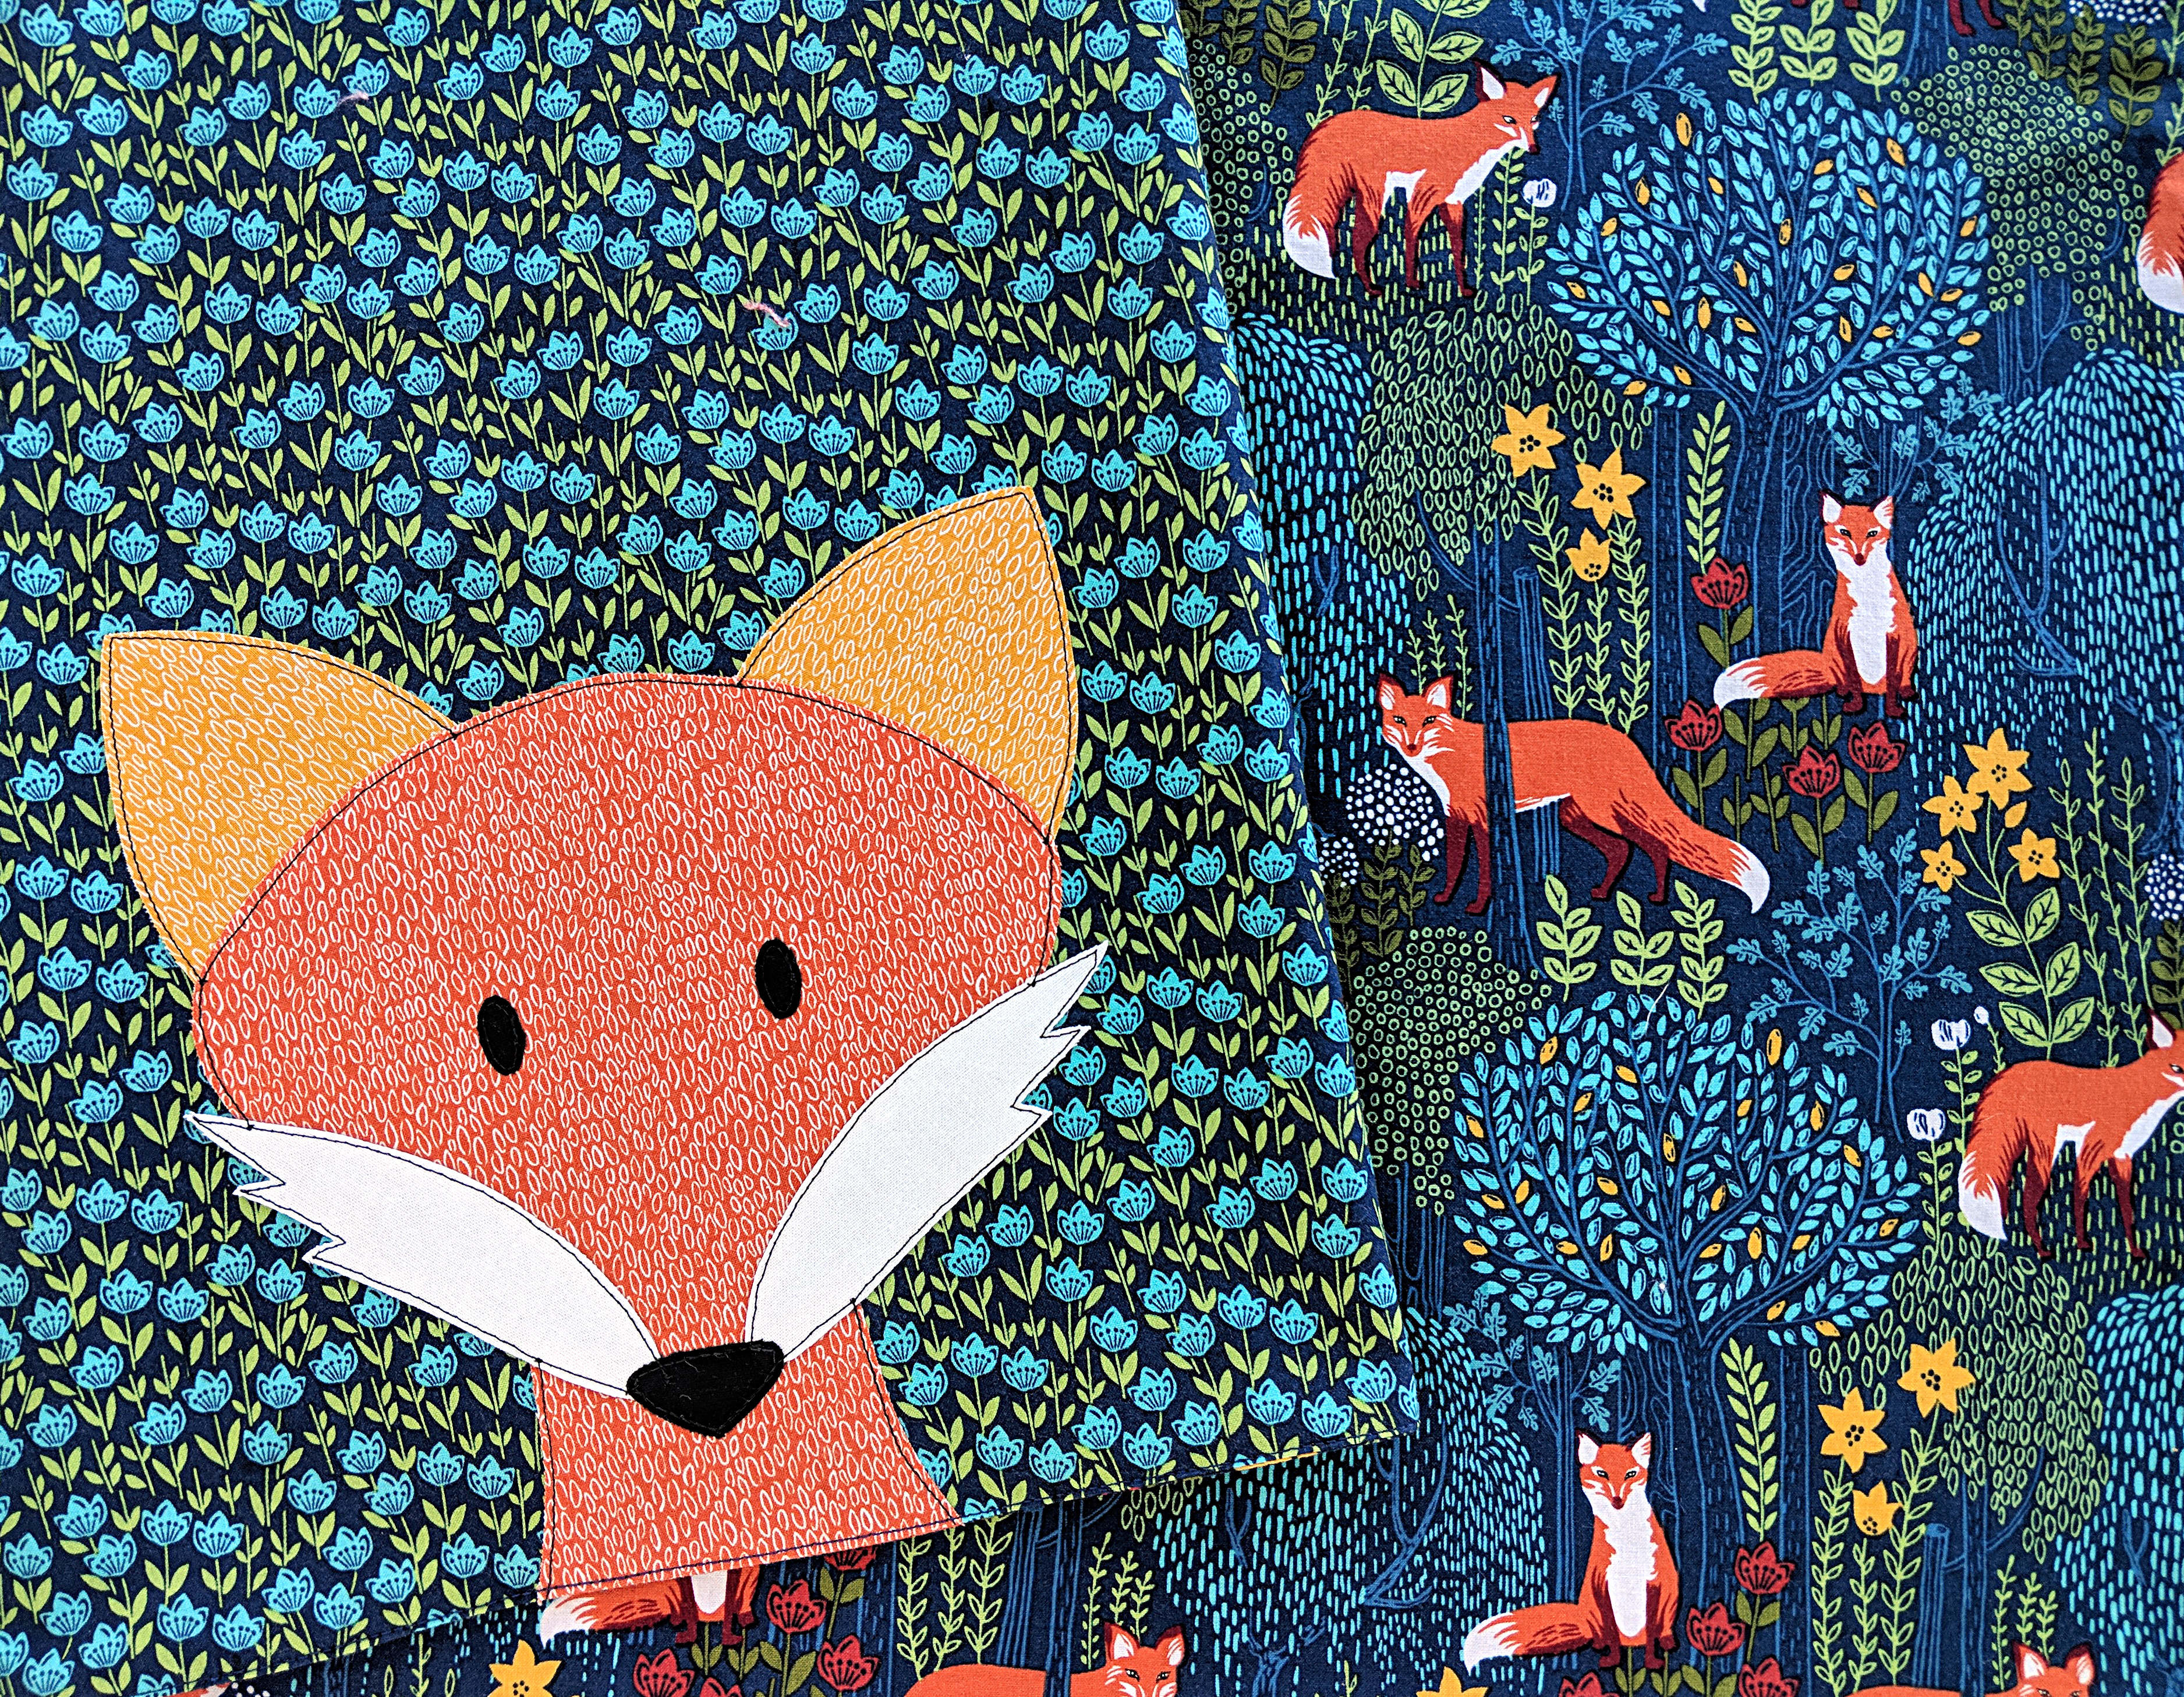
Sure – you can use fabulous fabrics and make it just this simple. How beautiful is this?
Honestly – no further embellishment needed at all.
You can add some applique. On this sample I added the Fergal Fox applique pattern in the lower right corner of the blanket.
No resizing needed – and it’s a great way to get extra mileage out of patterns you already own. If you do this, make sure you place the bottom edge of the neck right up against the raw bottom edge of the blanket.
That way the raw edge will get sewn up in the stitching that sews the front and back of the blanket together and it will look like the fox is peeking into the frame rather than like a decapitated head floating in the corner. 🙂
Have fun with this pattern! Be sure to tag any photos of your finished work with #shinyhappyworld – or share it in the Shiny Happy People group on Facebook.
Here are several free patterns that work with my basic 10-inch applique squares – no resizing needed!
Here are several free patterns that work with just some simple resizing. This post about making coasters has info about resizing an applique pattern that can be applied to any of these projects.
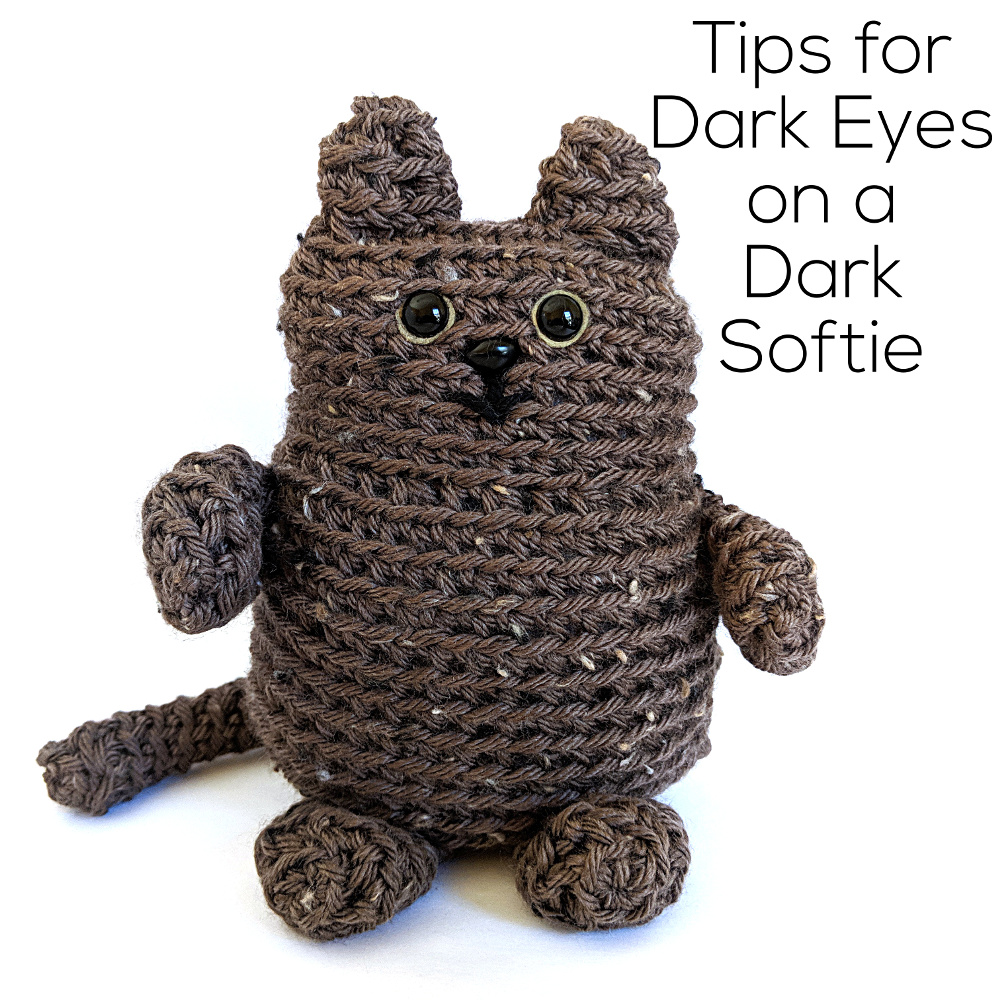
For the pattern I stitched him up in yellow, because lighter (and solid) colors make it easier to see the individual stitches. But I also wanted to make him in this tweedy dark brown for more of a tortoiseshell cat look – just for fun.
The tricky part of using dark yarn – or dark fabric for a sewn softie – is getting the eyes to show up well. The eyes are the most important part of the face!
I’ve got two solutions for you today.
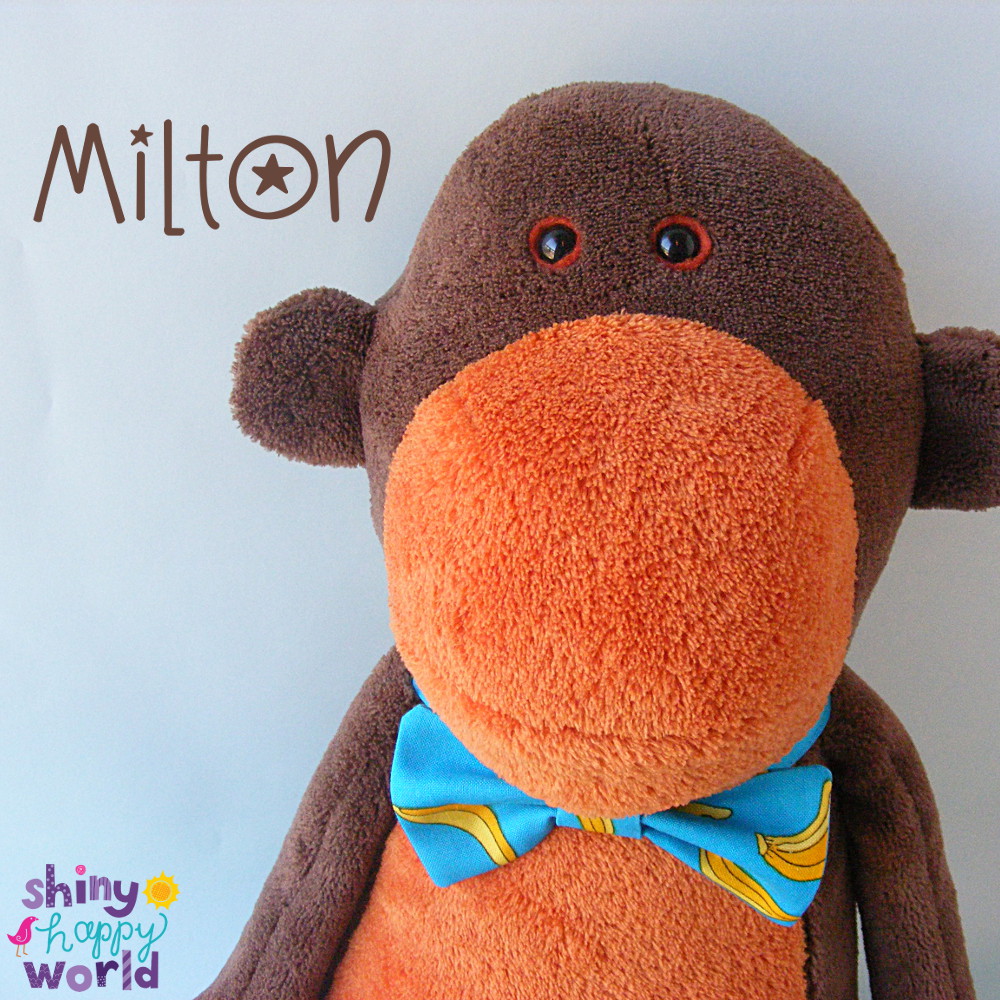
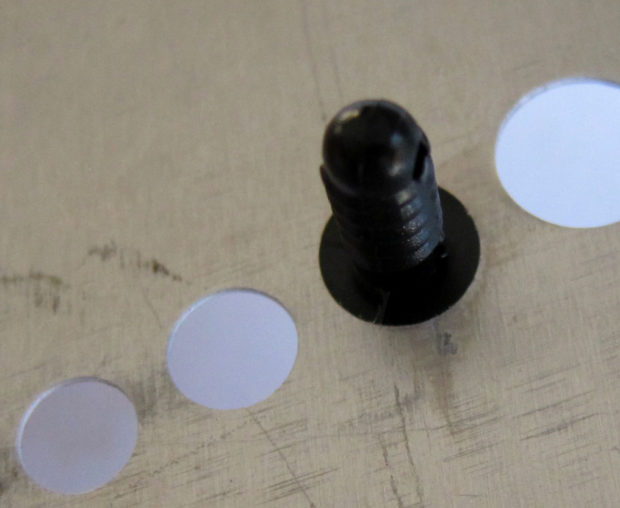
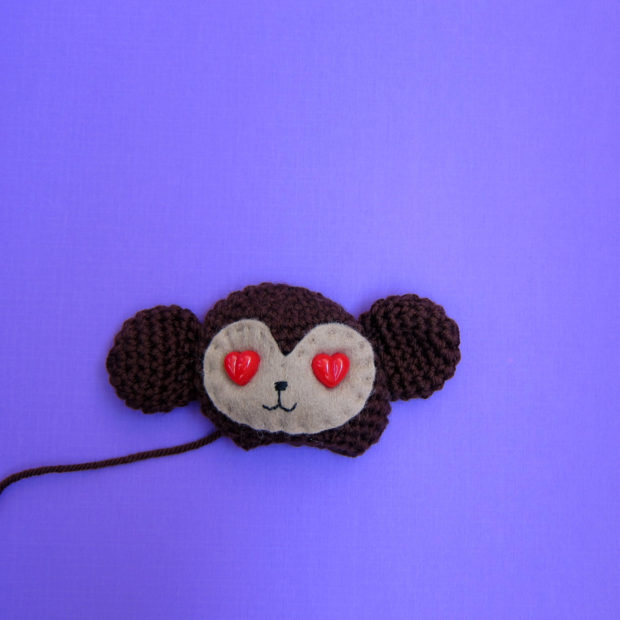
If you want to use a solid black craft eye (which is what I use for most of my softies) then it’s a big help to back those eyes with a circle of a lighter colored felt just a smidge bigger than the eye. That’s what I did with Milton Monkey. . .
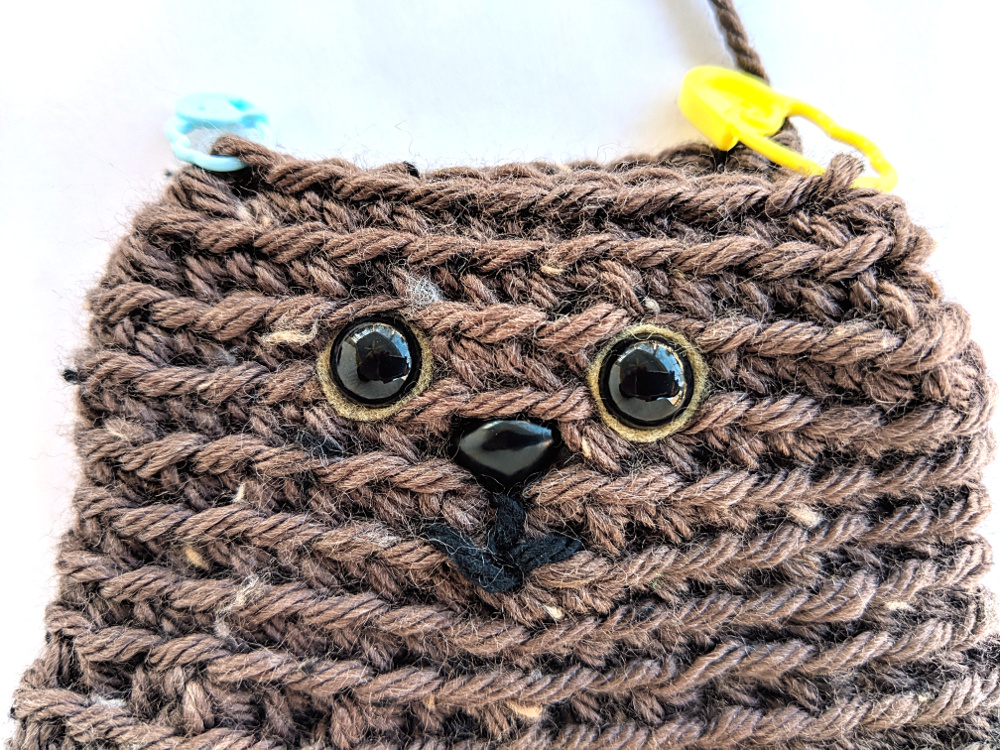
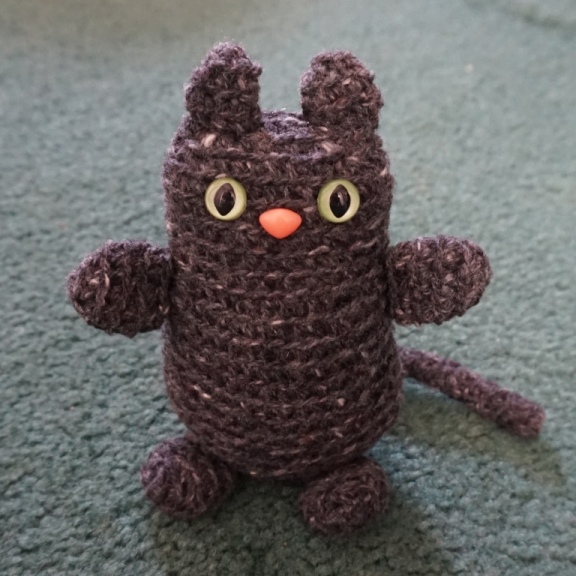
And that’s what I did with Felix. Here you can see those eyes a little closer.
I used a 1/2″ circle of sandstone felt with 9 mm eyes.
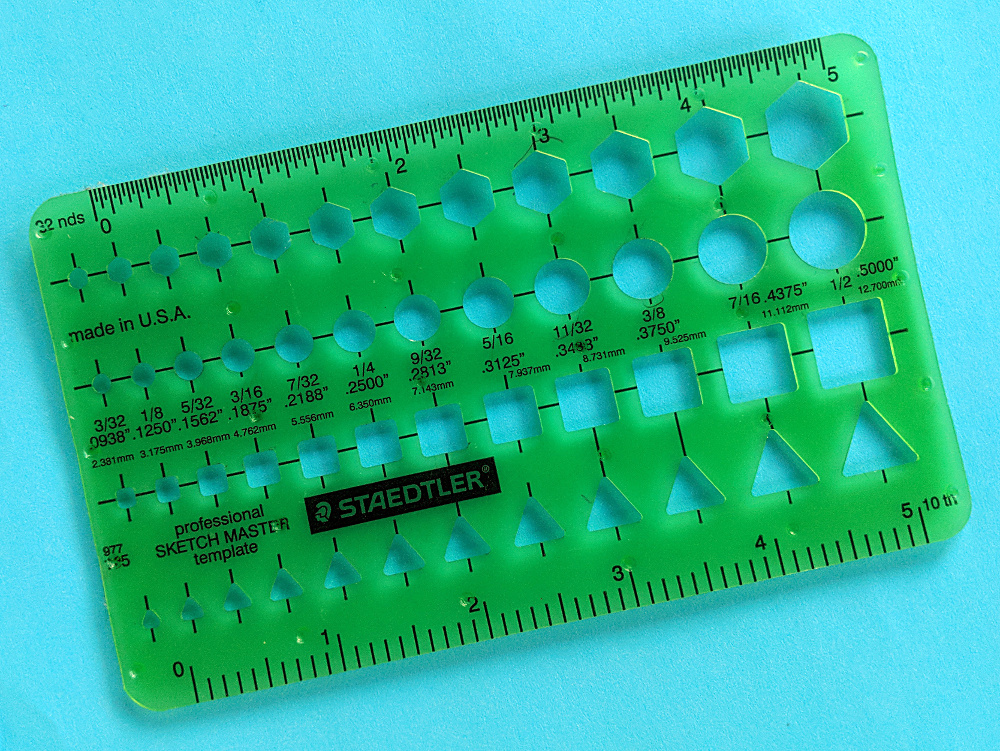
I use this tool to trace nice neat circles in lots of sizes.
I don’t remember where I got this exact template, but I’ve seen similar items at Office Max and Staples.
If you make a lot of softies and tend to use the same size eyes, you can also buy die-cut eyes which are perfectly perfect circles. I like the ones from Woolhearts on Etsy. You can choose the size and an assortment of up to six colors. It’s handy to keep a little stash of favorite colors.
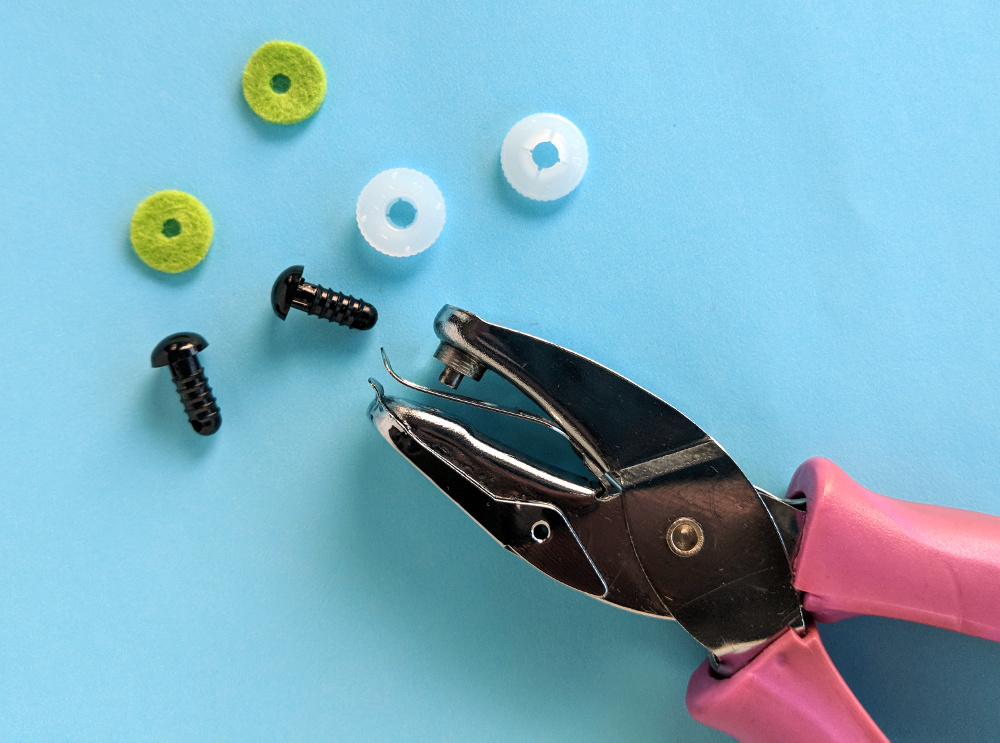
Once you have the circles cut, there’s one more step. You need to punch a hole in the middle for the shank of the eye to go through! You can use an awl, or you can use a 1/8 inch hole punch for extra neat holes.
Perfect little backs to set off your eyes! I usually stick to a color that’s a lighter shade than the main color – but not too light! White in particular can make your softie look scared.
Another option is to use an eye with color already in it.
(When I do that I usually use a slightly larger eye than what the pattern calls for – like jumping from a 9 mm to a 12 mm eye.)
Look at Sharon’s cat (named Arnold). She also made a dark brown kitty, but she used awesome cat eyes for hers!
With those big eyes and no mouth he immediately reminded me of the cat from Kiki’s Delivery Service.
And now I need to make a black cat. 🙂
Here are handy links to all the posts about amigurumi eyes. . .
Need to whip up a super easy trick or treat bag for Halloween this year?
Then I have the pattern for you!
It’s fully lined (which actually makes construction easier), requires no hand sewing, can be made with any of my square quilt block patterns with no resizing – and you can make it in an hour or less. 🙂
This project will work with any of my square applique patterns. If you’re using someone else’s pattern, you may need to resize it to fit a 10 inch square.
If you have a farmer who needs a few farm animals, you could use any of the blocks in the Noisy Farm pattern.
If you just want to customize it with a name or Halloween greeting, use a fun Halloween print fabric and this free alphabet applique pattern.
The sky is the limit!
What You’ll Need
1/2 yard medium weight fabric for the main bag (I used black cotton twill)
1/2 yard light weight fabric for the lining (I used a Halloween novelty print)
fusible adhesive (I recommend Heat & Bond Lite)
fabric for your applique
black thread
applique pattern of your choice
Cutting Instructions
Cut two 11″ x 11″ squares from the main fabric.
Cut two 11″ x 11″ squares from the lining fabric.
Cut two 14″ x 4″ rectangle from the main fabric for the handles.
Put It All Together
Step 1
Applique the main fabric squares with the design of your choice. If it’s one of my portrait designs, make sure the cut edge of the body is lined up with the bottom edge of the square.
If you’ve never done applique with fusible adhesive, it’s super easy! You’ll find instructions with video links in any of my patterns, and there’s a general video tutorial here.
Step 2
Fold the rectangles for the handles into double-fold strips and press.
Fold the bag in half to find the center of the top edge.
Pin the handles to the bag so that the inside edge of the handle is 2 inches from the center pin, and the raw edge of the handle is lined up with the raw edge of the bag.
Pin the handles in place on both sides of the main bag. You can baste them in place if you like, but I usually just hold them with pins for the next step.
Step 6
Leave the main bag right side out, and the lining inside out.
Slide the lining over the main bag, so that the right side of the lining is facing the right side of the applique, and the handles are sandwiched between the two layers. Match the side seams and centers and pin the two bags together around the top edge.
Sew around the top edge of the bag using 1/4″ seam allowance and leaving an opening on one side between the inside edges of one of the handles.
This is easiest if you start sewing right at the inside edge of one handle. Sew through that handle, around the side seam, through both handles on the other side, around the second side seam, and through the last handle. Stop as soon as you sew over the last handle (remember to backstitch!) and you’ll have an opening about 4 inches wide.
Step 7
Turn the bag right side out. This step is a little mind-bendy if you’ve never done it before, but it’s actually really simple.
First pull the main bag out of the lining so that both parts are inside out.
Now reach into the opening, grab the main bag and pull it through the opening so that it’s right side out. Keep pulling and the lining will follow – also right side out.
Now just tuck the lining down inside the bag. 🙂
Step 8
Smooth and press the top edge of the bag.
Fold under the seam allowance from the turning opening and press that as well.
Edgestitch all the way around that top edge. This will finish your bag, sew up the turning opening, and reinforce the handles – all in one step. 🙂
Finished!
Now go out and fill your trick or treat bag with lots of yummy candy. 🙂
Here are several free patterns that work with just some simple resizing. This post about making coasters has info about resizing an applique pattern that can be applied to any of these projects.
Do you have some plastic craft eyes in a box somewhere… and you aren’t sure how to tell what size they are?
Umm… yup, me too. Don’t worry! Today, I’ll show you how easy it is to figure out what size they are!
All you need is a ruler with millimeter measurements. A craft eye is sized by its diameter in millimeters. So, to determine the size, place the ruler across the widest part of the eye.
You can see that this eye is a 24mm. Easy!
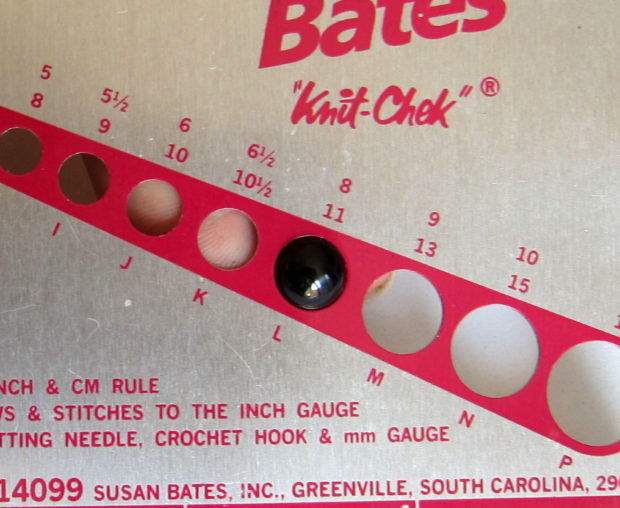
If you have a needle gauge and small eyes, I have an even easier way. Knitting needle measurements are determined by the diameter of the needle, so you can simply stick the eye in the gauge!
This is an 8mm eye, and it fits fully in the 8mm slot (size 11 needle).
Here’s a look at the back view:
Note that the eye fits snugly in the hole, but does not go entirely through like a knitting needle would.
I don’t like the envelope backs. They’re easy to sew, but they don’t cover the pillow as snugly as I like.
I like zippered covers, so they cover tightly and can be removed for washing – but I don’t like when the zipper is in one of the side seams. They never “sit” the same way as the other seams, so the finished pillow shape is always a little distorted.
I like the zipper to be somewhere in the pillow back (it doesn’t have to be the exact center) but I don’t like it to extend all the way to the edges, because the stiffness of the zipper again can distort the overall look of the pillow.
So here’s how I sew a pillow with a zipper in the back.
I make the cover a little small. If the pillow is 18 inches square, I cut my fabric 18 inches square. When I sew the front to the back using a 1/2 inch seam allowance, the pillow cover ends up 17 inches square – perfect for the nice snug fit I like.
I make the zipper a little short. Specifically – two inches shorter than the cut fabric. So for an 18 inch pillow, I buy a 16 inch zipper.
My daughter doesn’t like using regular rectangular bed pillows. Instead she has an enormous pile of square pillows – mostly with quilted and applique designs on them. 🙂 She doesn’t like the inexpensive “hard” pillow forms. She likes these Fairfield brand Home Elegance pillows. They feel like down pillows, but they’re a LOT less expensive and they’re machine washable. Win!
You can use any quilt block pattern to make a pillow cover.
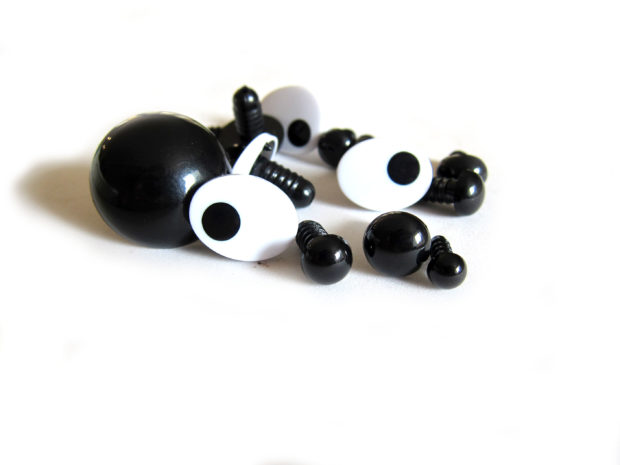
Craft eyes. Plastic eyes. Safety eyes. Animal eyes. They’re called lots of different things!
You can use them for both sewn and crocheted softies. I’ve even used them in applique wall hangings. I just use a pair of wire cutters to snip off the post that sticks out after you attach the washers.
I’ve made a video (below) that shows you how to install them. In the video I’m demonstrating on a crocheted stuffed animal, but you can use these eyes in sewn softies as well. You just need to poke a hole! I like to use a ball point awl. It creates a hole by stretching the fibers around the opening instead of by cutting any of the threads. If you cut a hole in stretchy knit fabric, that hole can run over time, just like a ladder in your stockings.
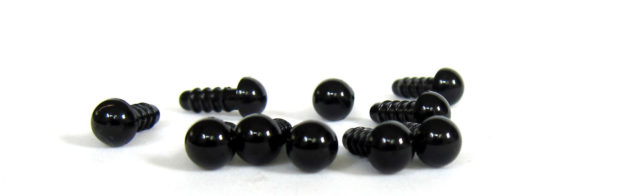
I prefer eyes with ridged shanks and plastic washers. I feel like they hold the best BUT they’re harder to use with smaller size eyes. It’s just really hard to hold such tiny pieces straight while you push the very tight washer on! So for the smallest eyes (4.5 mm) you’ll get smooth shanks and metal washers instead. They’re still small, fussy pieces, but they’re not nearly as hard to work with. Also – 4.5 mm eyes are so small that I really only use them for small felt softies – the kind of softies that stand on a shelf instead of being played with a lot.
Speaking of safety – just because they’re called “safety eyes” doesn’t make them safe for babies. The eyes themselves will never come apart (here’s a video showing how to remove safety eyes – you’ll see how hard it is to do). But babies can chew through the fabric around the eye, which then frees the eye (along with the still-attached washer) which is a choking hazard. So only use these on toys for kids over three, or toys that will be played with under supervision.
Below the video I’ve also included a quickie photo tutorial for those of you who want to get ‘straight to the point’ as well as some other links you might like!
Video Tutorial for Craft Eyes
This is a little 5 minute video. Enjoy!
How to install craft eyes
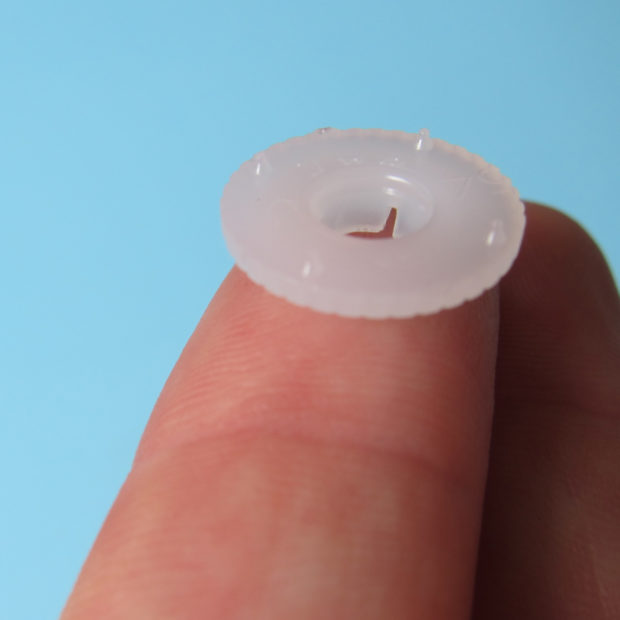
Do you see those little points?
Those little ‘barbs’ dig into the fabric and keep the eye from rotating. Which isn’t a big deal if you’re just using a black craft eye, but is crucial if you’re using a comic eye. You don’t want them twisting and giving you googly eyes!
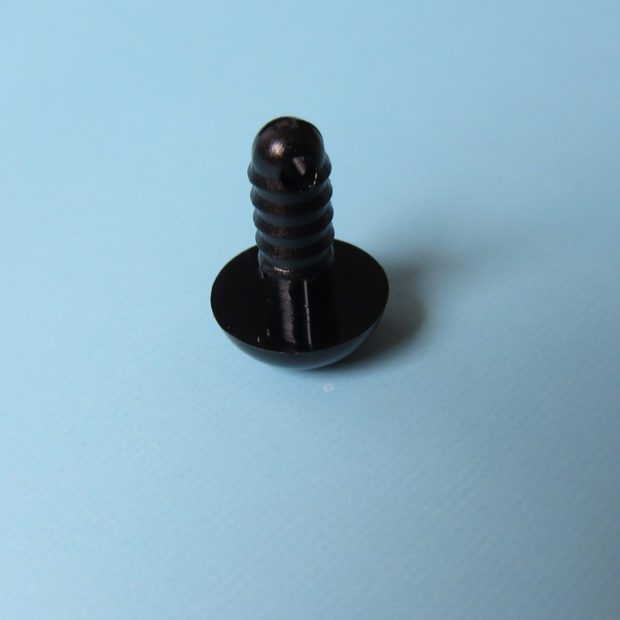
The ridges on the posts of craft eyes help the washer click on (and stay on!) securely. I love hearing the ‘click’ as I press the washer on! The ridges also help to make sure the washer presses on evenly.
So, let me show you how to install a craft eye with a plastic washer.
First, insert the post of the craft eye between the stitches on your piece where you want it to go. For sewn softies, use a ball-point awl or a small knitting needle to poke a hole. I recommend that you place the eyes first, before pressing on the washers, just to see if you like the look.
Once your eyes are positioned how you’d like, press the flat side of the washer (that’s the one with the tiny barbs!) onto the post.
Here’s a photo of how it will look (but without the fabric getting in the way… obviously, your piece doesn’t really look like this!):
I don’t want you to stress too much about this, because if you try to put the washer on backwards, it just won’t go.
Now, push! You’ll hear that click, and it’s on!
A note about smaller eyes
Most 6 mm craft eyes, because they are SO tiny, have smaller plastic washers without the ‘barbs’. And most 4.5 mm eyes (as mentioned above) have metal washers. But don’t worry, the same rule applies: flat side towards the fabric.
This post is originally from November 2013. I updated it in July 2017 to add the quilted batik tablet cover I made for my iPad Pro.
The day before I left for Quilt Market I decided that a really efficient use of my time would be to make myself a tablet cover using some of my new patterns. 😛
Here’s the result.
I posted it on Facebook and I got a bunch of requests for a pattern.
How about a free tutorial instead?
First you’ll need to measure your tablet. Of course, they’re all just a little bit different.
Add one inch to each dimension – length and width. This is your cutting size. If your tablet is 8″ x 11″ your cutting size is 9″ x 12″.
Cut four pieces of fabric to your cutting size. Two are for the outside and two are for the lining.
Or just make it out of the most fabulous fabric you can find!
For the new iPad cover, I used a fabulous hand-dyed batik fabric from Malka Dubrawsky of Stitch in Dye and added Big Stitch quilting around all the circles.
These are the tablet cover front and back, all quilted, trimmed to size, and ready to assemble.
Back the outside layers with some thin cotton batting and hold the layers together with some machine quilting (if you didn’t already quilt it as part of your embellishment). For the cat/dog cover, I just followed the line of the zigzags in the fabric. Easy peasy! Since the tablet is lined you don’t even need to back the batting.
So. You’ve cut your pieces, added any fanciness you like, and quilted in some padding. Time to start sewing it all together. This is super easy.
Sew your front to your back, right sides together, using 1/4″ seam allowance. Sew down one side, across the bottom, and up the other side. Don’t forget to backstitch at the beginning and end of your stitching.
Do the same thing with your two lining pieces except leave a 3-4 inch opening in the bottom for turning the whole thing right side out later.
Turn both the outside and the lining right side out and press.
I’ve got my turning stick poked through the opening I left in the lining. See how I pressed that too? That’ll make it a cinch to sew up when you’re done.
Now turn the outside inside out again. Leave the lining right side out.
Measure a strip of elastic 3 inches long. I used soft fold-over elastic in a pretty color but you can really use any elastic in any size or color.
Fold the elastic in half and pin it to the center of the front of your cover. (Fold the cover in half to quickly find the center.)
I like to leave a little extra hanging over the raw edge.
Slip the lining (right side out) inside the cover (inside out). Line up the side seams and pin or clip the layers together around the top. The elastic loop should be sandwiched between the two layers.
You can really see my quilting lines here on the batting.
Sew the outside to the lining all the way around the top using 1/4″ seam allowance.
I go back and forth over the elastic a couple of extra times. It’s a stress spot and I like to reinforce it.
Now comes the fun part.
Pull the lining out of the bag. Then pull the whole thing through the opening in the bottom of the lining. Sew up the opening in the lining using either whipstitch or ladder stitch and tuck the lining down into the bag.
Flip down the elastic loop to see where you need to position your button and sew the button in place.
Done!
Here’s the back of my cover. Of course I had to decorate the back too!
And here’s a full view of the batik cover.
It’s the same font and back. 🙂
Here are several free patterns that work with my basic 10-inch applique squares – no resizing needed!
Here are several free patterns that work with just some simple resizing. This post about making coasters has info about resizing an applique pattern that can be applied to any of these projects.
The summer holidays are just starting here in the northern hemisphere, which means it’s time for me to start getting a lot more questions about teaching kids to sew. 🙂
Summer vacation is a great time for some sewing lessons!
Kids love to learn from other kids – so I’m rerunning here a video my daughter made with me a few years ago. (She was 11 at the time.) In it she shows how the machine works, how to sew wavy, straight, and parallel lines, how to use decorative stitches, how to turn corners, and more.
It’s a no-pressure way for kids to get a feel for how the machine pulls the fabric through on its own, how (and how much) they need to steer, how fast and slow they can make it go and more. And they’re not just practicing on random scraps of fabric that they’ll throw out! They’ll use these fancy fabric strips to sew up a horde of slithery snakes!
Every time I teach a group of kids – those snakes are the #1 favorite project. They make so many of them!
If you have a kid just starting out on the machine this is a great way to practice some basic skills. It’s also a good (sneaky) way to see if they’re ready for a book like Creature Camp! Set them loose with this project. It uses a lot of the same skills they’ll learn in the very first project in the book, so if they can handle these snakes they can jump into the book!
Here’s the video. . .
Jo used the same color thread for all her stitching just to keep the pace of the video going. But encourage your kids to change threads as often as they like! It’s a great way to practice re-threading the machine. 🙂
Making those snakes is easy!
Get the Snake Charmers pattern here. It’s a free pattern that’s usually made with regular fabric – but follow the special instructions below to use your practice pieces to make your snakes extra special.
Cut strips of fabric 3 inches wide and 10 inches long. That’s a little bigger than what the instructions call for. All the stitching on the fabric can make it shrink up a bit, so the extra is good. It also can be hard for kids to sew right up to the edges, so this gives them some extra room.
Stitch all over the fabric in any design and colors you like. There’s no right or wrong way to do it so this is a totally no-pressure way to practice. Have fun!
When you’re happy with the stitching, press the fabric nice and flat.
Using the Snake Charmers instructions, trim the pieces to size and sew up some snakes.