Video – How to Iron Embroidery

How to Iron Embroidery (without smooshing the stitches) - video

I’ve had a LOT of people asking me how to iron their finished embroidery. There’s a little trick to doing it without smooshing your stitches – and that’s what I show you in this video. Don’t worry – it’s easy and doesn’t require anything special. 🙂

That bird you see in the video is a free pattern. You can find it here.

And if it’s birds you like – you can find all my patterns featuring birds here.

Here are all the posts about finishing embroidery projects.

Basic Finishing

Other Ways to Use Embroidery

Return to the Learn to Embroider main Table of Contents.

Happy stitching!

How to Machine Applique with Freezer Paper – All the Lessons

Cute turquoise monster face appliqued on a pink quilted background. Text reads: How to Applique with Freezer Paper

Want to learn how to machine applique with freezer paper?

This is the post for you.

You can see all my applique videos here, including needle turn applique, how to applique with fusible adhesive, and how to applique with (and on) fake fur.

My preferred method is Quilt As You Go and fusible adhesive, but some people don’t like the raw edges on fusible applique. But they also don’t like the amount of time and handwork involved in needle turn applique. For those folks, freezer paper applique is the best option.

This post rounds up all the lessons on freezer paper applique – all in one place.

If you’re getting ready to start your very first applique project, grab a cup of tea and sit back and watch these lessons first. It’s like a mini online workshop – for free.

Lesson #1

How to Machine Applique Convex Curves – Basic introduction to the technique, why I love it, and how to applique the easiest curves.

Lesson #2

How to Machine Applique Inside Points – Super easy once you know the trick.

Lesson #3

How to Machine Applique Concave Curves – A logical extension of lesson #2.

Lesson #4

How to Machine Applique Points – The trickiest shape to handle.

There’s one more post guaranteed to come in handy if you use this method. . .

The Joy of Starch – If you’re having any trouble getting nice sharp folds on your applique pieces – or having them come uncreased before you have a chance to sew them down – try starch. Read this post to see photos of the difference it makes and learn two ways to use it.

You can use this method with just about any applique quilt pattern. 🙂

You can find all of my Applique Quilt Patterns in the shop!

Here are links to all the posts showing how to applique with fusible adhesive – my favorite method. It’s fast and easy and (with the right materials) it holds up beautifully to rough use and repeated washing.

Here are links to special posts about eyes.

Here are links to some extra fun things you can do with your applique.

Other Applique Methods

Finished with this topic?

Return to the Let’s Make a Quilt main Table of Contents.

Move on to the lessons about outline stitching.

Happy stitching!

My Secret Weapon to Make Fabric Behave

starch - secret sewing weaponStarch.

Starch!

Simple. Cheap. Old-fashioned. Starch.

It has been crazy humid here this summer.

It’s beyond humid. It’s wet.

We had over 17 inches of rain in the first week of July – and we’ve continued to have heavy rains in the last few weeks. We usually get about five inches for the whole month.

My flour is clumpy. My cereal boxes are soggy. My salt is unsprinkleable. And my applique pieces won’t stay folded!

Aaaaargh!

Five minutes after I press them they look like this.

http://petapixel.com/2013/07/27/outdoor-nature-cam-captures-a-veritable-bear-hoedown/

It’s coming unfolded before I can even press all the pieces for one block!

The solution, my friends, is starch.

Look at the difference.

applique with starch

This is two days after I pressed it.

Starched folds stay folded.

I just use regular spray starch from the grocery store. Nothing fancy or expensive. And I think I’ve been working off this same can for over 10 years.

You can spray it on just before pressing, like I do in this video.

Or you can spray some into a small dish (like a little custard cup), wait for the foam to subside, then paint the liquid starch on with a paintbrush. If you do that you don’t have to paint the whole seam allowance – just make sure you get it right up against the freezer paper. That’s where the fold will be that you’re desperately trying to hold in place while you get the rest of the pieces for the block pressed.

I use both methods interchangeably. It depends on my mood, how many pieces I’m working on, my tolerance for mess that day, and how generally lazy I’m feeling.

If I’m only pressing a few pieces I just spray it on and ignore the mess from the overspray. The extra flakes of starch will brush right off my ironing board and wipe off my iron.

If I’m doing a whole bunch of pieces I’ll actually go downstairs and get a dish, then dig around for a paintbrush and use the paint-it-on method. I actually prefer that, but sometimes I’m too lazy to go to the extra trouble.

If you want to see the details of the machine applique technique I’m talking about here, click here to find all the tutorials about it in one handy dandy place.

But starch isn’t only useful for applique! That’s where I use it most often, but it’s great for holding any pressing. It’s especially useful for hemming – particularly if the fabric you’re trying to hem isn’t a crisp woven cotton. It can be really helpful in making slippery synthetic fabrics behave like a nice, obedient cotton. 🙂

Happy sewing!

Best,
Wendi
Applique Wendi (with fabulous hat)


Meet Abby Glassenberg – Softie Designer Extraordinaire

abby-glassenbergToday I’d like to introduce you all to a fellow pattern designer who makes softie patterns I think you’ll love to make. Meet Abby Glassenberg! She’s the author of Stuffed Animals: From Concept to Construction. She blogs at While She Naps, and sells digital patterns for softies in her shop.

I started following Abby several years ago and I’ve loved watching her work evolve and her business grow. I can’t wait for you to meet her, so let’s jump right in!

Hi Abby! Thanks so much for spending some time with us here at Shiny Happy World!

Those of us who run solo businesses tend to wear many hats – and that makes it hard sometimes to tell people what we do. But that’s the first thing I’m going to ask you to do! Tell readers a little bit about you and your work. How do you introduce yourself and what you do to a stranger?

I’m a sewing pattern designer, craft book author, sewing teacher and craft blogger. I design sewing patterns for dolls and stuffed animals. My patterns help you create softies that are adorable and look professionally made. Each pattern includes step-by-step photos and clear instructions written in language you can easily understand. I love sewing toys and I want you to have a great experience, too!

I love that you think of designing patterns as helping other people have a great sewing experience too. That’s terrific! So – in a sea of patterns out there, what makes your work unique?

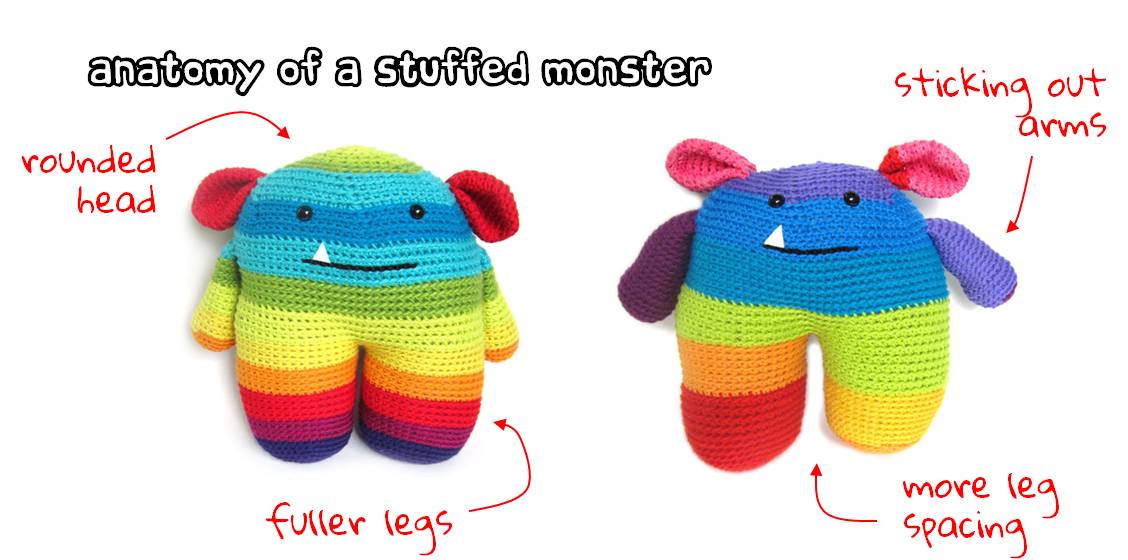
My stuffed animals are truly three-dimensional. I like gussets and darts! I love the puzzle of drawing flat pattern pieces so that when they’re sewn together you get an oval-shaped sphere, for example, or a curved horn. While you sew you’ll see how the language of softie pattern pieces works and perhaps you’ll be inspired to design toys yourself!

Tell me a little bit more about your latest pattern. What made you decide to make it and what were some decisions you made along the way in the design process?

Emma dollMy latest pattern is Emma the Doll. She’s a big doll at 20”, she’s entirely machine sewn and she’s made from fleece. I’m a mom of three young daughters, ages 9,7, and 2, so I have a good handle on how kids really play. A few weeks ago my kids spent the afternoon on the front lawn with a huge pile of toys having a funeral for a pink stuffed boar!

When I dreamed up this new doll I wanted her to be big and sturdy, to have jointed arms and legs so that she can be posed, and to be machine washable. Emma achieves all of these things, and with style.

I love the Emma doll pattern! She’s so totally kid-friendly! And I was completely captivated by this photo of her (smiling) in the washing machine. As a mom – that really says it all. 🙂

It's ok! I'm just having a bath!

It’s ok! I’m just having a bath!

Emma’s a very playable doll, kid-friendly doll. But you started out making sculptural birds – definitely not toys. (Abby’s first book, The Artful Bird, teaches you how to make them.) What made you switch gears and move into stuffed animals designed to be played with?

I think my years designing and sewing birds were a great way to explore three-dimensional shaping in fabric. I learned how to control bulges and how to pull shapes inward in order to achieve the particular body shapes of each species. After I wrote my first book I felt free to delve into children’s toys and I’ve really enjoyed designing teddy bears and baby lovies, dolls and elephants, hobby horses and turtles, and everything in between!

So tell me about your new book. How did it come about? What was the most challenging part of writing it? What’s your favorite project from the book?

il_570xn-452002987_td5k1-570x600My new book is Stuffed Animals: From Concept to Construction and it was published by Lark Crafts in May. This book is all about designing your own stuffed animals and it’s perfect for beginners as well as those with more sewing and design experience under their belts. I actually thought of writing a book that would be a comprehensive guide to soft toy design like this one long before I wrote my first book, The Artful Bird. It took many years of research and experimentation to create a book of this depth and I’m really proud of it. I enjoyed every aspect of writing Stuffed Animals, even the tedious parts! It truly was a labor of love and a book that I felt I was made to write. My favorite project is the 16th pattern in the book – a dinosaur with a zippered mouth!
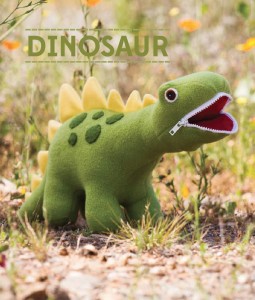
Dinosaur with zippered mouth

Roar!

I love this book so much! My “official” review is here.

What are your dreams for the future of your business?

My business is really two-fold: I design sewing patterns for toys, and I also write about running a creative business. I’d like to grow both sides of what I do. In the realm of sewing patterns, I’d like to teach an online class on sewing softies. I was a middle school teacher in my former career and I still really see myself as a teacher. And, of course, I have tons of ideas for new softie patterns. I truly feel that I could design stuffed animals and dolls for the rest of my life and never run out of ideas! In the realm of writing about running a creative business I will continue to seek out and speak with those in power about the craft industry and share my experiences running my own business. I love reporting about what’s going on in my niche and feel so thankful to have found a large audience who shares my interest.

Can you tell us about a typical day? Where do you work and what’s your routine like?

We wake up early in the Glassenberg household! I’m up at 6:10 every morning. I get the kids off to school and then I go running. I’m at my computer by 10:15 and I work until about 2:30. Those hours include a combination of writing blog posts and patterns, doing research, responding to emails, posting on social media, drawing, sewing, photographing my work, editing photos, and doing graphic design for my site and my patterns. Oh wait, there’s packaging orders and shipping, and sourcing supplies, too. Like most people who run a small business I do everything there is to be done, even the weekly bookkeeping. But I seriously do love it all. I also work in the evenings from 8-9:30pm.

What’s your favorite sewing tool?

Hemostats. I may have 12 pairs. Or 13. When I travel I panic that if my luggage gets lost I may be without my hemostats and that would be serious issue for me.

I should have known that’s what you’d say. 🙂 You rave about them so much that I finally tried a pair (you know that, I guess, since I bought them from you) and they really are a pretty awesome little tool. But 12 or 13 pairs? That’s true devotion.

What’s your most popular pattern? Why do you think it’s so popular?

lovey dovey
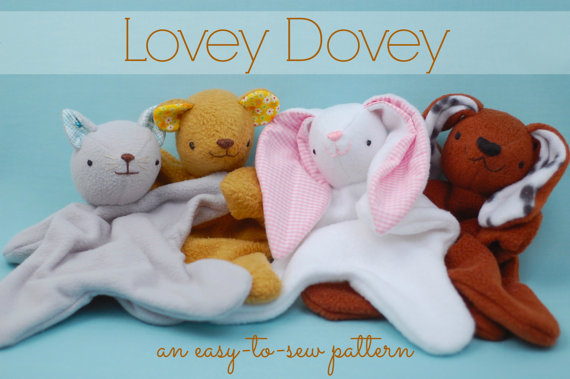
The Lovey Dovey. It’s a great go-to project to make for a new baby and everyone wants to make something special to give as a baby gift.

This pattern comes with four variations (a bunny, a puppy, a bear, and a kitty) so you can customize what you’re making for each recipient. The pattern is also very approachable. You look at it and say, “Okay, I can handle that!” And it’s cute! You can’t deny the importance of cute when it comes to toys.

stella owlImagine someone with no sewing experience. She just took her first sewing machine out of the box and figured out how to thread it. She’s eager to make something – but also a little bit scared. Which one of your patterns do you recommend?

I’d recommend Stella the Owl. She’s a very straightforward design, but still really clever! Her wings come together with a bit of Velcro so that she can embrace her little owlet.

She’s so cute! And I think it would be really fun to choose fabric for the contrasting wings.

rubber duckieWhat’s your very favorite pattern? Why?

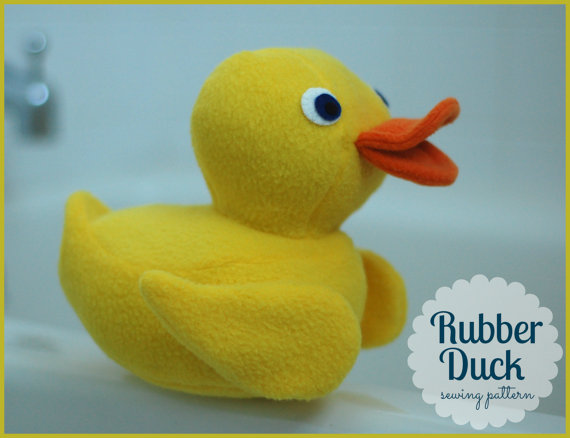
I’m really fond of my plush Rubber Duck. He’s a bath time favorite in plush form!

This pattern includes several really cool, but easy, construction techniques and the finished softie looks really professional.

I think this pattern is a really nice representation of my design style.

Can you suggest another designer that beginning sewists might like to get to know better?

I’m a big fan of Raynor Gellatly, a Scottish plush pattern designer whose business is called Elf Pop. Her dolls and toys have a very sweet, innocent look and I think they are ideal for relatively new sewists looking to create toys that kids will immediately want to hug!

Thanks so much, Abby!

I hope you all enjoyed getting to know Abby!

Happy sewing, everyone!

Best,
Wendi
Applique Wendi (with fabulous hat)

Tutorial – Using Safety Eyes with Woven Fabric

Using Safety Eyes with Woven FabricUsually I use safety eyes with polar fleece or fake fur.

You can see a video showing how to use them here.

They really stand out from the fabric and look great – and there’s nothing you need to fuss with.

But when I was designing Bean I decided I wanted the face to look younger. That means bigger eyes and I knew safety eyes would give me just the shine and roundness I wanted.

The problem is the 9 mm safety eyes (the size I wanted to use) have a back that’s larger around than the eye itself.

That’s not an issue with fabrics with a bit of pile to them (like fleece or fur) but I didn’t like the way it looked with the woven cotton I was using for the face.

You can see the sharp edge of the backing in a little ring around the eye on the finished doll. It doesn’t look too bad – until you stuff it. Then it looks very pronounced.

Luckily – the solution is super easy!

safety eyes tipCut a circle of felt for each eye, just a little bit bigger around than the washer used on the inside of the eye.

It doesn’t have to be perfect.

If you’re using fabric in a light color, make sure to use felt in a light color too so it doesn’t shadow through.

safety eyes tip

When you insert the eyes, slip the little felt circle between the fabric and the washer. It’ll be on the inside of the doll head.

Make sure you lock the washer down tight.

Now when you stuff your doll the felt will act like a little layer of stuffing between the washer and the “skin” – softening the hard edge of it.

See? I told you it was easy!

Happy sewing!

Best,
Wendi
Applique Wendi (with fabulous hat)

The Dress Up Bunch is a collection of cute and cuddly rag dolls. Get patterns for the dolls, plus all their fun outfits and accessories!

How to Make Denim Shorts for The Dress Up Bunch

How to Make Doll-Sized Denim Shorts with all those cool details - a tutorial from Shiny Happy World

Here’s how to make some denim shorts for a doll and give them that cool hem and seam treatment that jeans have.

Steal it!

Start with the legs from a cut-off pair of jeans (you do save those, don’t you?) and the free Play Clothes shorts pattern.

How to Make Doll-Sized Denim Shorts with all those cool details - a tutorial from Shiny Happy World

The instructions for the shorts say to turn up the bottom hem 1/2 inch and then another 1/2 inch. We’re going to steal the already-made hem so we need to shorten the pattern by 1 inch. Just turn up the bottom edge one inch and crease it to hold.

How to Make Doll-Sized Denim Shorts with all those cool details - a tutorial from Shiny Happy World

Make sure the edges of the cut-off denim leg are all lined up – the outside seam running right up the side and the front and back edges of the bottom lined up with each other.

Place the pattern on the bottom of the cut-off denim leg. The folded hem of the bottom of the pattern should be lined up with the bottom edge of the pants, and the edge of the pattern that says to place it on the fold should be butted right up against the flat-felled seam at the side of the cut-off leg. Cut around the pattern. It should look like the photo up there. Repeat with the other leg for the other side of the shorts.

How to Make Doll-Sized Denim Shorts with all those cool details - a tutorial from Shiny Happy World

Follow the rest of the pattern instructions without any more changes. You’ve got a cool pair of denim shorts with nice hem and seam details!

I call them Cheater Pants. 🙂

Here they are, modeled by Bean.

How to Make Doll-Sized Denim Shorts with all those cool details - a tutorial from Shiny Happy World

I used the same technique to give Karl here that classic hem treatment to his denim shorts too.

Karl (with a K) - boy doll wearing denim shorts

You can use this technique with any doll-clothes pattern!

Happy stitching!

What a difference stuffing makes!

I’ve crocheted two monsters using the same pattern (Roy the Rainbow Monster) and similar yarn… but they look a little bit different. Do you know why?

stuffing a stuffed animal

It’s the stuffing!

Notice that the monster on the left has a fuller body, and less stuffed arms. This results in almost no space between the legs, a round head and arms that lay flat.

The monster on the right has a less stuffed body, and plump arms. In contrast to the other monster, this guy has a gap between his legs, a flatter head and arms that stick out from the body.

There’s no right way! The only thing that matters is how you want your animal to look!

So, don’t think of stuffing as that last pesky thing to do before finishing your animal… think of it as the final step that gives your animal its shape! And shape your animal with stuffing!

Here are handy links to all the posts about stuffing amigurumi. . .

Return to the main table of contents for Let’s Learn to Crochet Amigurumi.

Move on to the lessons for closing up the opening.

Happy stitching!

Tips for Selecting Locker Hooking Materials

It’s Saturday! That means it’s time for me to share what I’m crafting… and some tips!

Today I’ll tell you about locker hooking, and give you some tips for picking your materials.

Locker Hooking

Right now, I’m working on locker hooking a bathroom rug.

You might be asking… what is locker hooking?

Locker hooking uses a crochet hook (or a special ‘locker hook‘, which is a crochet hook with an eye on the end), yarn, fabric strips and rug canvas to make fabric loops that are locked onto the backing with the yarn. It looks like this:

rainbow locker hooked mat

It’s fun! And it’s easy… especially for us crocheters who have the hang of using a hook!

Some tips for selecting your materials

To locker hook, you’ll need yards of fabric, 1″ thick. Check out my post on making yarn from fabric strips for details.

Here is the fabric I gathered:

blue and grey fabric

And here is my fabric ball… all those yarn strips cut and put together:

ball of fabric

Getting your fabric ready is almost as time-consuming as doing the actual locker hooking! But if you get into the right mindset, it’s a relaxing process. And it’s a fabulous way to use up cotton fabric!

Here are some of my tips for getting the right locker hooking materials:

  • Use 100% cotton. Not only does it tear into strips nicely (a big time-saver), but it also means your mat will dry quickly if it gets wet.
  • Focus more on the colors of the fabric than the design. When you cut the yarn into 1″ strips, you won’t see much of the design.
  • Aim for a varied palette. This way, if you run out of fabric, you can purchase more and it’ll fit right in!
  • Make sure your canvas is a few inches (in each direction) larger than you want your finished piece to be, since you will use some up in the border.
  • Go ahead and spring for a locker hook. They’re pretty inexpensive and will save you a lot of time!

I’ve started the actual locker hooking part… I’ll keep you posted as I go!

SHARE THIS

How I Design Softie Faces

How I Design Softie Faces

Time for a process post – showing a bit behind the scenes of how I do some of my design work.

Today we’re talking faces.

I think the face is one of the most important parts of any softie. It’s where the personality really shines through!

I want to make it easy for you to get the face just right in any pattern you’re making. But sometimes just right isn’t clear until after the softie has been stuffed.

Stuffing changes the curve of the surface, so eyes that looked great when it was flat might now look too far apart. Or a smile that was clearly visible is now kind of hidden under the curve of the chin.

What to do?

Well – I usually work through several prototypes of each softie – getting the shape of the body right – before I even start on the face.

Then I draw the face on the already stuffed prototype.

Caterpillar Phil face in progressI usually sew my prototypes from plain white cotton. It’s easy to draw on that with a soft pencil. I can even erase and redraw it several times until I like what I see – though the surface gets a bit grubby after a few erasings. For Caterpillar Phil I tried features positioned very high on the face (to make him look chubby), very low (to make him look younger), and centered (even though I almost never like plain centered). I finally settled on something just a bit below the center line. (If you want to learn how to draw faces read Ed Emberley’s Drawing Book of Faces. It’s awesome.)

Caterpillar Phil face in progressAfter I’m happy with the face I go over it with a black marker, Then I unpick all my stitches to remove the face piece(s) from the prototype. I iron it flat again and trace the face onto my final pattern piece. That way you’re getting the pattern and the placement exactly like what I worked up in my sample.

Update – I wrote a post here showing my favorite way to transfer those pattern markings to your fabric.

Caterpillar softie pattern

That’s how I do all my faces – even if it’s just placing a couple of safety eyes.

Are you curious about any other part of my design process? Leave a comment and I’ll add it to the list for a future post.

Happy sewing!

Best,
Wendi

How to Crochet a Donut Shape

Learning to crochet a donut shape is really handy! Unstuffed, I especially like using it for fish mouths.

You can see it here in this seahorse crochet pattern.

Ivo the Seahorse - easy crochet amigurumi pattern

And here on the lips of this fish pattern.

Willie the Fish - easy crochet softie pattern

If you add stuffing, you can make a swim ring for your stuffed animals, like Walter here.

Walter the Water Buffalo - easy crochet pattern

You can also – of course, make a donut!

It can be a little tricky the first time you try to crochet a donut shape from written instructions alone, so today I’ll show you a photo tutorial!

folded edge in crochet

The piece usually begins with a tube. . .

crocheted tube

To turn that tube into a donut shape, you’ll need to crochet two rounds together. First fold the piece so that the two (desired rounds) are touching:

crocheting two rounds together
folding crochet piece

In this (pretend) example, you’re folding the foundation chain to round 6, in preparation for “crochet through the round you just crocheted AND the foundation chain”.

You may want to pin the rounds together if that would help you:

using a locking stitch marker to secure fabric

Now it’s time to crochet! Insert your hook through the next stitch (on round 6) and the corresponding stitch on the foundation chain:

single crocheting two layers together

Wrap the yarn around your hook, and draw through the first two loops (treating these as one loop of a ‘normal’ single crochet):

single crochet two layers together

Wrap the yarn around your hook and draw through both remaining loops.

Crocheting two layers of crochet together

Continue crocheting the two rounds together, stitch by stitch, until you’ve completed the round. If you’re stuffing the shape, it’s easiest to stuff a bit at a time as you go.

crocheting two rounds together

Ta da!

folded edge in crochet

Isn’t that such a great shape?

Here are handy links to all the posts about crocheting more advanced shapes. . .

Return to the main table of contents for Let’s Learn to Crochet Amigurumi.

Move on to the posts about troubleshooting common problems.

Happy stitching!