Tips for Dark Eyes on Dark Softies

dark brown crochet cat with black eyes

Felix is a new crochet pattern and I love him. 🙂

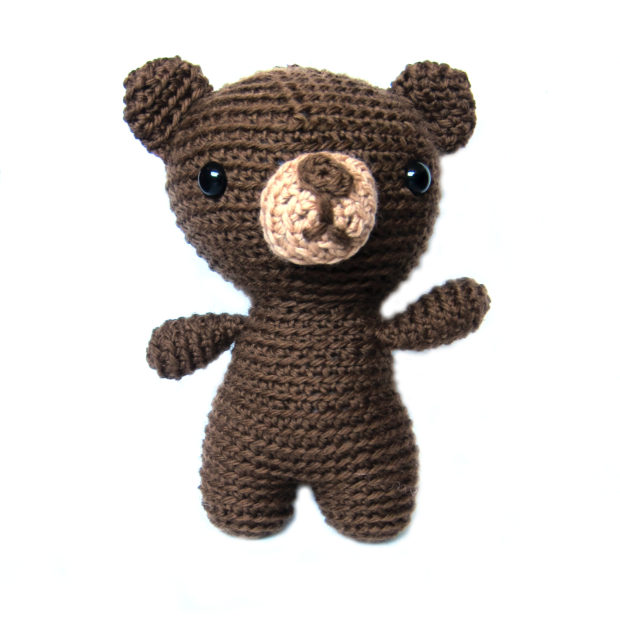
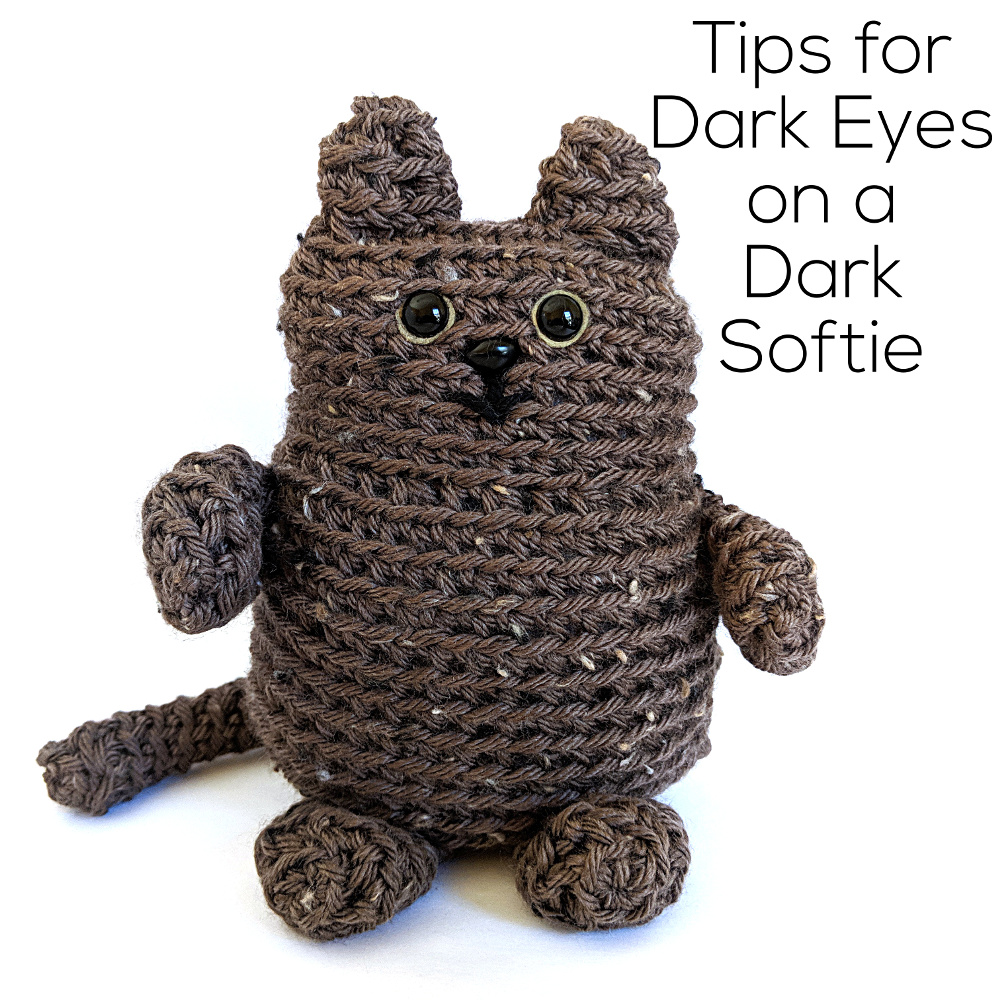
For the pattern I stitched him up in yellow, because lighter (and solid) colors make it easier to see the individual stitches. But I also wanted to make him in this tweedy dark brown for more of a tortoiseshell cat look – just for fun.

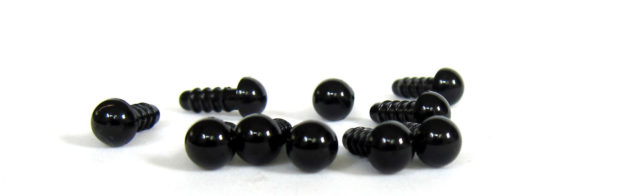
The tricky part of using dark yarn – or dark fabric for a sewn softie – is getting the eyes to show up well. The eyes are the most important part of the face!

I’ve got two solutions for you today.

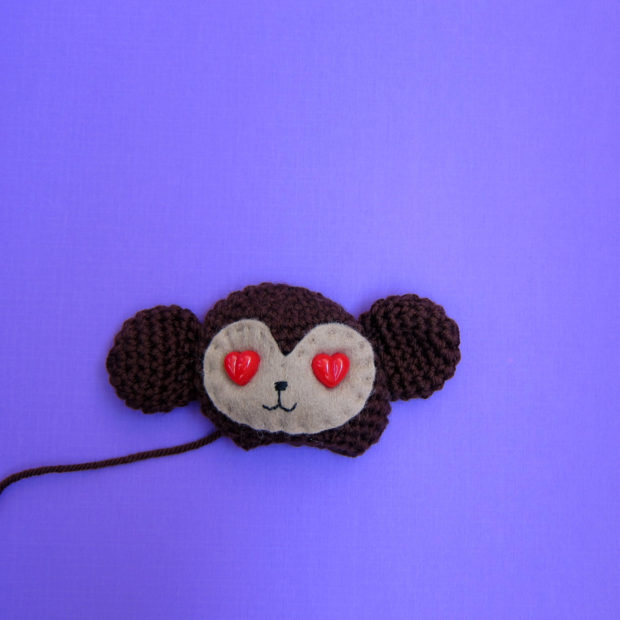
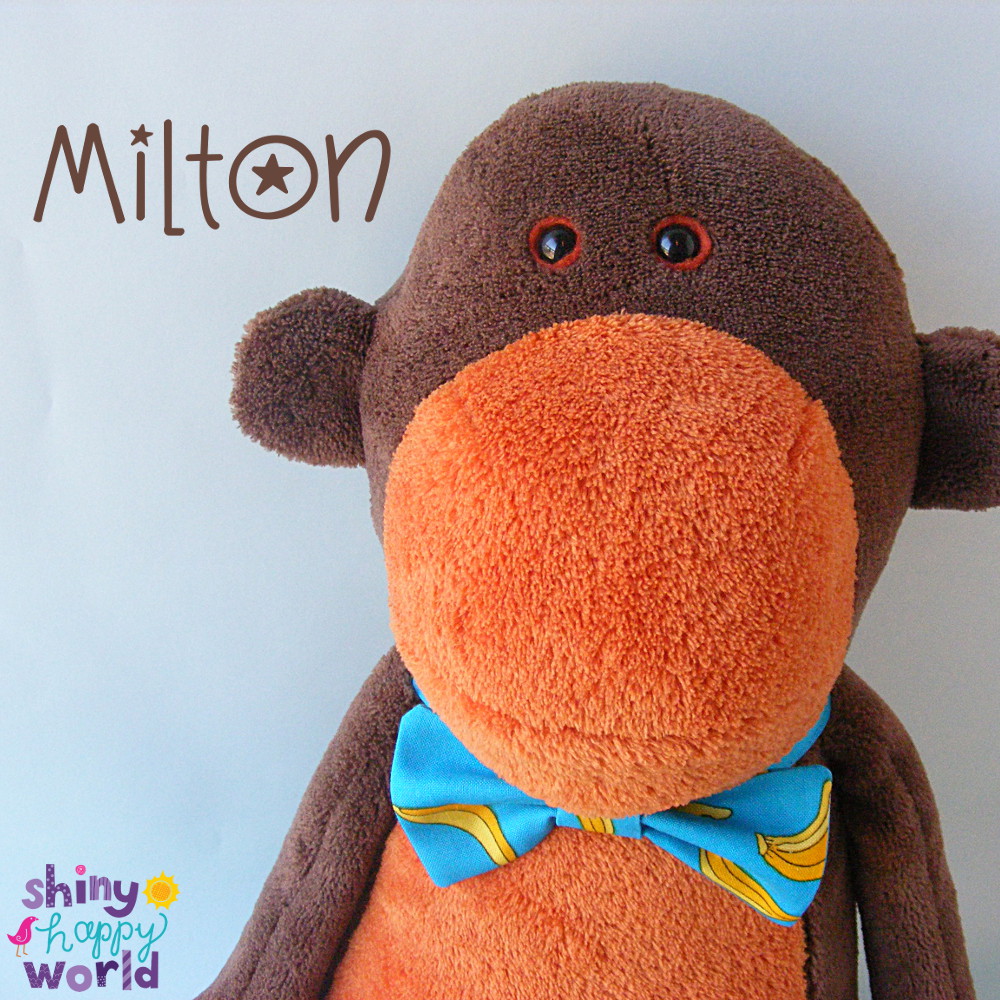
If you want to use a solid black craft eye (which is what I use for most of my softies) then it’s a big help to back those eyes with a circle of a lighter colored felt just a smidge bigger than the eye. That’s what I did with Milton Monkey. . .

Milton Monkey - a softie pattern from Shiny Happy World

. . . and with Brandon Beaver. . .

Brandon Beaver - a Cuddle Club pattern from Shiny Happy World

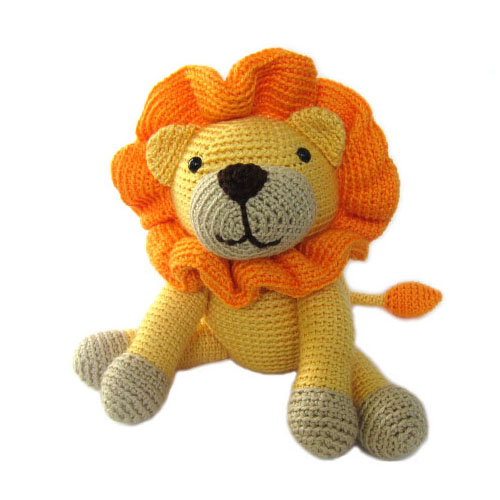
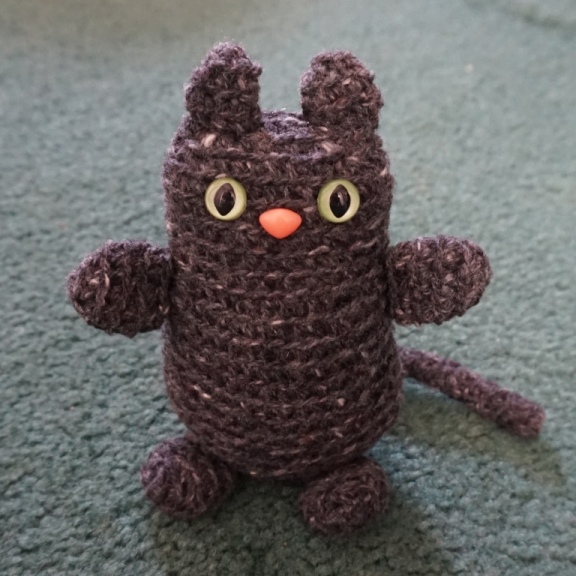
And that’s what I did with Felix. Here you can see those eyes a little closer.

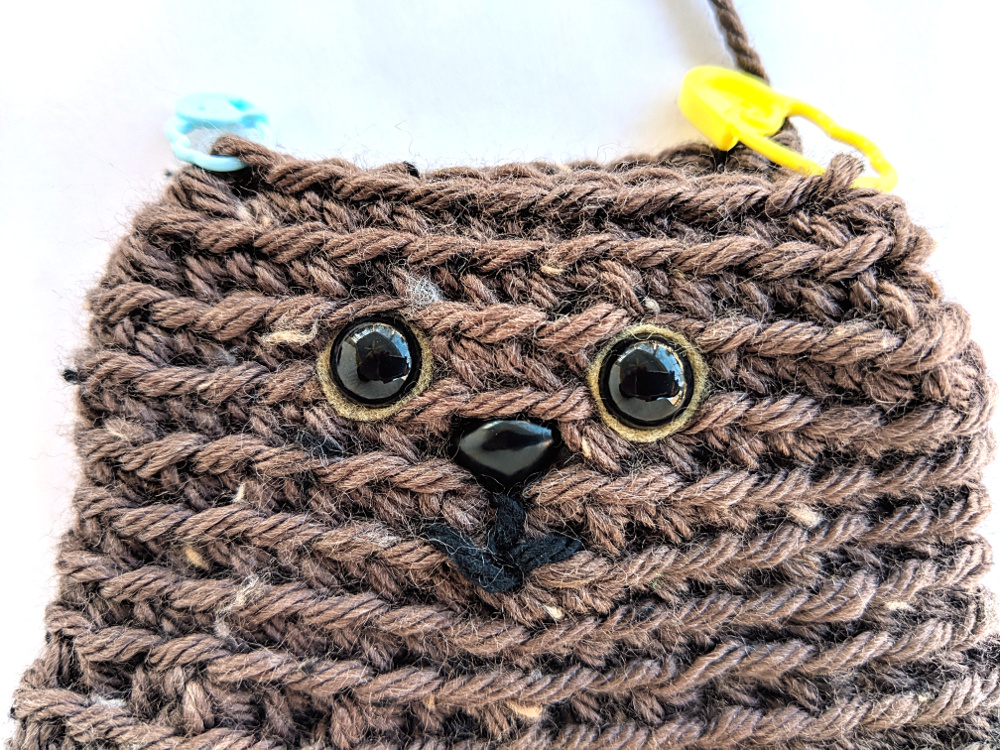
I used a 1/2″ circle of sandstone felt with 9 mm eyes.

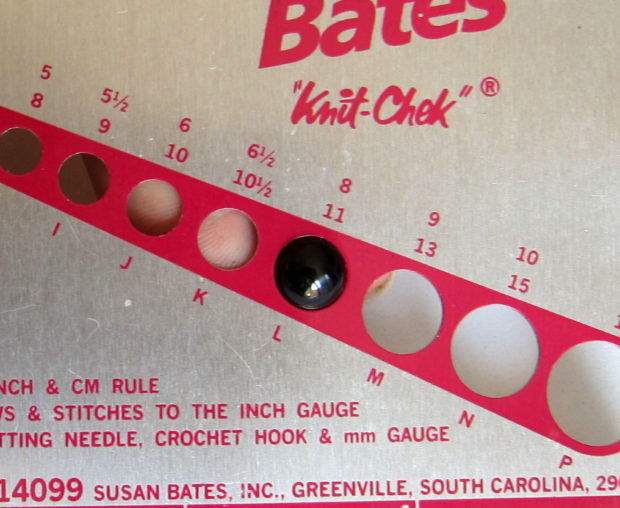
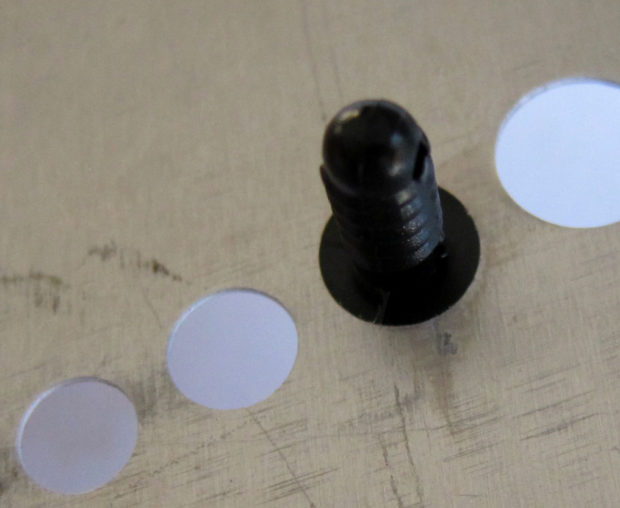
I use this tool to trace nice neat circles in lots of sizes.

circle template

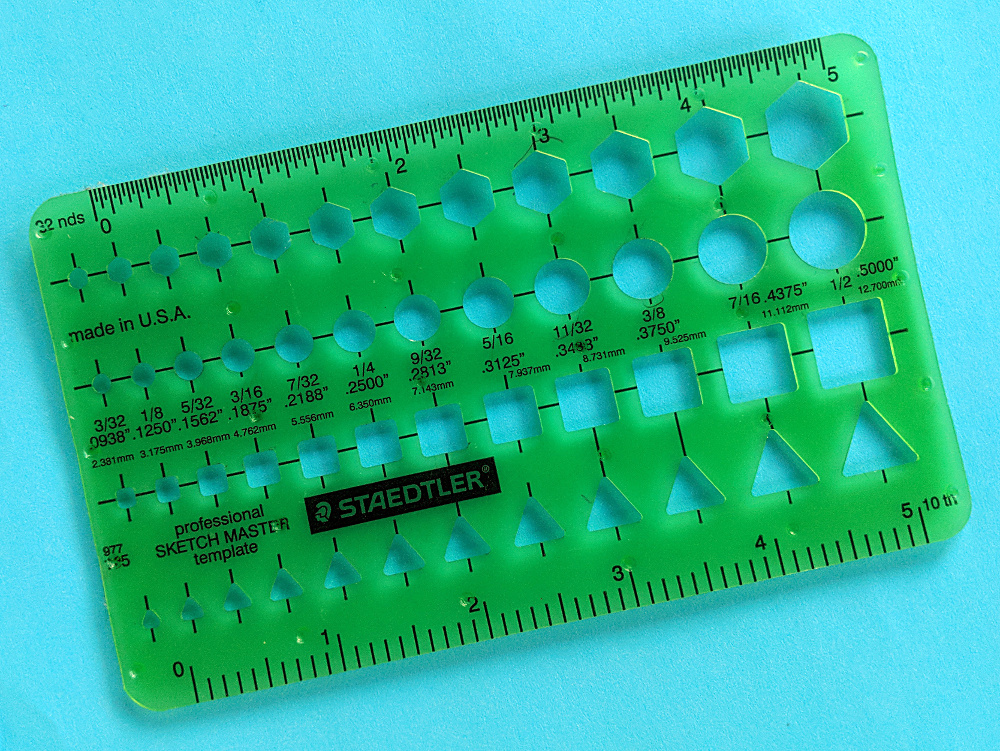
I don’t remember where I got this exact template, but I’ve seen similar items at Office Max and Staples.

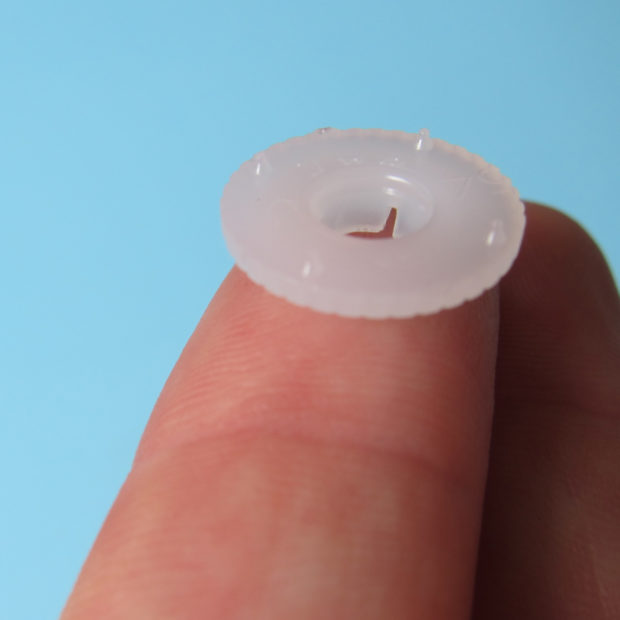
If you make a lot of softies and tend to use the same size eyes, you can also buy die-cut eyes which are perfectly perfect circles. I like the ones from Woolhearts on Etsy. You can choose the size and an assortment of up to six colors. It’s handy to keep a little stash of favorite colors.

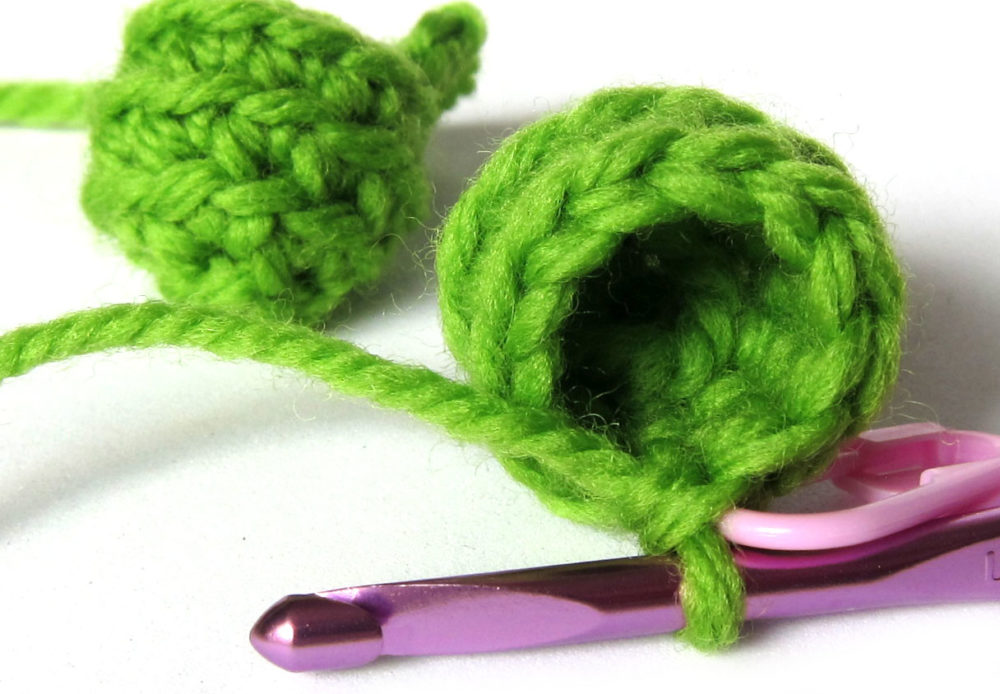
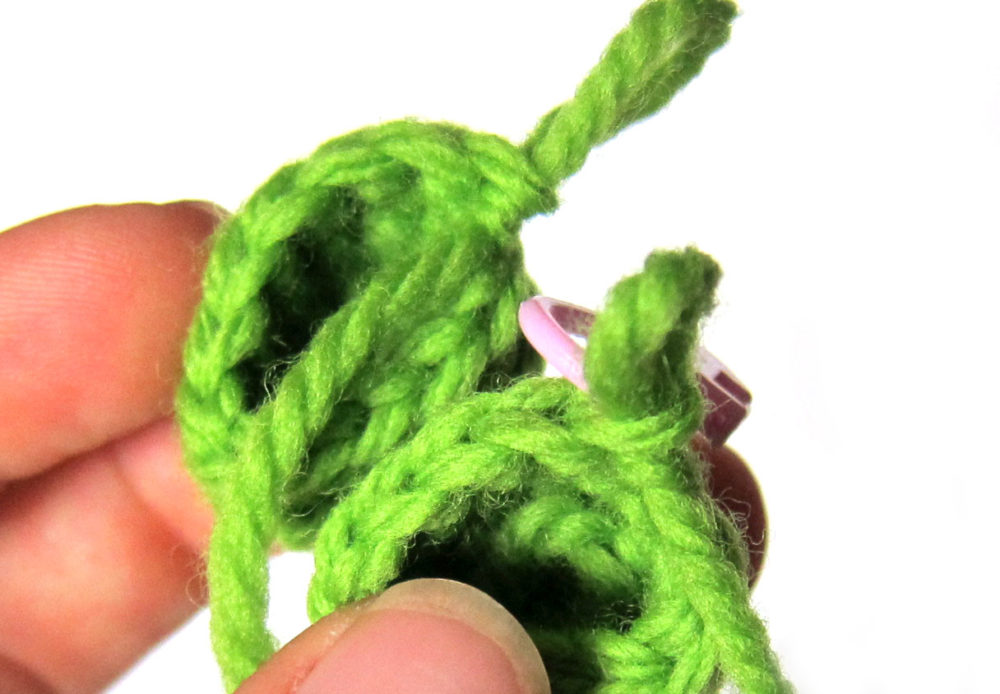
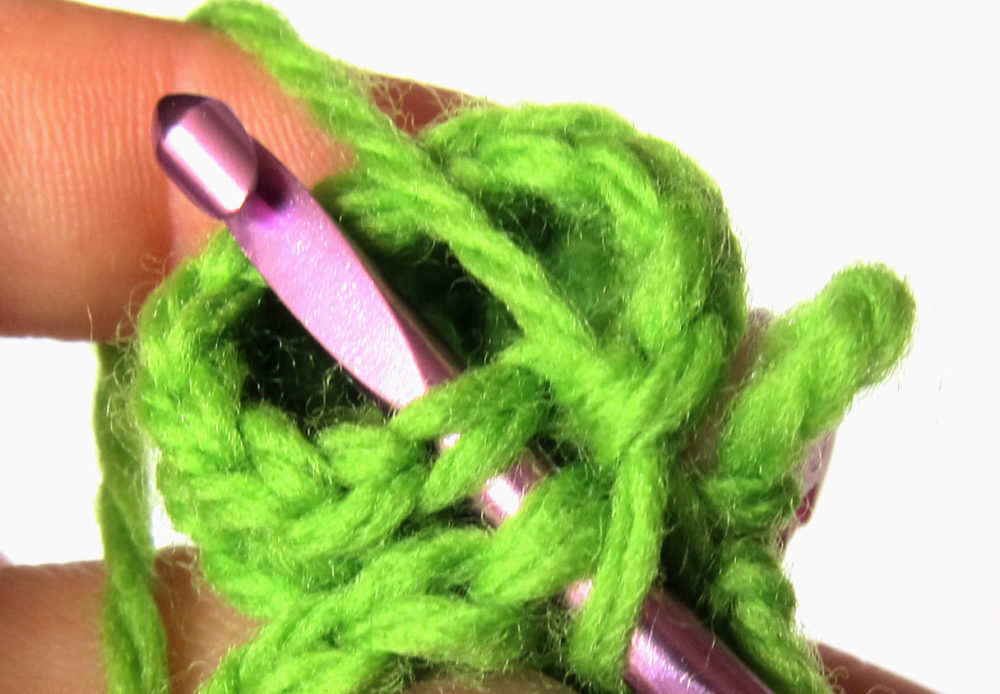
Once you have the circles cut, there’s one more step. You need to punch a hole in the middle for the shank of the eye to go through! You can use an awl, or you can use a 1/8 inch hole punch for extra neat holes.

Use a hole punch for nice neat holes in felt

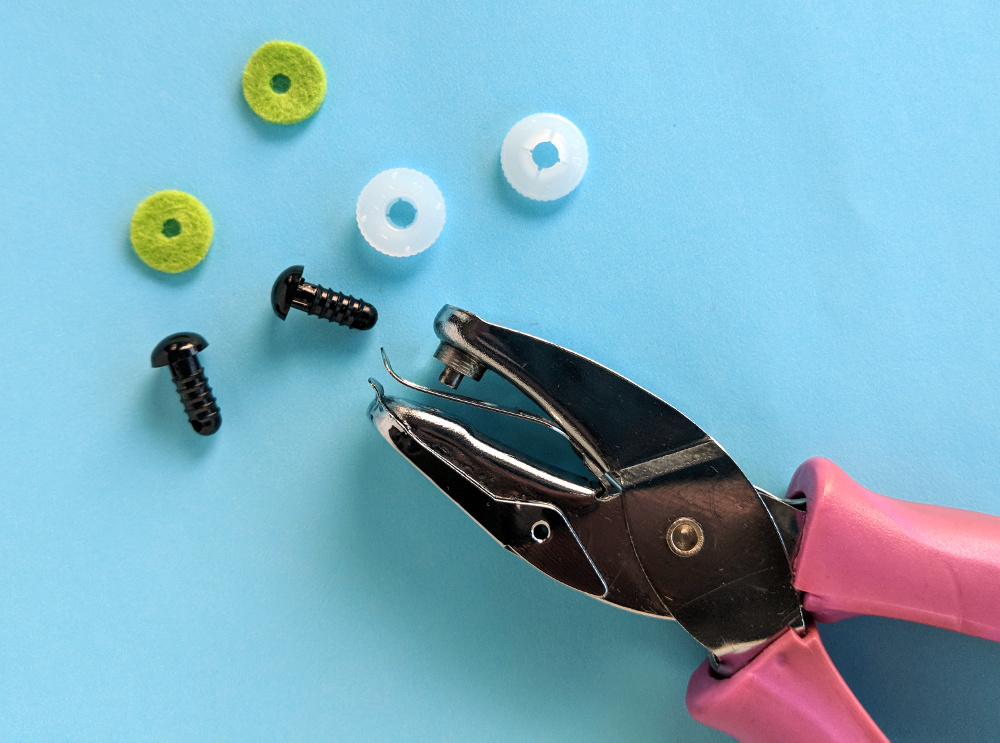
Perfect little backs to set off your eyes! I usually stick to a color that’s a lighter shade than the main color – but not too light! White in particular can make your softie look scared.

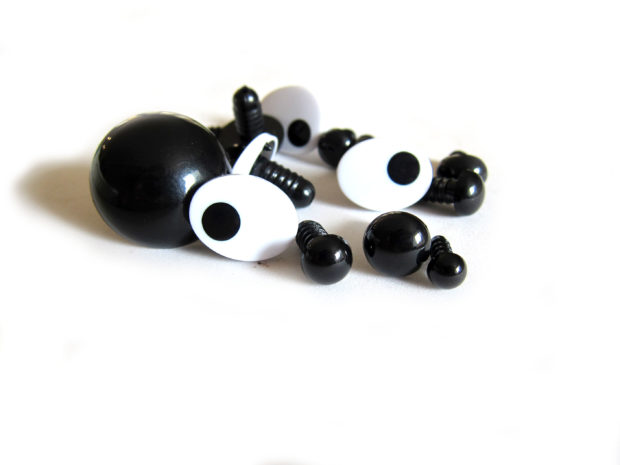
Another option is to use an eye with color already in it.

(When I do that I usually use a slightly larger eye than what the pattern calls for – like jumping from a 9 mm to a 12 mm eye.)

Look at Sharon’s cat (named Arnold). She also made a dark brown kitty, but she used awesome cat eyes for hers!

dark brown cat with yellow eyes

With those big eyes and no mouth he immediately reminded me of the cat from Kiki’s Delivery Service.

And now I need to make a black cat. 🙂

Here are handy links to all the posts about amigurumi eyes. . .

Return to the main table of contents for Let’s Learn to Crochet Amigurumi.

Move on to the lessons for standing legs.

Happy stitching!

FreshStitches + Shiny Happy World = One Awesome Crafty Resource!

If you’ve been in the Shiny Happy People group last night or this morning, you’ve gotten a sneak peek at some really big news.

Shiny Happy World and FreshStitches are joining forces to become one awesome crafty resource!

Let me back up a little. . .

When I started Shiny Happy World, I deliberately gave it a name that didn’t reference any particular craft because I play around with a lot of different ones – and I wanted to keep that arena wide open.

Stacey did the same thing when she started FreshStitches. She immediately became famous for her crocheted stuffed animals and ended up specializing in that, but in the background she’s always made softies, done a lot of knitting, some embroidery – and she’s currently working on a gorgeous EPP quilt.

Stacey and I met online and we’ve been friends for years now, and we’ve even collaborated on a few projects. It was time to bring our worlds together in an official way. 🙂

Before I get into the nitty gritty details of what that means for you, let me tell you a little bit more about Stacey.

Stacey Trock - the gal behind FreshStitchesLike me – Stacey is fond of rainbows and cuteness. 🙂

Also like me – she has always specialized in designs that are accessible to beginners.

She’s an amazing teacher and pattern designer!

I’ve been crocheting all my life. Really. I actually don’t remember learning. It’s just something I’ve been able to do forever. But I didn’t do anything fancy. I knew how to single, double, and triple crochet and how to do things like scallop borders – but I never learned to read a pattern and I only crocheted things like scarves and blankets.

Stacey taught me How to Crochet Things That Are Not Flat and it opened up a whole new world!

I started with her hat class on Craftsy. I have a big head and I can never wear store-bought hats. They dig a groove in my forehead and give me headaches. 🙁 Stacey’s class taught me how crazy easy it is to crochet in the round – and make a hat to fit my enormous head.

Once I learned how easy it is to crochet in the round, of course I had to try to make some stuffed animals that way. 🙂 Once again – Stacey’s Craftsy classes showed me the way!

(If you want to jump right in to learning to crochet – you can find all those classes that I learned from here – in the new Crochet Patterns section of Shiny Happy World.)

So – what does this grand alliance mean to you?

MORE AWESOMENESS!!!

Seriously. We’re not taking anything away from either group, but we will be bringing the best of each group to the other.

For example – Shiny Happy World has an amazing Facebook group full of incredibly warm, supportive, enthusiastic and positive Shiny Happy People. FreshStitches will be joining us there. In fact – they’re already joining up! There’s a post pinned to the top of the page inviting everyone – newcomers and existing residents – to introduce themselves. Pop on over to the group and give them a warm welcome!

FreshStitches does really fun CALs (crochet-alongs) and we’re going to be bringing some of that fun into the other crafts already here at Shiny Happy World. They just started a Christmas CAL and we’re expanding that to be a Christmas Craft-Along. Make any Christmas (or holiday or winter – whatever this season means to you) pattern from either Shiny Happy World OR FreshStitches and enter to win. There are prizes! You’ll see a new post next week – pinned to the top of the Shiny Happy People group – for you to show Works in Progress on that. I’ll announce it in the newsletter too.

We’re moving the FreshStitches shop into the Shiny Happy World shop as soon as that inventory arrives at my house and I can get it added. You guys! Wait until you see the awesome fun eyes! There are big googly comic eyes!

In short – the transition should be pretty seamless for all of you. You’ll just start to see more crochet awesomeness popping up on the website and the Facebook group!

FreshStitches and Shiny Happy World

What a great way to start 2018!

Happy crafting!

Best,
Wendi
Wendi Gratz from Shiny Happy World

SHARE THIS

The Crochet Wildlife Guide Review + FREE Penguin Pattern + Giveaway!

I am so excited! I love showing off a great book to you… and there are so many goodies! Keep reading to grab a FREE download of the Chinstrap Penguin by Philip Ha (aka Sir Purl Grey) AND enter to win a digital copy of the book, The Crochet Wildlife Guide.

The Crochet Wildlife Guide

You may have heard me say this before on the blog, but I get a lot of amigurumi books across my desk and for many of them, I say, ‘oh, ok. This has some cute patterns.’ And it ends there.

And I’ll admit it, my books are among them.

Much of the bare-bones nature of many books you see is completely driven by the publisher’s desire to save money. Cute illustrations? You have to pay an illustrator for those. Step-by-step detailed instructions? Nope. That takes too many pages. Fancy shaping techniques? Oh, no. That doesn’t appeal to a wide-enough audience.

For a crocheter who wants extra information either because they’re a beginner (and need the help and explanations) or are adventurous and want to try something new (hence, needing explanations of new and complicated stitches), this formula can be very frustrating.

Needless to say, when a book comes to me that breaks the mold, I jump out of my chair with glee!

The Crochet Wildlife Guide

The Crochet Wildlife Guide is a self-published book by Philip Ha and Jeff Wiehler, and the book is filled with creative crochet ideas and an artist’s touch. I was impressed by the coverage of basic crochet techniques as well as detailed instructions and illustrations for each animal.

The Crochet Wildlife Guide bird

Each project contains a diagram (as shown above) that allows you to see each piece and how they are put together. These photos are often what takes a good pattern and makes it amazing and easy-to-follow. (It’s why I include step-by-step photos in all of my individual patterns… no matter how many words you have, sometimes, you just need a photo!)

I was also enchanted by the darling illustrations in the book (including this table of contents).

The Crochet Wildlife Guide table of Contents

The patterns included in the book walk the line perfectly between wildlife-realism and kawaii cuteness. Amigurumi like the red panda on the cover, have little details so the animal is instantly identifiable and unique, but not fussy and still cute with wide appeal.

The book also includes a table of the skills required for each pattern. This is such a great idea… you can identify the project that’s just right for you!

The Crochet Wildlife Guide difficulty levels

Throughout the book, the authors emphasize places where you can become your own designer, by highlighting small changes you can make or pointing out the design techniques used to create a particular shape.

The Crochet Wildlife Guide Bat

The photography, with animals photographed in nature, is lovely as well.

The book is available for purchase in digital or print form, from The Crochet Wildlife Guide website or from Amazon.

FREE Chinstrap Penguin Pattern

Free penguin crochet pattern

Phillip and Jeffrey have given us a pattern that didn’t make the book for FREE so that you can get started on some crochet cuteness right away!

Click here to download the pattern:  Penguin pattern by SirPurlGrey

Happy stitching!

How to Crochet Standing Legs with No Hole

green crochet project in prgress. Text reads: How to Crochet Standing Legs with No Hole

Today we’re lucky enough to have a guest post written by Mirena of Mirena Made! Mirena has been a FreshStitches customer for years, and she creates hand-crocheted creations that she sells in her shop. (Yes, you too can sell anything you make with Shiny Happy World or FreshStitches patterns!)

Thank you so much, Mirena, for coming by and sharing this new technique with us! It’s a nifty trick that lets you crochet standing legs with no hole. Nice!

New Technique to Crochet Standing Legs in Amigurumi

I am a huge fan of FreshStitches designs and of Stacey and I also prefer patterns where the sewing and attaching is kept to a minimum (I suspect there are other amigurumi crocheters like me!)

adorable bear from FreshStitches Ami Club

One of my favorite FreshStitches patterns is Bentley the Bear, which is crocheted using standing legs.  In the standard technique, you get little hole that remains between the legs and you have to sew it afterwards… ah, sewing!

So, here is a technique that eliminates the hole and lets you continue your crocheting without worrying about it!

Step 1: You crochet the first leg exactly as stated in the pattern BUT at the end you cut the yarn, leaving a long tail and you DO NOT fasten off.

Step 2: You crochet the second leg as stated in the pattern (leaving the yarn attached, as instructed).

how to crochet standing legs without leaving a hole

Step 3: You take both legs and you place the first one behind the second one, matching their stitches.

how to crochet standing legs without leaving a hole


Step 4: You place the loop of the first leg on your hook and using its tail you single crochet in the next stitches through both thicknesses. You do 4 sc in total and you fasten off.

how to crochet standing legs without leaving a hole


Step 5: You place the loop of the second leg on your hook and you are ready to continue crocheting!

how to crochet standing legs without leaving a hole

The disadvantage to this technique is the stitch count. Normally, you would have 36 stitches after joining the legs but because we crocheted some of them them to attach the 2 legs together, we lost a few stitches. I solve this problem by increasing in the next round.

This technique will work with any pattern with standing legs, you just have to pay attention to the stitch count and adjust accordingly!

What a fabulous technique! Thanks so much for sharing, Mirena! You can use this trick to crochet standing legs with no hole in ANY of the standing-leg patterns in the shop. It’s my favorite body shape – so there are lots to choose from – but here are a few of my favorites.

Here are all the handy links to posts about crocheting standing legs. . .

Return to the main table of contents for Let’s Learn to Crochet Amigurumi.

Move on to the lessons showing how to change colors.

Happy stitching!

What size are my craft eyes?

Do you have some plastic craft eyes in a box somewhere… and you aren’t sure how to tell what size they are?

Umm… yup, me too. Don’t worry! Today, I’ll show you how easy it is to figure out what size they are!

All you need is a ruler with millimeter measurements. A craft eye is sized by its diameter in millimeters. So, to determine the size, place the ruler across the widest part of the eye.

Using a ruler to measure plastic safety eyes

You can see that this eye is a 24mm. Easy!

If you have a needle gauge and small eyes, I have an even easier way. Knitting needle measurements are determined by the diameter of the needle, so you can simply stick the eye in the gauge!

Measuring a craft eye with a needle gauge

This is an 8mm eye, and it fits fully in the 8mm slot (size 11 needle).

Here’s a look at the back view:

Note that the eye fits snugly in the hole, but does not go entirely through like a knitting needle would.

Now you can organize your craft eye stash!

How to crochet the mane on a lion!

Our Kepler the Lion CAL is well underway! The pattern is available for sale here.

Amigurumi Lion Stuffed Animal Pattern

The trickiest part about this pattern is the mane. And although the pattern has step-by-step photos, I thought you might enjoy a little video that demonstrates the hardest part: planning and doing the first round of single crochets for the mane.

(Tip – you can use this skill in lots of different ways – like attaching a skirt to a doll, a foot to a slug, petals to a flower, and more.)

For this technique, I begin by attaching with a single crochet (read more about how to do that, here!) Why? This is an easy way to join a new yarn, and because you’re doing a single crochet, you’ve actually started the work! No need to get confused by a slip stitch or extra knots.

crochet lion pieces

Don’t forget to share how your lion is coming along!

Here are handy links to all the posts about crocheting more advanced shapes. . .

Return to the main table of contents for Let’s Learn to Crochet Amigurumi.

Move on to the posts about troubleshooting common problems.

Happy stitching!

How to Use Safety Eyes

Craft eyes. Plastic eyes. Safety eyes. Animal eyes. They’re called lots of different things!

You can use them for both sewn and crocheted softies. I’ve even used them in applique wall hangings. I just use a pair of wire cutters to snip off the post that sticks out after you attach the washers.

colored craft eyes or safety eyes fro making stuffed animals

I’ve made a video (below) that shows you how to install them. In the video I’m demonstrating on a crocheted stuffed animal, but you can use these eyes in sewn softies as well. You just need to poke a hole! I like to use a ball point awl. It creates a hole by stretching the fibers around the opening instead of by cutting any of the threads. If you cut a hole in stretchy knit fabric, that hole can run over time, just like a ladder in your stockings.

I prefer eyes with ridged shanks and plastic washers. I feel like they hold the best BUT they’re harder to use with smaller size eyes. It’s just really hard to hold such tiny pieces straight while you push the very tight washer on! So for the smallest eyes (4.5 mm) you’ll get smooth shanks and metal washers instead. They’re still small, fussy pieces, but they’re not nearly as hard to work with. Also – 4.5 mm eyes are so small that I really only use them for small felt softies – the kind of softies that stand on a shelf instead of being played with a lot. 

Speaking of safety – just because they’re called “safety eyes” doesn’t make them safe for babies. The eyes themselves will never come apart (here’s a video showing how to remove safety eyes – you’ll see how hard it is to do). But babies can chew through the fabric around the eye, which then frees the eye (along with the still-attached washer) which is a choking hazard. So only use these on toys for kids over three, or toys that will be played with under supervision.

Below the video I’ve also included a quickie photo tutorial for those of you who want to get ‘straight to the point’ as well as some other links you might like!

Video Tutorial for Craft Eyes

This is a little 5 minute video. Enjoy!

How to install craft eyes

Do you see those little points?

plastic washer on a safety eye

Those little ‘barbs’ dig into the fabric and keep the eye from rotating. Which isn’t a big deal if you’re just using a black craft eye, but is crucial if you’re using a comic eye. You don’t want them twisting and giving you googly eyes!

The ridges on the posts of craft eyes help the washer click on (and stay on!) securely. I love hearing the ‘click’ as I press the washer on! The ridges also help to make sure the washer presses on evenly.

how to attach a craft eye 2

So, let me show you how to install a craft eye with a plastic washer.

First, insert the post of the craft eye between the stitches on your piece where you want it to go. For sewn softies, use a ball-point awl or a small knitting needle to poke a hole. I recommend that you place the eyes first, before pressing on the washers, just to see if you like the look.

monkey with heart eyes

Once your eyes are positioned how you’d like, press the flat side of the washer (that’s the one with the tiny barbs!) onto the post.

Here’s a photo of how it will look (but without the fabric getting in the way… obviously, your piece doesn’t really look like this!):

how to attach a safety eye or craft eye for making stuffed animals

I don’t want you to stress too much about this, because if you try to put the washer on backwards, it just won’t go.

Now, push! You’ll hear that click, and it’s on!

A note about smaller eyes

Most 6 mm craft eyes, because they are SO tiny, have smaller plastic washers without the ‘barbs’. And most 4.5 mm eyes (as mentioned above) have metal washers. But don’t worry, the same rule applies: flat side towards the fabric. 

6mm safety eyes

This post about sources for my favorite tools and supplies has links to places where you can buy safety eyes.

Here are handy links to all the posts about amigurumi eyes. . .

Return to the main table of contents for Let’s Learn to Crochet Amigurumi.

Move on to the lessons for standing legs.

Happy stitching!

Crochet: Back Loop vs. Both Loops + Video

This post was originally published April 28, 2015… but it’s so popular that I’ve updated it and added a video!

Crocheting is so much fun because there are so many options! Even a simple single crochet gives you the option of crocheting through the front loop, both loops or the back loop!

crocheting through the back loop

Today, I’ll show you where to insert your hook for the most two popular techniques: the back and both loops. I’ll also link to some posts that you might find helpful… and included a video tutorial at the end!

how to count the number of stitches in a round, crochet tutorial by FreshStitches

The Back Loop

Every stitch is a V laying on its side. Do you see the V in the above photo? The back loop refers to the top leg of this V.

crocheting through the back loop

To use this technique, insert your hook where I’ve put a black dot in this photo:

crocheting through the back loop

Why the back loop?

Crocheting through the back loop is my favorite! You’ll want to read this blog post that outlines all of the advantages!

Both Loops

The term ‘both loops’ refers to both the back and front loops. This is the ‘standard’ when a pattern doesn’t specifically reference any loops. This is the entire V:

both loops

To use this technique, insert your hook where I’ve put a black dot in this photo:

insert both loops

Video

I know it can be hard to picture what these variations look like when you’re actually crocheting, so I’ve recorded a video for you!

What’s it look like in the end?

You’ll want to have a look at this blog post where I show you photos of how each technique looks, in the round and in rows!

Which is your favorite?

How to Start Amigurumi the Easy Way! The Sloppy Slip Knot.

Sloppy Slip Knot - the easiest way to start amigurumi (so much easier than the Magic Ring)

Today I’m going to show you my favorite way to begin crocheting amigurumi: using the sloppy slip knot. I find it easier to do than the magic ring, and it closes up nicely so that you don’t have a hole at the start of your work. I’ve included a photo tutorial and a video tutorial.

(If you really want to use a Magic Ring, I’ve got a tutorial here. But trust me – the sloppy slipknot is soooooo much easier. Once I learned it I never looked back.)

Sloppy Slip Knot Photo Tutorial

Step one: To begin, don’t make a slip knot. Instead, simply twist the yarn once around your crochet hook.

Easiest way to begin your amigurumi crochet! Try this technique: the Sloppy Slip Knot!

Step two: Chain two stitches.

Easiest way to begin your amigurumi crochet! Try this technique: the Sloppy Slip Knot!

Step three: Single crochet 6 times in the second chain from hook. Not sure which one is the second chain? Check out where this arrow is pointing!

Easiest way to begin your amigurumi crochet! Try this technique: the Sloppy Slip Knot!

It’s important to note that you go into the second chain away from the hook, not the second chain that you crocheted. The loop on the hook doesn’t count as a stitch.

Easiest way to begin your amigurumi crochet! Try this technique: the Sloppy Slip Knot!

This is what your piece will look like when you have done your 6 single crochets. There’s a hole in the middle.

Step four: Here’s the magic part. Just pull the tail, and your hole closes up! And don’t worry, the hole won’t slip open over time.

Easiest way to begin your amigurumi crochet! Try this technique: the Sloppy Slip Knot!

It’s easy!

If the hole doesn’t pull closed, this probably means that you crocheted your 6 stitches into the incorrect stitch. No worries, try again!

See? Isn’t that a lot easier than the Magic Ring?

And now you’re ready for the second round. You’ll want to read this post on crocheting the 2nd round of amigurumi for help counting your stitches.

Sloppy Slip Knot Video Tutorial

A picture is worth a thousand words, but a video is probably worth a million! Here’s a video of me doing the Sloppy Slip Knot.

Do you think it’s a technique you’ll try?

Here are handy links to all the posts about working the first round of your crochet pattern. . .

Return to the main table of contents for Let’s Learn to Crochet Amigurumi.

Move on to the lessons for round two and beyond of your pattern.

Happy stitching!

How much yarn does crochet use? Single vs. double crochet

My previous post, how much yarn do I need? has been so popular that I wanted to expand on it a little bit today by looking at adding another stitch into the mix, the double crochet.

How much yarn do I need crochet

Double Crochet vs. Single Crochet

The measurements above show you how much yarn you’ll use for a single crochet stitch for different thicknesses of yarn.

Did you know that different stitches use different amounts of yarn, too?

For my measurement, I measured single crochet and double crochet, both using a size H (5.0mm) hook, worsted weight yarn and crocheting through both loops.

how much yarn single crochet uses vs. double crochet

How much yarn does a double crochet in bulky yarn use? Or fingering? I’m only one gal! You’ll have to measure that yourself! Here is a tutorial on how to measure how much yarn a stitch takes.

You can use this number to calculate how much yarn your project will use or how many rows you can work on your blanket before you run out of yarn. Cool, right?

Which stitch should I use?

It looks like the double crochet uses more yarn, but keep in mind that it’s also a bigger stitch, too… so one stitch covers more surface area.

Knitting, too?

You can do the same comparison for any two stitches… even comparing a knitted stitch with a crochet one! Check out Not So Granny’s post on Does crochet really use more yarn than knitting?

Enjoy!

Best,
Stacey