Free Christmas Stocking Pattern

Free Christmas stocking pattern from Shiny Happy World.

Use this simple stocking pattern with whatever embellishment you choose. Or none at all! The lined construction is easy enough for beginners, and it works with any quilt, appliqué or embroidery pattern.

Throughout most of the instructions I’m using this free Santa appliqué pattern, but you can use any decoration you like. Here’s the exact same stocking made with three different cats from this quilt pattern.

Free Christmas stocking pattern from Shiny Happy World.

Here’s how to make the stocking. . .

Step 1

Download the stocking pattern here. The pattern pieces print on two pages. Overlap them so that the heart and the edges of the stocking line up and tape them together. There’s more info on joining pattern pieces like this here.

Step 2

Cut two rectangles 9″ wide and 19″ tall from your main fabric, your lining fabric, and 100% cotton batting. My favorite batting is Warm & Natural.

Step 3

Layer one main fabric rectangle with one batting rectangle and quilt the layers together.

Free Christmas stocking pattern from Shiny Happy World.

I’m showing this from the back so you can really see the quilting. Any design will do – it just needs to hold the two layers together.

Repeat with the other main fabric and batting rectangles so you have two pieces.

Step 4

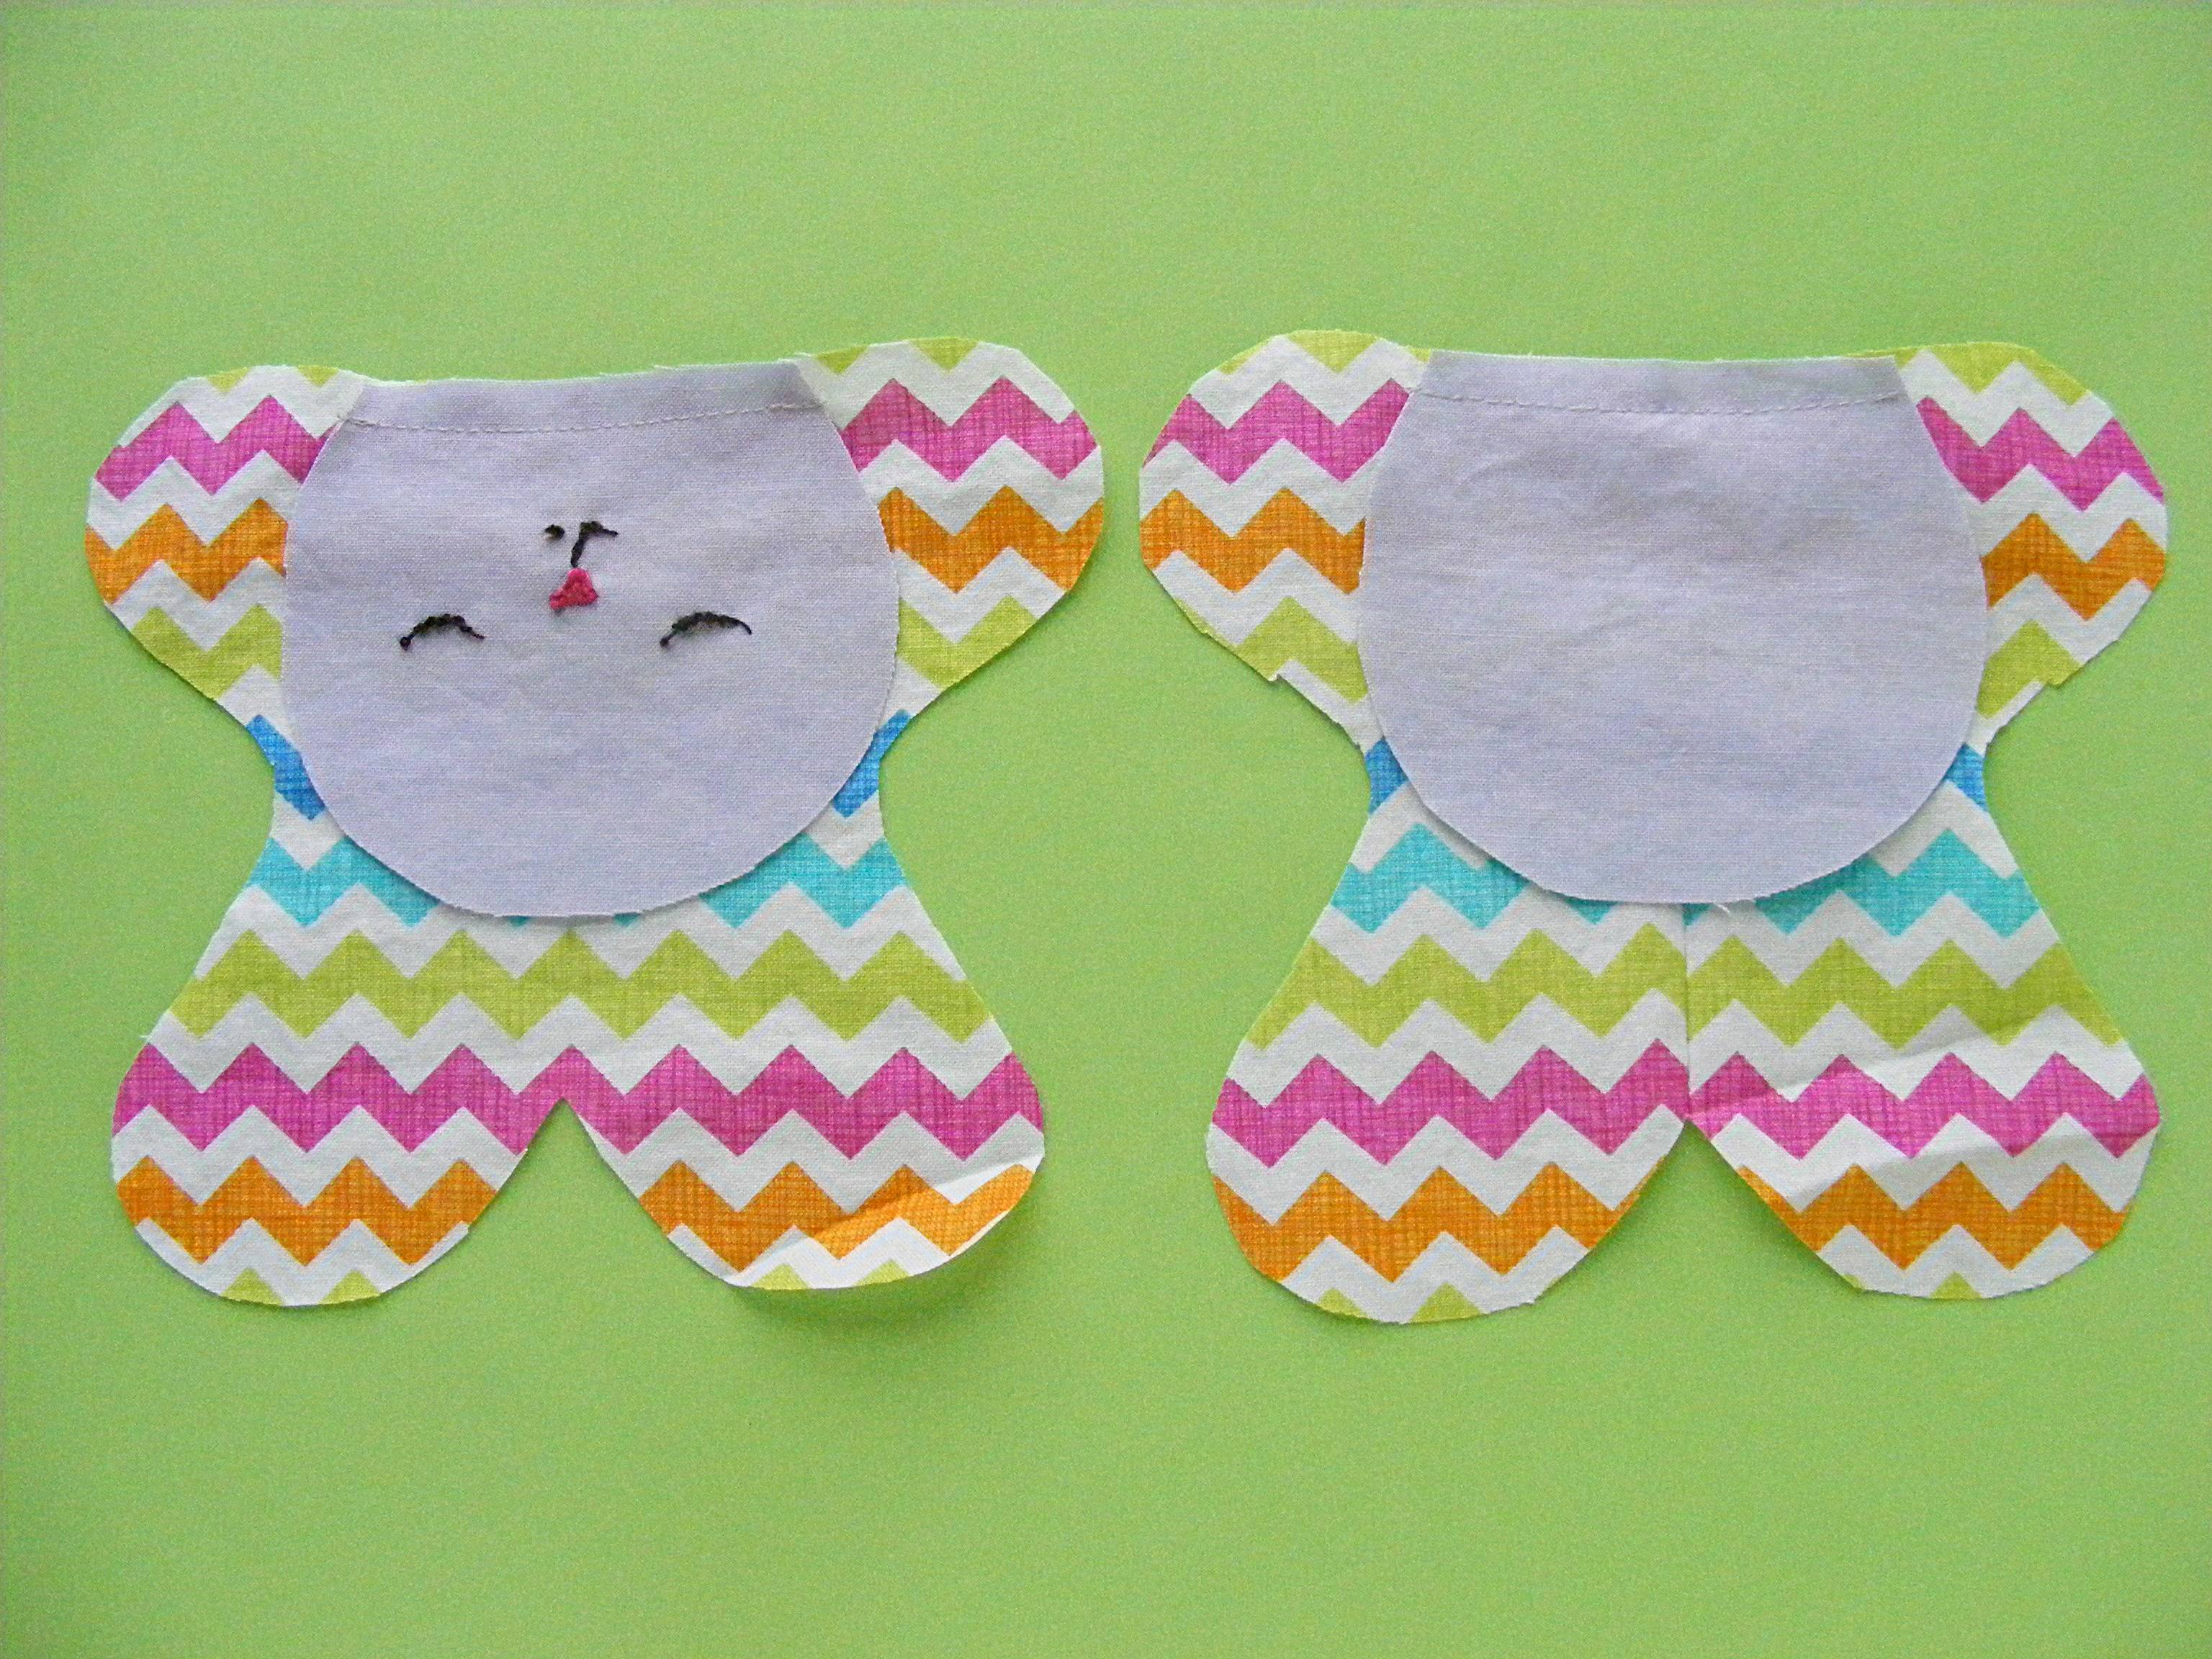
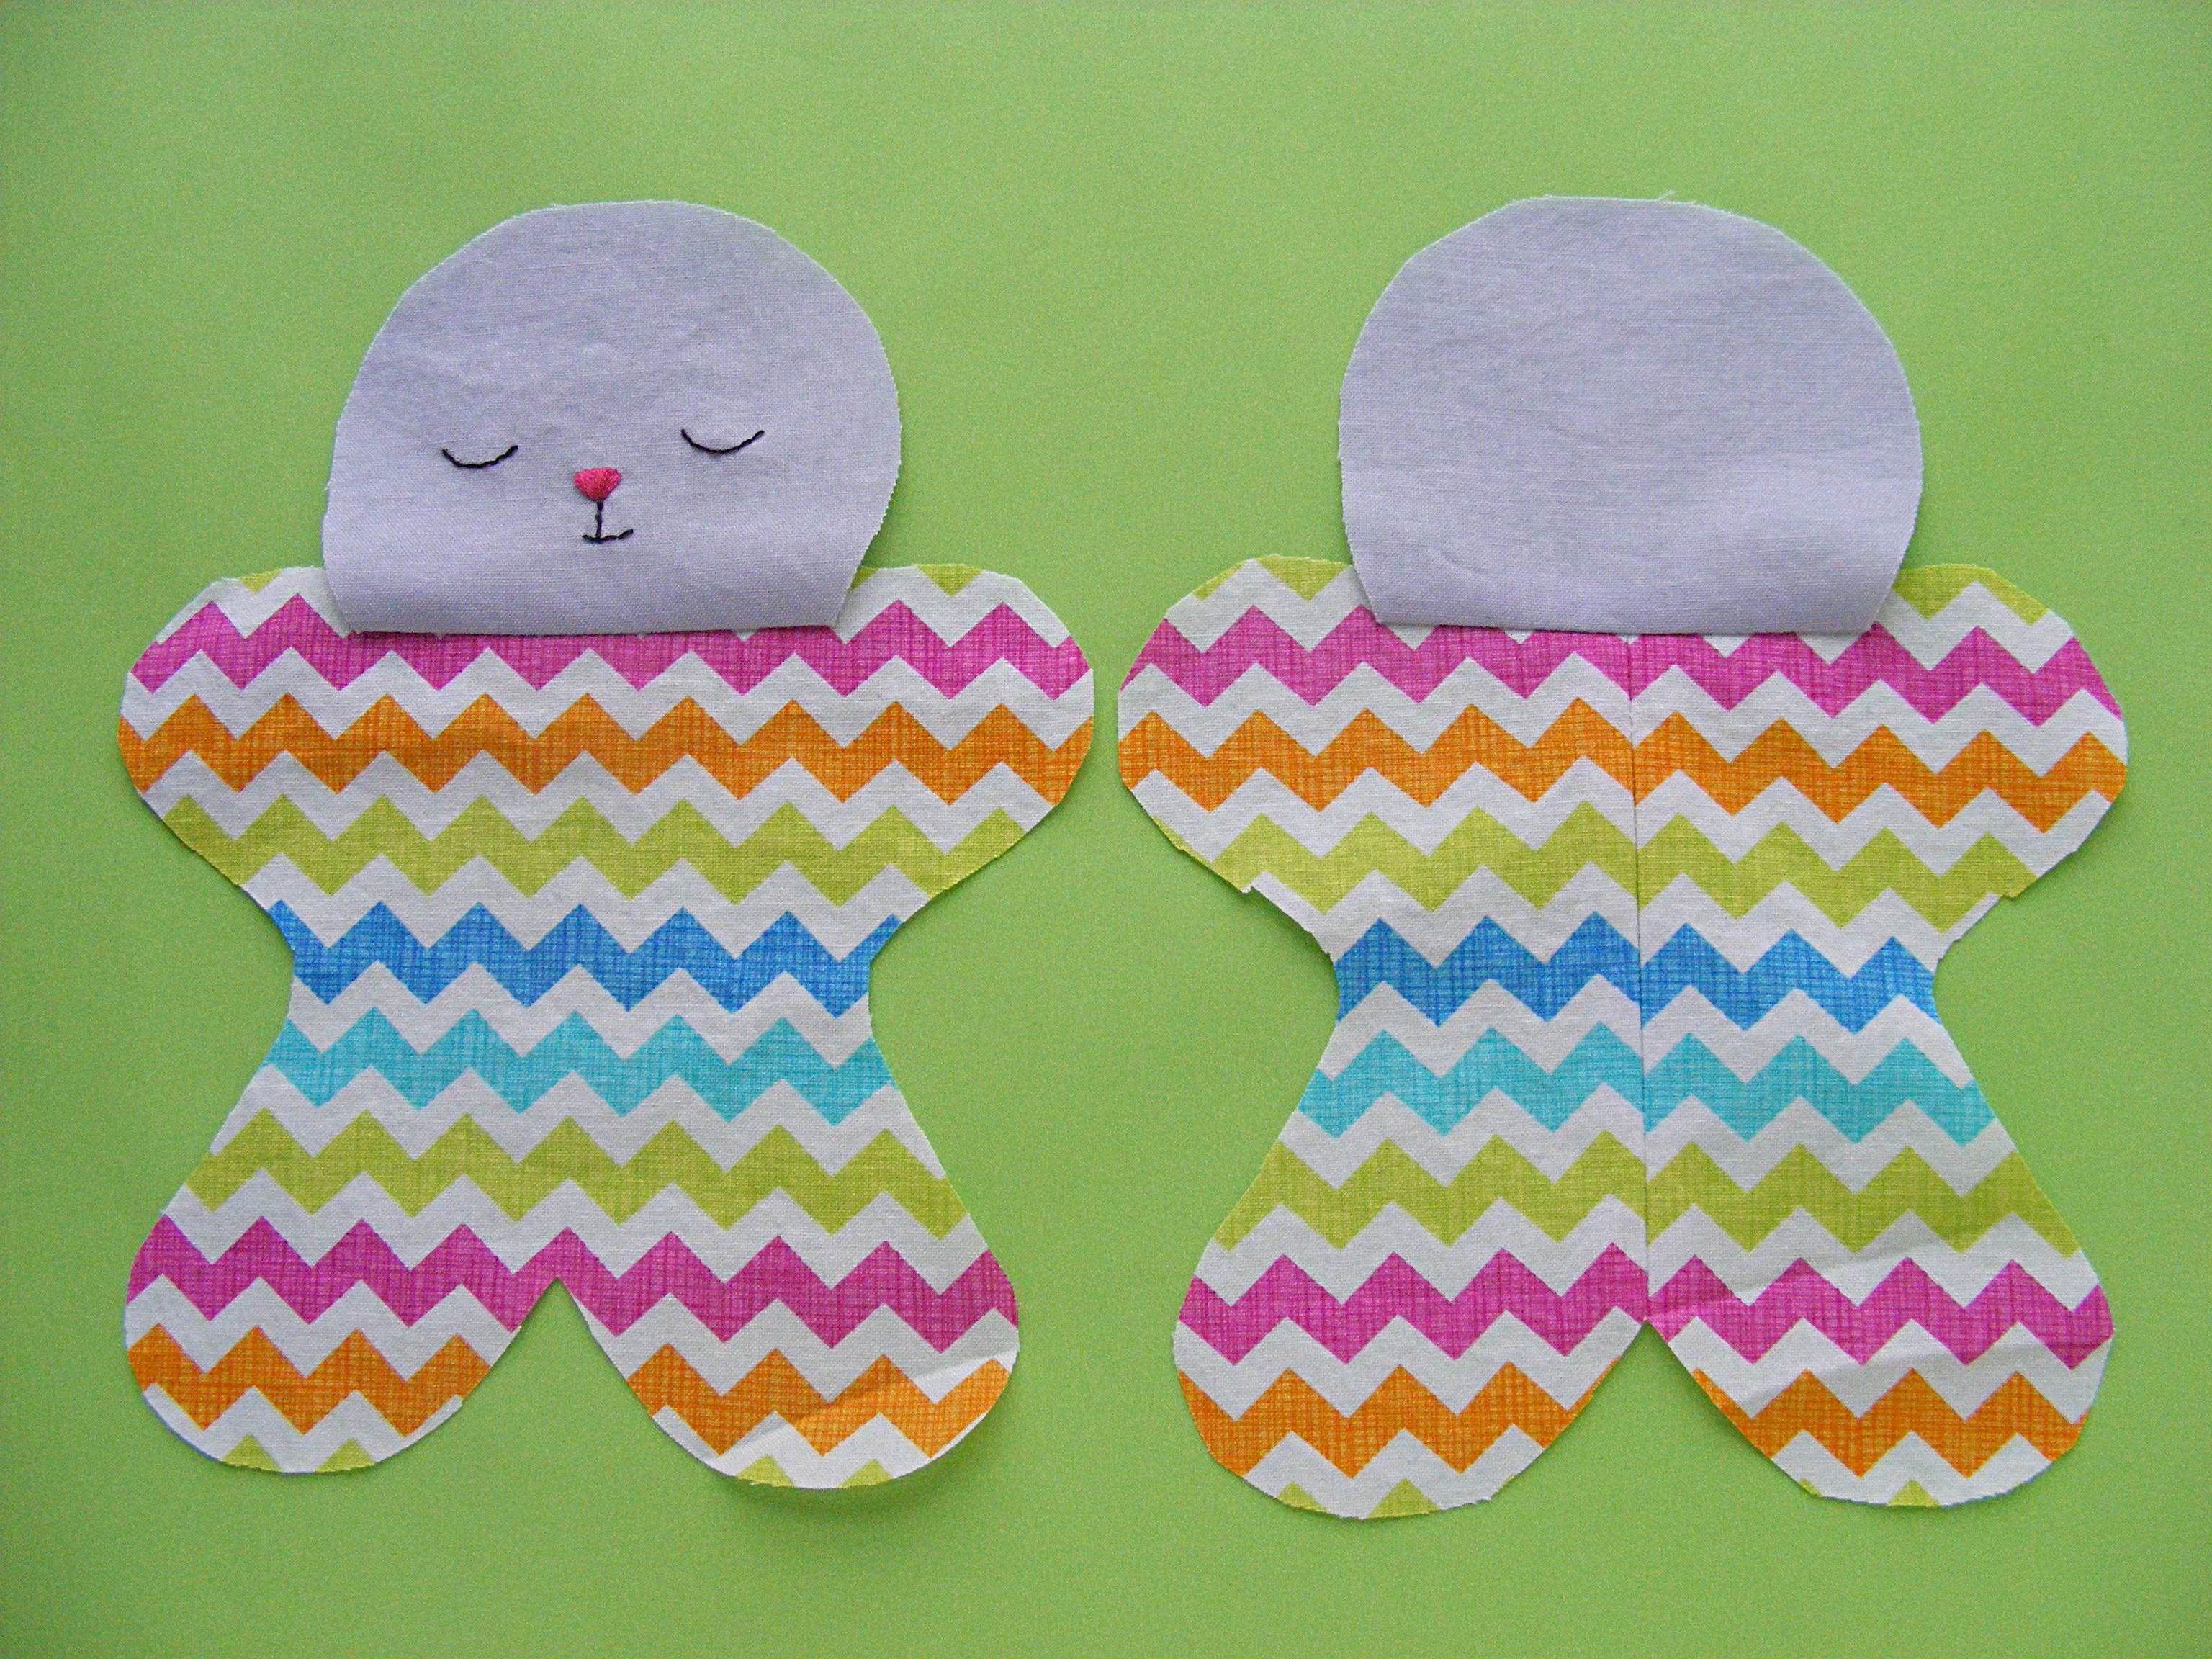
Layer the two quilted layers and the two lining layers right sides together and cut four stocking pieces – two main and two lining.

Step 5

Decorate the front of the stocking however you like. I used my favorite appliqué with fusible adhesive method. You can see how I do that in this video.

If you’re doing floating heads (like the cats) no adjustment is needed. Just print the pieces out at whatever size you like.

If you’re doing a head that’s cropped off at the bottom (like the Santa) you’ll need to make some adjustments because the bottom of the stocking slants.

Free Christmas stocking pattern from Shiny Happy World.

On the original Santa appliqué pattern, the beard is cropped off at the horizontal dotted line. For the stocking I left a lot of fusible adhesive below that dotted line and fused the whole thing to the fabric. That extra fabric will accommodate the slant at the bottom of the stocking.

Free Christmas stocking pattern from Shiny Happy World.

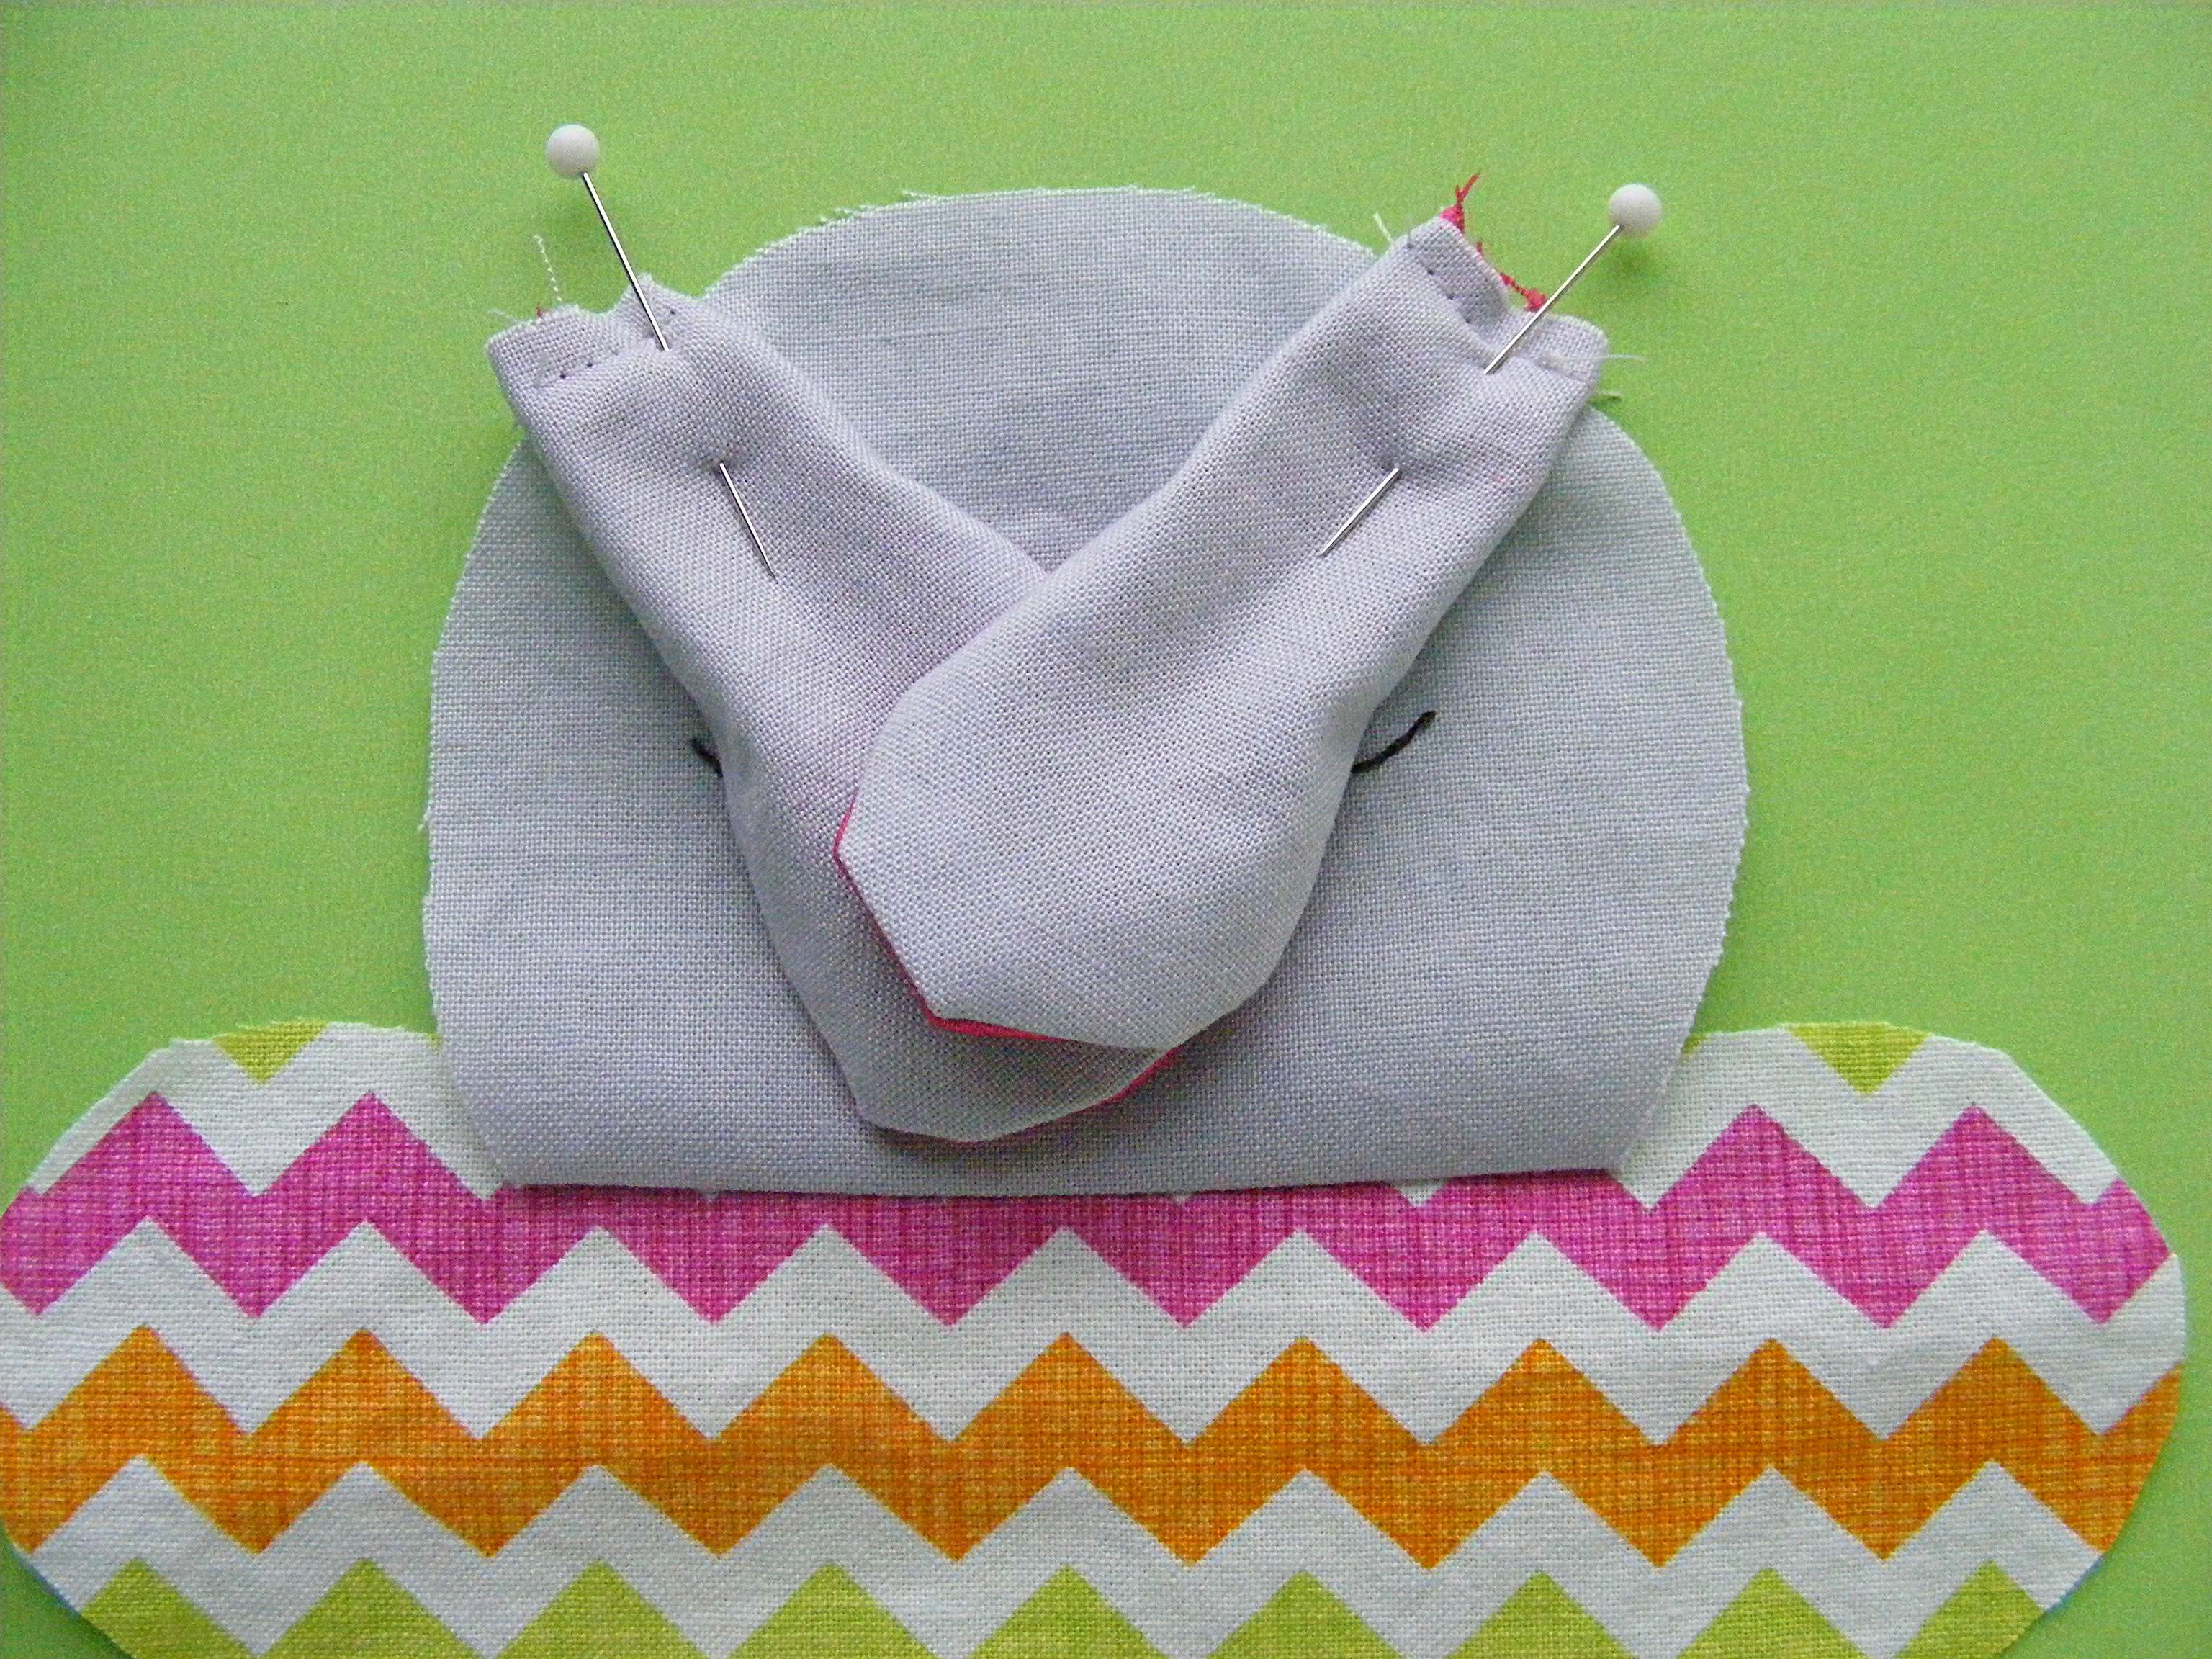
Arrange the pieces on the front of the stocking. Let that extra beard fabric overhang the bottom edge of the stocking.

Free Christmas stocking pattern from Shiny Happy World.

When you’re happy with the arrangement, fuse it down, stitch around the edges, and then trim off the extra beard. You can use this same technique for any animal bodies that you want to use on the stocking from any of my quilt patterns.

Step 6

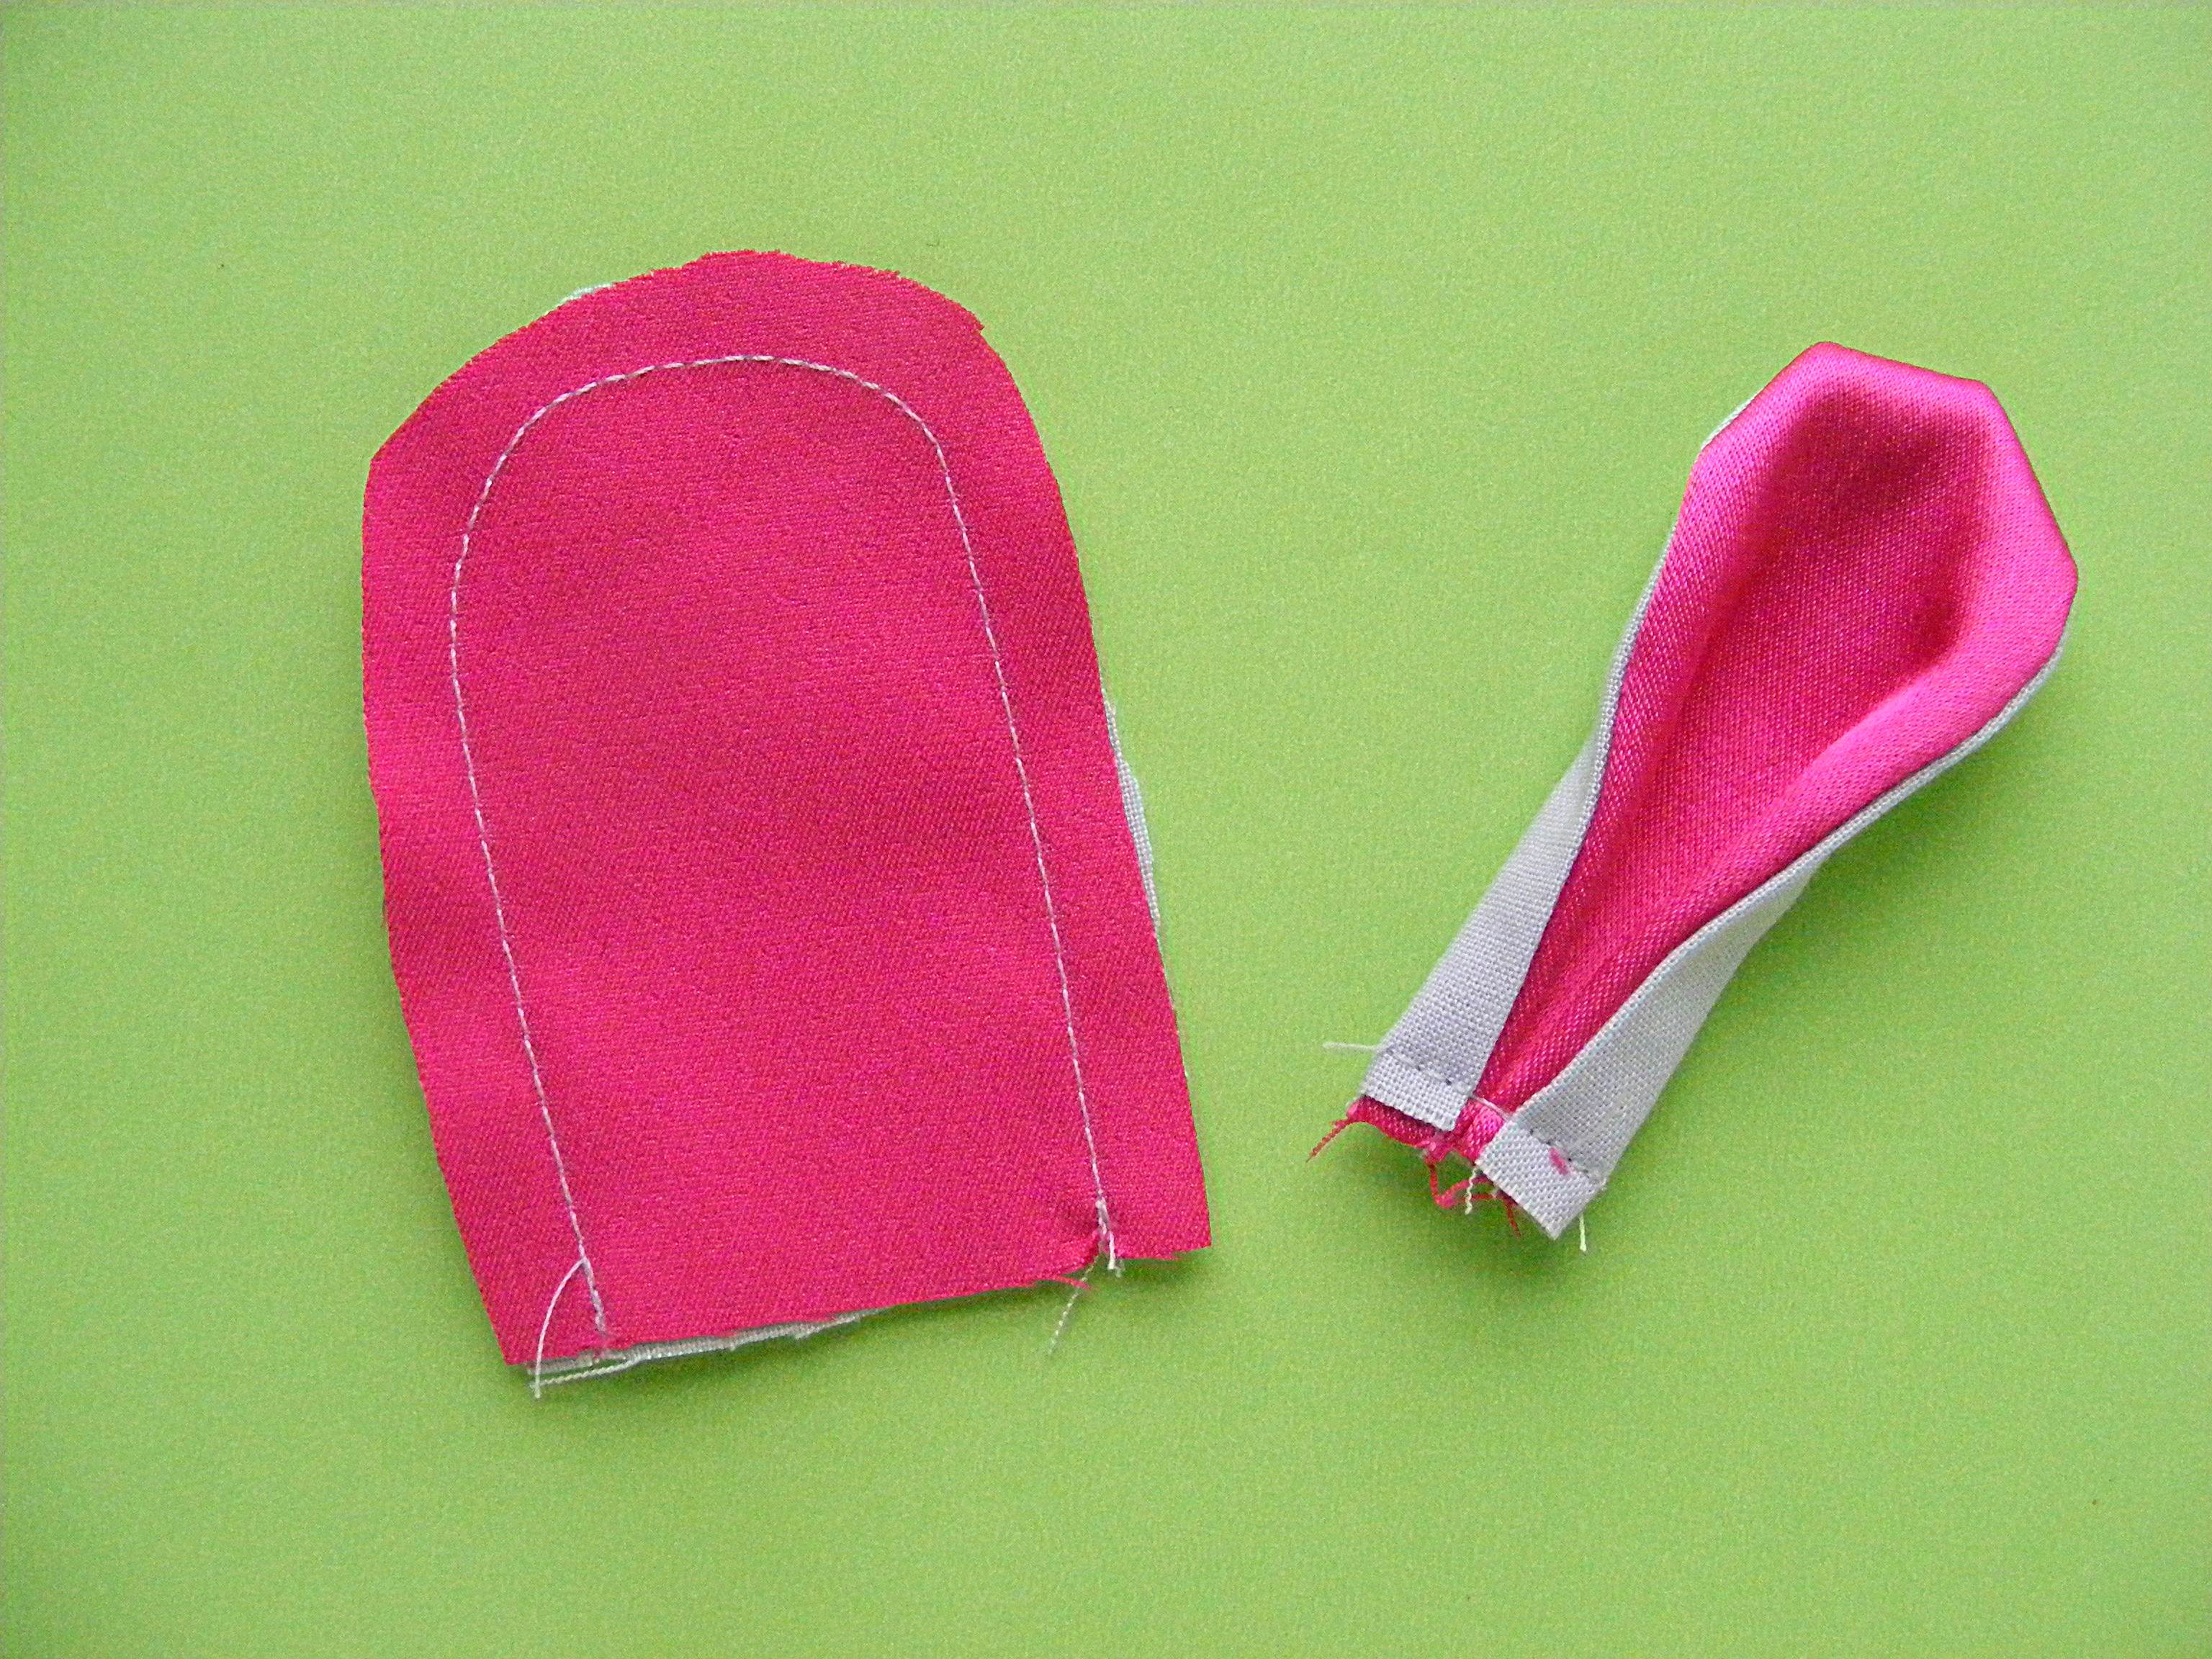
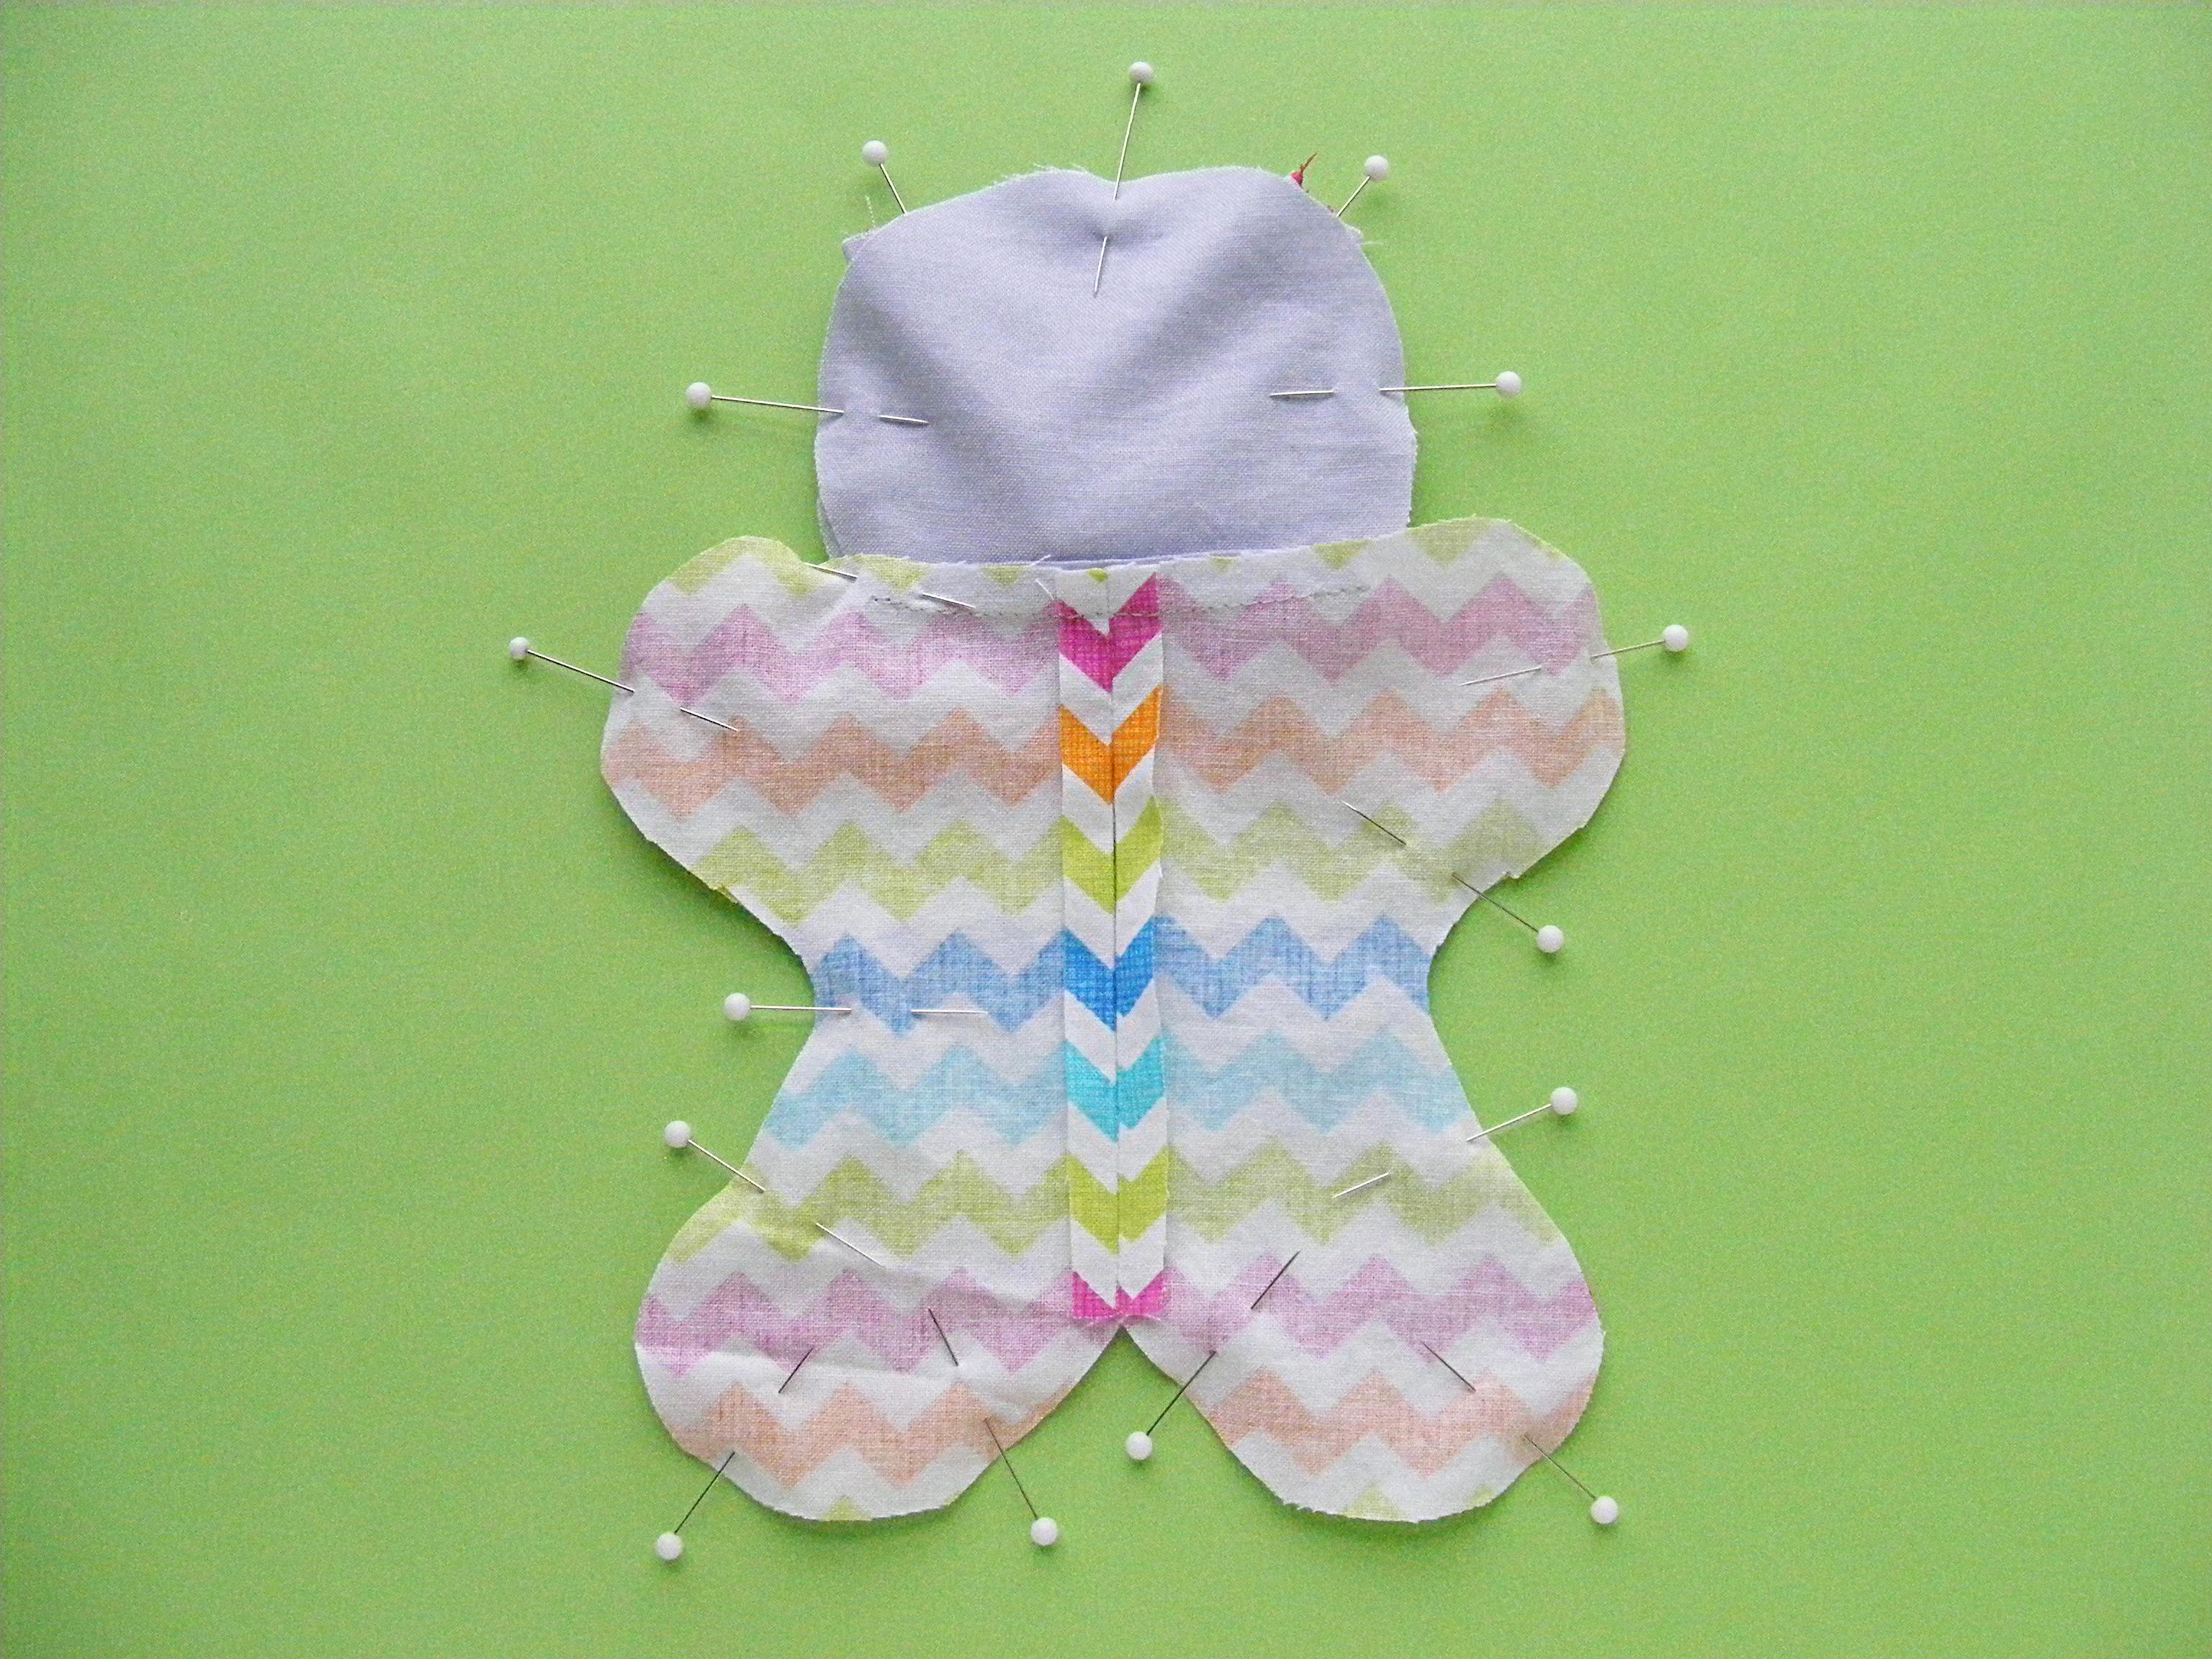
Now time to start putting the stocking together! Layer the lining pieces right sides together and sew around the edges using 1/4 inch seam allowance.

Free Christmas stocking pattern from Shiny Happy World.

Leave the stocking top open, and also a place on the back seam for turning. The turning hole needs to be big enough to fit your hand through it.

Step 7

Layer the main stocking pieces right sides together and sew them around the edge using 1/4 inch seam allowance – just like the lining. Leave the top open, but do NOT leave a turning opening.

Free Christmas stocking pattern from Shiny Happy World.

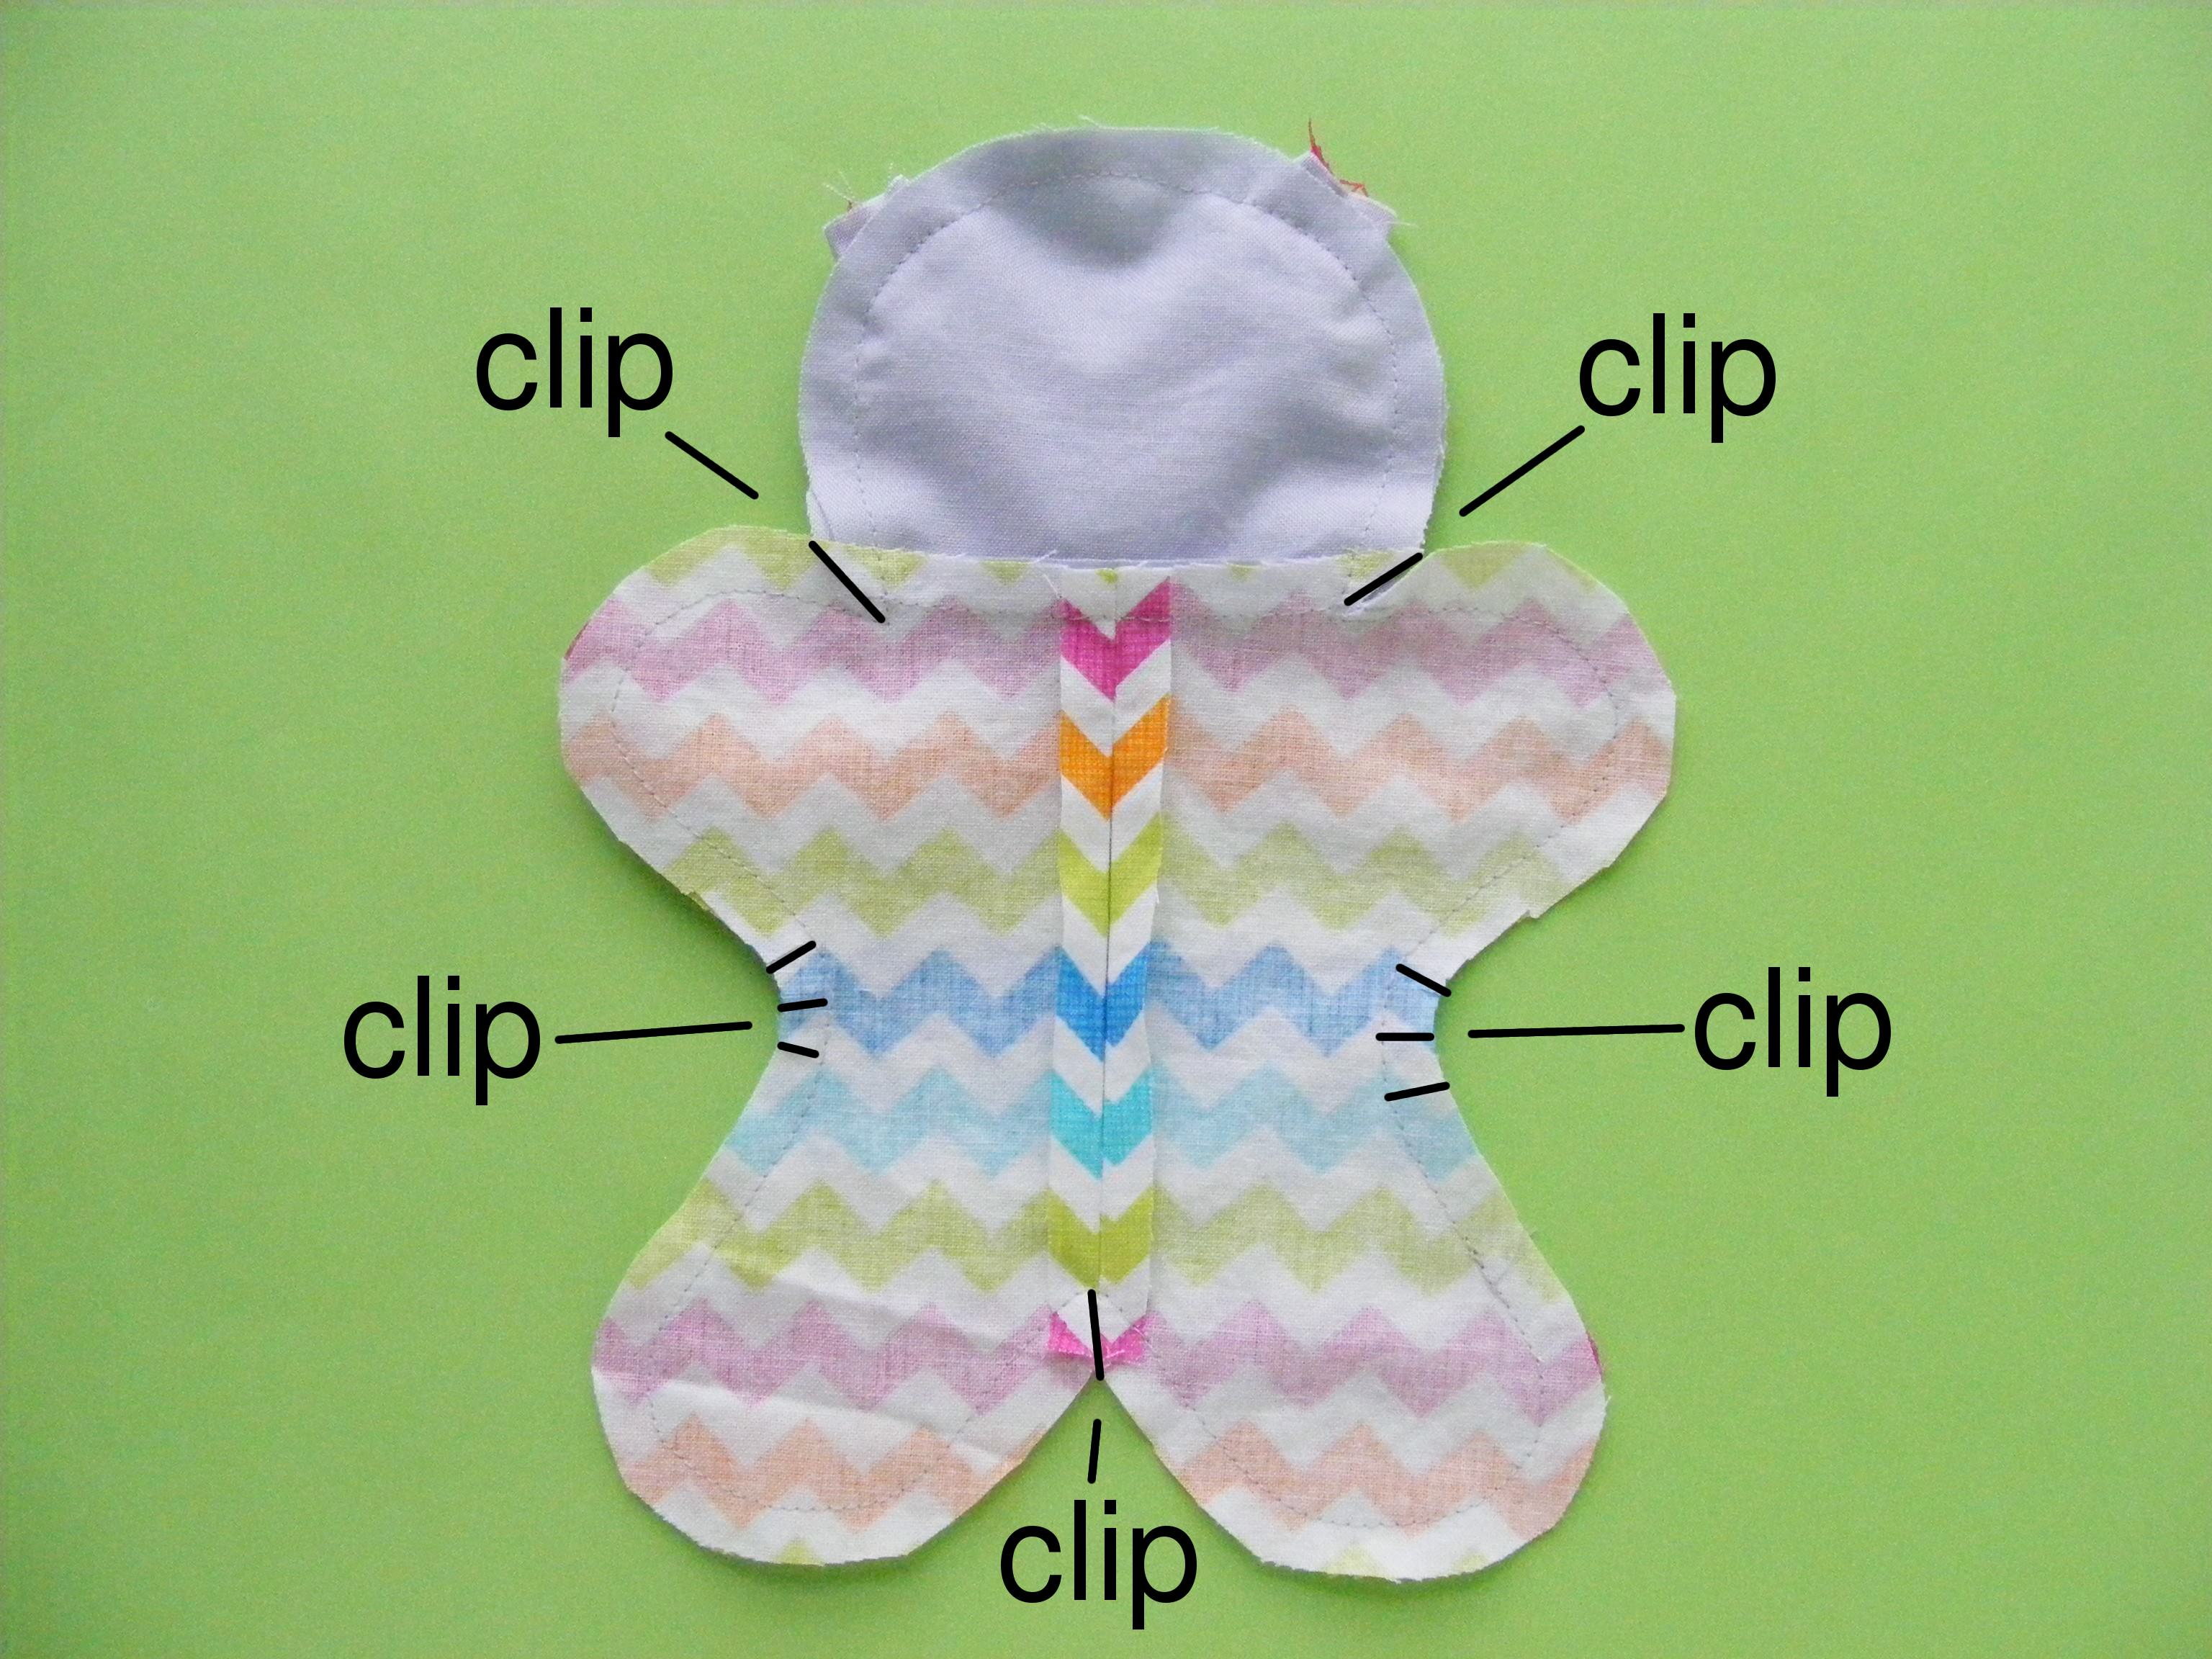
Clip the seam allowance in the concave curve of both the main stocking and the lining. Watch this video for the how and why of curve clipping.

Step 8

Turn the lining right side out. Slip it inside the stocking (the stocking should still be inside out) and line up the side seams.

Free Christmas stocking pattern from Shiny Happy World.

Sew the stocking to the lining all the way around the top edge using 1/4 inch seam allowance.

Step 9

Turn the stocking right side out. This can be confusing if you’ve never turned a lined thing right side out before.

Free Christmas stocking pattern from Shiny Happy World.

Start by pulling the lining out of the stocking. Then reach into the turning opening, grab the toe of the stocking, and pull the stocking right side out through that opening.

Free Christmas stocking pattern from Shiny Happy World.

Keep pulling and the lining will start coming through too – right side out. Turn the lining completely right side out. Sew up the opening using ladder stitch, and tuck the lining down into the stocking.

Step 10

You have two options for the top edge. You can work the lining and the stocking so that the seam between them is right at the top edge of the stocking. You only see the lining if you peek inside. Press with lots of steam to set the fold.

Free Christmas stocking pattern from Shiny Happy World.

(If you want to add a hanging loop like on this cat stocking, cut a loop of ribbon and slip it between the stocking and lining layers before you sew them together in Step 8. Be sure to catch the ends of the ribbon in the stitching as you sew those layers together.)

If you want a little bit of the lining to peek out of the top, leave the batting inside standing up (don’t fold it down) and use that as a guide to fold the lining down over it. Press with plenty of steam.

Free Christmas stocking pattern from Shiny Happy World.

Finished!

Here’s a quick list of links to all the patterns I used. . .

The free Santa appliqué pattern is here. I printed it at 60% to fit on the stocking.

The Cats quilt pattern is here. I printed the three cats I used at 80%.

The free alphabet pattern is here. I printed it at 90%. You might need to go much smaller for a significantly longer name, or arrange the letters the long way.

You could make the stocking even simpler by just using a really fun Christmas fabric – no fancification needed! Try embroidering a design instead of using appliqué. Or use a couple of leftover pieced quilt blocks for the main fabric.

Play around with this pattern! It’s completely open-ended so you can do just about anything with it!

Here are several free patterns that work with my basic 10-inch applique squares – no resizing needed!

Here are several free patterns that work with just some simple resizing. This post about making coasters has info about resizing an applique pattern that can be applied to any of these projects.

Return to the main Let’s Make a Quilt Table of Contents.

Happy sewing!

Are buttons baby safe stuffed animal eyes?

Craft eyes from Shiny Happy World (even though they're called safety eyes, they are not baby safe stuffed animal eyes)

I get a lot of questions about what stuffed animal eyes are safe for babies.

Even though craft eyes are often called safety eyes – they are not recommended for use in toys for children under the age of three.

I’m often asked, “can I use buttons instead”?

In short, the answer is no.

To explain why, let’s talk about why craft eyes aren’t baby safe for stuffed animals. It’s incredibly unlikely that the washer will accidentally come off of the back of the eye. (In fact, it’s pretty difficult to remove the washer from an eye with plastic ridges, as I showed in this blog post on how to remove craft eyes.)

The danger with craft eyes is that a baby (or dog) could chew through the fabric that the eye is attached to, dislodging the eye. A plastic eye securely attached to a scrap of shredded fabric is still a choking hazard.

Now what about buttons? Many people assume that since they’re sewn on, they’re more secure. But it’s not true. A baby can use their set of chompers to chew through the thread attaching it to the piece. It’s actually easier for a abby to chew through the threads holding a button eye in place than it is to chew through the fabric surrounding a craft eye.

Baby-safe stuffed animal eyes

For completely baby-safe stuffed animal eyes you have a few different options.

For crocheted stuffed animals, the easiest solution is to crochet the eye.

amigurumi crochet owl kit by FreshStitches

And they look fabulous! Just look at that adorable owl. You can get that owl pattern here, and there’s a tutorial here with a pattern for crocheted eyes that you can use with any stuffed animal.

Another option for baby safe stuffed animal eyes is felt.

How to Add Baby Safe Felt Eyes to Your Stuffed Animals - a tutorial from FreshStitches and Shiny Happy World

There’s a post here with instructions to make felt eyes – including adding that little white spark. You can use felt eyes on both crocheted and sewn stuffed animals.

One more option for baby-safe softie eyes is to embroider them! This also works on both crocheted and sewn stuffed animals. On small stuffed animals you can use this stitch, and for larger eyes I recommend satin stitch or split stitch as fill stitch.

So many options- and all baby safe. Choose the one you like the look of best!

Happy stitching!

How to Paint Your Own Craft Eyes

You can get craft eyes in lots of fun colors, and I show you how to use them here. But, what do you do if you want something you can’t find in a shop? Like pink eyes? Or glitter eyes? Or polka dot eyes? Hmm… those would be hard to find.

You can paint them yourself! Today, I’ll show you how to paint your own craft eyes! All you need is clear craft eyes and some paint. And since there are oh, about a thousand, colors of paint available… the possibilities are endless!

Scroll down for the video!

Glitter eyes!

Have you seen Beanie Boos? They’re a group of Beanie Babies with glitter eyes!

I’ve been getting lots of requests for glitter eyes, because you want to add this awesome touch to your own stuffed animal creations. I can’t find anywhere where they are commercially available… but, I have found the perfect glitter paint!

Glitter eyes from FreshStitches

Aren’t these amazing? And they’re even more sparkly in person!

Glamour Dust paint is fantastic!

paint square

It’s so much fun!

How to Paint Your Own Craft Eyes

Painting your own craft eyes is easy! All you need is some acrylic paint and clear craft eyes.

Paint your own craft eyes

You’ll get more details in the video below, but here are the basic steps:

  1. Apply a thin coat of acrylic paint to the back of the craft eye
  2. Allow paint to dry
  3. Repeat. I’ve applied 2-3 thin coats for maximum glitter

Video Tutorial

I filmed this tutorial before I got the fancy palettes, and I realize my thumb is often in the way… oops! But, I think you get the idea!

Isn’t that easy? And here’s the result!

Glitter eyes from FreshStitches

Of course, you don’t have to use glitter paint. Any acrylic paint will work! And you don’t have to paint them all one color. Try painting little polkadots before you lay down a solid background color. Or maybe stripes! Or a starburst effect! The only limit is your imagination!

Ombre Glitter Eyes

An ombre effect is a little more tricky than simple stripes, so here’s some more info on that.

Aren’t these amazing?

ombre glitter eyes

This ombre effect is super-easy to achieve with glitter paint because the paint is actually clear with specks of glitter. That means that one coat leaves little gaps for another color to shine through!

TUTORIAL

Here’s how to do it in three easy steps!

freshstitches ombre eye tutorial

I’m so excited about the possibilities… I’m thinking my next ones will be white and pink ombre.

glitter freshstitches

What color combinations do you think would be amazing?

Get glittery! 🙂

Here are handy links to all the posts about amigurumi eyes. . .

Return to the main table of contents for Let’s Learn to Crochet Amigurumi.

Move on to the lessons for standing legs.

Happy stitching!

Freezer Paper, Sulky Sticky Fabri-solvy or Fusible Adhesive? Which Stabilizer to Use When?

Freezer paper, Sulky Sticky Fabri-solvy or Fusible Adhesive? Which product do I use when?

I rely heavily on three products/stabilizers for the work I do.

  • Freezer paper
  • Sulky Sticky Fabri-solvy
  • Heat & Bond Fusible Adhesive

I recently had someone ask when I use each one – and that’s a great question.

Here’s the rundown. . .

Freezer Paper

Freezer paper is an excellent stabilizer.

I use it most often to cut out felt pieces. I print the pattern pieces directly onto the freezer paper. (You can trace if you’re not as lazy as I am.) I iron the paper to the felt and then I cut the pieces out – cutting through the felt and the freezer paper at the same time. Since I label all my pieces it means I have a nice pile of labeled felt pieces, cut perfectly accurately, waiting for me to stitch them together. Awesome!

Freezer paper also works this way when cutting out regular fabric, but I only use it on fairly small pieces – so small that I can’t use pattern weights. I use it for ALL my felt cutting.

Freezer paper is also excellent for fusing to the back of any fabric that you’re going to draw or paint on. If you’ve ever tried to do that without a stabilizer, you know that the pen or marker will tend to drag the fabric along with it. It can be really hard to keep it flat and smooth. Freezer paper makes the fabric act like paper. Handy!

Finally, people use freezer paper for this appliqué method. That used to be my favorite method – until I tested some of the new fusible adhesives out on the market and found a new favorite. 🙂

In all cases – the freezer paper will peel right off when you’re done. It doesn’t leave any residue behind, and you can reuse it a LOT of times before it loses its ability to fuse.

You can find rolls of freezer paper in the grocery store, or shop for these printable sheets.

Fusible Adhesive

Fusible adhesive is what I use in all my appliqué projects. That’s mostly quilts, but also T-shirts, tote bags, pillows and more. Unlike the freezer paper – which sticks temporarily to the fabric – the fusible adhesive is a permanent glue.

So the only time I use this product is when I want to permanently stick one piece of fabric to another.

I LOVE LOVE LOVE using Heat & Bond Lite fusible adhesive on printable sheets, as opposed to the stuff you can buy by the bolt. It’s more expensive – yes – but it lets me skip over the tedious tracing step and jump right to the fun part of my appliqué project. That’s worth money to me. 🙂

Sulky Sticky Fabri-solvy

The Magical Embroidery Stuff! This amazing invention has made every part of my crafting life easier and more fun. (I wrote a whole post about its awesomeness here.)

I use it to transfer embroidery patterns to EVERYTHING. There are other products you could use to transfer a pattern to light-colored, smooth, woven fabric – but Sulky Sticky Fabri-solvy makes embroidery on every surface possible. And it makes stitching on smooth woven cotton easier and better.

With this stuff you can embroider stretchy fabrics like T-shirts and baby onesies (no extra stabilizer needed). You can embroider dark fabrics. You can embroider nappy fabrics like velvet and terrycloth and fleece. You can embroider felt. Oh! How I love embroidering on felt!

I use it to stabilize stretchy fabrics when I appliqué on them. It just washes away – leaving no itchy stabilizer behind.

I freehand all my quilting designs – but if I did anything fancy I would print or draw it on this and stitch through it, then soak it away later.

Freezer paper vs. Sulky Sticky Fabri-solvy

I think this is where most people get confused, because I use both of them extensively when I work with felt.

If I’m just cutting the shape out – I use freezer paper. It’s cheaper and doesn’t require soaking to remove.

If I’m embroidering something on the shape and then cutting it out – I use the Sulky Sticky Fabri-solvy. Sometimes you’ll see me recommend both things in one project – like this snowman ornament.

Happy Snowman Felt Ornament Pattern

The hat, hat band, and carrot nose have no embroidery on them. Neither does the back of the ornament. I cut all of those pieces out with freezer paper.

The snowman front and the scarf both have embroidery on them, so for those I printed the pattern on Sulky Sticky Fabri-solvy, stuck it to the felt, embroidered the details, cut it out on the lines, and soaked off the stabilizer. (You can see how this works in this post.)

All of my patterns tell you which product to use where.

I hope that answers your questions about which product I use in which situation! Let me know if you have any other questions about any of them. I love them all and I’m always happy to share info about products that make your crafting easier and more fun. 🙂

These links go to all my posts about quilt supplies.

Finished with this topic?

Return to the Let’s Make a Quilt main Table of Contents.

Move on to the lessons about cutting and quilting your background blocks.

Happy stitching!

My Stitch & Stash Project Bag

I love, love LOVE my new project bag! It makes me smile every time I use it – and I’ve been using it steadily for about two months now.

It’s made with the Stitch & Stash Project Bag pattern from Betz White – reversible, with no zippers or velcro to snag on my work, and with a handy pocket inside to hold my tools. Such a well-designed bag for crafters!

Of course, I had to add some appliqué to the front. Give me a flat surface in a pattern and I will add some appliqué. Guaranteed. 🙂

I only made a couple of simple changes to the project.

The original pattern has snaps on the sides, but I decided not to add them because I know I will never actually snap them and I like the shape without tucking in the sides.

I quilted the outer bag fabric instead of just staystitching the batting around the edges. I love the little bit of extra texture the swoopy quilted waves add to the front. I just quilted the batting to the main fabric – no need to add a backing fabric since the bag is lined. This is how I quilt all my quilts, too.

You might worry that that will make the seams too bulky, but if you use 100% cotton batting (I love Warm & Natural) and press the seams open, it’ll squish nice and flat.

Stitch & Stash Project Bag - in progress

When I work with batting like this I also use sewing clips instead of pins. They’re great for holding bulky fabrics in place with no distortion!

Stitch & Stash Project Bag - in progress

Of course, the main change I made was adding the cute kitty. 🙂

After I did the quilting, I appliquéd the cat in place with fusible adhesive and stitched around all the pieces with black thread. I love the cartoony pop that gives.

Here’s a video showing how I appliqué an image like this.

Stitch & Stash Project Bag - in progress

The cat is one of the blocks in my Cats Quilt, shrunk down a bit. I made the small bag and resized the cat image to be 5 inches tall and 4 inches wide. That left plenty of breathing room between the top of the cat and that awesome big grommet, and fit from side to side nicely. I wouldn’t go any bigger than that in either direction for whatever image you’re adding.

The fabric is a mix of some of my favorite basics from Timeless Treasures – Jazz, Dreaming and Sketch.

I love it! Mine is holding my current EPP project (to be shared soon – it’s almost finished!) and Jo has already requested a larger one with a monster on it, and a tall, skinny pocket inside especially for holding a few crochet hooks. My plan is to make a few more in different sizes (the pattern includes three sizes) to hold various works in progress and hang them on some hooks on my studio walls. Cute AND functional. I see a lot more of these in my future. 🙂

Get the bag pattern here.

Get the cat quilt pattern here.

Happy sewing!

Best,
Wendi
That's me!

Make a Totoro Stuffed Animal

Cute stuffed Totoro - adapted from the Franklin the Fat Cat sewing pattern from Shiny Happy World

Jo wanted to make a Totoro stuffed animal for a friend from school – and she had a pretty brilliant idea of how to do it without drafting a whole new pattern.

Start with Franklin the Fat Cat! It’s one of her favorites and she’s made it a few times, so she knew it was an easy pattern to work with.

She used Cuddle Fleece in charcoal and camel for the body, plus some felt scraps in black, white, and smoky marble.

She drafted new patterns for the ears, eyes, nose and those things on his chest. (There’s a link to download those pieces at the end of this post.)

She used the tail pattern from Eddie the Teddy Bear to give him a stubby little tail.

Turn Franklin the Fat Cat into Totoro

And she gave him no feet/legs.

Want to make your own? It’s pretty easy. The only part that’s really different from Franklin (as far as construction goes) is the ears.

Jo wanted them to stand up really well, so she used Soft & Stable foam inside.

Stack a piece of foam, then one ear piece right side up, followed by one ear piece facing down. Sew up and around the top of the ear, leaving the flat bottom open for turning.

Making a Totoro stuffed animal - photo showing partially sewn new ear piece

Sewing through the foam is super easy. Here’s what that piece looks like from the bottom.

Inside-out Totoro ear shown from the foam side.

Reach in between the two fleece layers to turn it right side out – the foam will end up between the two layers. Neat!

Fold the sides of the bottom of the ear in to the center and stitch it across the bottom to secure the folds.

Totoro ear - folded and ready to attach to the stuffed animal

Now it has some shape.

Repeat for the second ear and then treat them just like the cat ears in the pattern instructions.

Applique the eyes, nose and chest thingies onto the body front. Jo stuck them down with a glue stick to hold them while she sewed. Clever!

After you stitch around the edges of all the pieces, insert 9 mm safety eyes into the middle of the whites. (If you do that sooner, the shanks of the safety eyes will make it impossible to sew around the whites.)

After that, the assembly is just like Franklin. Easy peasy!

Young girl holding a finished Totoro softie she made - adapted from the Franklin the Fat Cat pattern

One cute Totoro stuffed animal and his maker, ready for delivery to a friend. 🙂

If you want to make your own, here’s what you’ll need. . .

Happy stitching!

Best,
Wendi

The Evolution of a Sleeping Bag

Evolution of a Sleeping Bag - a process post

The sleeping bag I designed for the Dress Up Bunch dolls involved a bit of engineering, so I thought I’d share something about my process here.

My initial thought was to make a sleeping bag almost exactly like a “real” one. The zipper was going to go down the side and across the bottom, so that you could open up the sleeping bag entirely. Here’s my first prototype. . .

Evolution of a Sleeping Bag - a process post

And here it is zipped up. . .

Evolution of a Sleeping Bag - a process post

Looks pretty good, right?

I loved the look of it – but sewing the zipper around the corner was not fun. Like – really, really unfun.

I try to make my patterns as easy and fun as possible – so I wanted to fix that.

I tried rounding the corner more and more, through a few different tries, but it was still pretty dang hard to wrangle. And it was starting to look ugly and not as sleeping-bag-ish.

Back to the drawing board.

Sewing a zipper around a corner was out, so I tried just a zipper going down the side.

My first attempt at sewing it inside out was kind of a mess because I didn’t use a separating zipper and I needed to sew it in a tube and it was hard to sew from top to bottom that way.

Next I tried a separating zipper so I could sew the two sides separately.

Much, MUCH easier!

I sewed it flat and sewed all the way around (leaving a little opening for turning) and it looked awesome. And then I zipped it up and realized I had made a nicely finished tube. 🙂 The bottom wasn’t closed!

Forehead smack.

I picked the bottom open and realized now I could sew the top and sides without needing any hand-sewing. The whole bottom became the turning opening.

Score!

I folded the sleeping bag closed and sewed up the bottom.

Terrific!

But then I realized it was impossible to zip it up. With the sleeping bag sewn up it was pretty much impossible to start the separating zipper. Just about impossible for me – definitely impossible for any kids trying to work it.

Aaargh.

Oooh – but then I realized that I could zip it closed first and then sew up the bottom. Now the zipper is together and it can’t come apart – a terrific bonus because separating zippers can be tricky for some little kids. I had planned to hand stitch the zipper permanently together as the final construction step, but now that wasn’t necessary!

Done! (Almost.)

Dress Up Bunch Camping Set

I added a couple of elastic loops so it could be rolled up and secured without having to tie anything, and the design is finished!

Sometimes I get a design right on the first prototype, but usually it works like this – a series of attempts and revisions that get closer and closer to the final design – one that looks good AND is easy to make. 🙂

Get the pattern here.

Happy sewing!

How to Match and Join Pattern Pieces

How to Join Pattern Pieces

I try whenever possible to have my pattern pieces print out on a single sheet of paper – but sometimes I just need to go a little bit bigger. In those cases, you need to tape two pattern pieces together to make one larger piece.

For clothing patterns you can get into taping LOTS of pieces together, but for my softies and applique patterns it’s almost never more than two pages – and it’s easy!

Here’s how to do it. . .

Step 1

Print out both parts of the pattern. Make sure you’re printing at 100%!

How to Join Pattern PiecesThis shows two halves of a new Dress Up Bunch shirt pattern. It’s a one piece pattern (no separate front, back, sleeves, etc.) so that makes it just a little bit too big to fit on a single sheet.

There’s also a pattern piece for the bib to a set of overalls. You can ignore that bit. 🙂

Step 2

Cut off the blank edge of one of the pieces.

How to Join Pattern Pieces

Printers don’t print all the way to the edge of the paper, so you’re always going to have a blank strip at the edge of your pattern pieces. Just cut your pattern piece a bit so that the edges of the piece go right up to the cut edge of the piece of paper. In this case, you can cut anywhere between the line between the two hearts and the edge of the paper. I like to leave as much pattern as possible in there because it gives me more lines to match up, which keeps things accurate.

Step 3

Overlap the two pieces.

How to Join Pattern Pieces

I like to do this step in a window so I can really see the lines on both pieces of paper.

Line up as many points as possible – the line, the two hearts, and the edges of the pattern. Now you can see why you cut away that strip of blank paper – it would have broken up the continuous outline of the pattern piece.

Once you get everything lined up perfectly, tape the pieces together.

Step 4

Cut out the pattern piece.

How to Join Pattern Pieces

Two pattern pages have become one pattern piece. Easy peasy!

Happy sewing!

Best,
Wendi
That's me!


Free Bunny Softie Pattern

Itty Bitty Sleepy Bunny - a free beanie bunny softie pattern from Shiny Happy World

It’s a free bunny softie pattern! With a soft beanie body and small size, this Itty Bitty Bunny is just perfect for Easter baskets! And it’s super easy to make!

It can’t wait to hop into the pocket of someone special. 🙂

Here’s how to make it!

Materials

  • scrap bunny­-colored fabric
  • scrap of pink satin for the bunny ears
  • less than a fat quarter of pajama fabric
  • embroidery thread for the face (I DMC #3371 and #601)
  • plastic pellets (I like Poly­Pellets Weighted Stuffing Beads)
  • polyfill stuffing (I like Soft Touch Poly­fil Supreme Fiberfill)

Step 1

Download the pattern templates.

Cut out all materials as directed on the pattern pieces. You should have. . .

  • 1 body front piece
  • 2 body back pieces
  • 2 head pieces
  • 2 ears cut from bunny fabric
  • 2 ears cut from ear lining fabric

Step 2

Trace the face onto one head piece.

Embroider the eyes and mouth using backstitch and two strands of DMC #3371.

Satin stitch the nose with two strands of DMC #601.

Step 3

Place one ear lining and one ear piece right sides together and sew around the top (curved) edge.

Turn the ear right side out and press. Fold the bottom edges in to the center of the ear and stitch them in place.

Repeat for the second ear

Step 4

Sew the two body back pieces together along the center back line, making sure to leave a few inches open for stuffing.

Don’t forget to backstitch at the beginning and end of your stuffing opening.

Step 5

Open up the center back pieces and press the seam nice and flat, including the edges of the stuffing opening. That will give you a nice clean edge to sew when you’re closing up that opening by hand.

The stick shows where the stuffing opening is.

Step 6

Fold the bottom of the head and the top of the body in half to find the centers. Line those centers up so the head is exactly centered on the body.

Sew the face to the body front and the other head piece to the body back.

Step 7

Fold the heads up and press.

The seam allowance should be pressed toward the head so the body remains flat.

Step 8

Lay the body front face up on a flat surface.

Lay the ears face down over the face as shown in the photo. Don’t worry about making them perfectly even ­ crooked is cute. :-­)

Pin in place.

Step 9

Place the body back face down over the front, sandwiching the ears between the layers. Pin or clip the layers together carefully.

I match the neck seams first, then the center bottoms, then the dips at the sides and then the tips of the arms and legs and the head.

Step 10

Sew all the way around the body using 1/4 inch seam allowance. Make sure you’re catching the ears.

Clip into the seam allowance at all the concave curves and points as shown in the photo.

Step 11

Turn the body right side out.

Awwww! Isn’t that a cutie? Take a moment to admire your work so far. You’re almost done!

Step 12

Stuff the head pretty firmly with fiberfill ­ but not past the neck.

Pour 1/2 cup of plastic pellets into the body and sew up the opening in the back using ladder stitch.

Finished!

All done! Give it an itty bitty hug and then slip it into a special someone’s pocket. :­)

It’s a pocket-sized softie for your kids – and a snuggly bedtime softie for your kids’ dolls. Take a look at the Itty Bitty Bunny with one of the Dress Up Bunch dolls.

Emily with her Itty Bitty Bunny - patterns from Shiny Happy World.

Because dolls need softies to play with, of course. :­-)

Have a great weekend, everyone!

Best,
Wendi
That's me!

The Dress Up Bunch is a collection of cute and cuddly rag dolls. Get patterns for the dolls, plus all their fun outfits and accessories!

Made with Love – Donating Your Handmade Quilts and Softies

Donating Handmade Toys and QuiltsEvery once in a while I get an email from someone saying they love to make softies, but don’t have any children in their lives right now the right age to get them. They want some suggestions for where they can donate their creations.

There are so many wonderful places!

  • children’s hospitals
  • firefighters and police departments like to keep some on hand to give to traumatized children
  • homeless and family violence shelters
  • orphanages – both in the US and overseas

This is just a the tip of the iceberg! I put out a call in a recent newsletter asking readers where they give, and I got a bunch of great responses!

So let’s start with a few general guidelines and things to think about, and then move into the specific suggestions offered by readers.

The number one bit of advice I have is to ask first! Some organizations might have restrictions that you could never anticipate. Depending on the ward, some hospitals can only take toys that are made of hypoallergenic materials – they can give you a list of what is and isn’t allowed. One suggestion that surprised me (but made perfect sense) was to keep arms and legs minimal so there’s less to get hooked on tubes and wires.

My local shelter asked for toys to be small – they pointed out that each kid has a bed and a small shelf and that’s it – and when they leave they leave with a small bag. They can’t have a stuffed animal that takes up half the bag. They also asked for some teen-appropriate softies, saying the teens are often happy to have a softie to hug, but don’t want something that looks too babyish – a request that totally broke my heart. So contact the organization and ask first.

And remember – your favorite organization might prefer cash! I’ve lost count of the number of cat and dog quilts that have been made and auctioned off at shelter fundraisers! Every one of them makes me so happy!

Sarah of Dolls and Daydreams has some really great info about donating dolls abroad here.

And now – here are some responses from readers. . .

Lots and lots of people mentioned the Knit-a-Square organization. They collect knitted and crocheted squares to be joined into afghans, and also handmade stuffed animals and dolls – all going to AIDS orphans in Africa. Definitely take a look at their website – they have the infrastructure to distribute a LOT of love. 🙂

Julia writes. . .

I am about to send two quilts to Quilts For Kids, an organization that donates quilts for kids in hospitals. I have tons of baby-ish fabrics in my closet and feel great that they’re all going to a good cause.
After I found out about QFK heard a lovely story about a family that had premature twin babies in a NICU in New York–the NICU also had quilts and both parents commented on how comforting this was.

Beatrice writes. . .

Currently I am in the process of making lots of “Warrens” which will be donated to orphanages and cancer hospitals in Egypt. I have been living in this country for 18 years and donated lots of items and cash to help the poorest, which sadly are numerous. This time though, I feel really happy, because with every lovely bear finished I try to imagine a little girl or boy who will love what I have created.

Liz writes. . .

A local organization that I donate time, money, and material things to is Hope’s Door, in Dallas.  It’s a shelter for battered women and their children.  They do a wonderful job and are a great bunch of dedicated, insanely organized people.  Throughout the year, Hope’s Door does everything from toy drives to fun runs to auctions. If you’re going to post a list, I’d love for you to mention them, and I know they would appreciate it, too!  They always have needs because, sadly, they always have clients.

Cindy writes. . .

There is a woman who works with my husband who belongs to a small church that gives away bags of food once a month. For Christmas I donate lots of stuffed animals and dolls. And also at Easter I donate  Easter things – bunnies and chicks, etc. I’m so grateful I have the time and money to do this.

Candy writes. . .
Here’s a suggestion of where to donate softies; local hospitals and local woman’s shelters. I have been making and donating for several years now to both. The shelters love the animals or dolls because lots of times the families are rushed away from their homes because of fear and abuse and don’t have time to grab things of love and importance so having something to cling to (softie) is sometimes a life saver. This goes for kids as well as the women. Hospitals love any type of donation, whether it be softies, knitted things for babies, sewn things for babies and blankies. I know there are lots of other places to donate but these are my favorite.

Laura writes. . .

Wildlife rescue groups sometimes request crochet artificial nests for orphaned birds, bunnies, possums etc. Your readers can see if they can find one locally that needs some.

I have seen cat and dog rescues that take handmade fleece blankets to shelters so the animals don’t have to sleep in those harsh metal cages without any protection and warmth they can receive from a blanket. Just make sure to contact rescue first to obtain size wanted.
An excellent charity is your local domestic violence shelter. These families have fled their homes with nothing. They can use new blankets and quilts ( I have donated many fleece blankets for infants and toddlers), new handmade softies for the kids, hats gloves and scarves in the winter. This is an extremely rewarding charity to donate!

Ann writes. . .

I donate softies and dolls at my local hospital pediatrics ward and in the Emergency Room waiting area where children often are waiting with adults. I also go to the local pediatric office, pediatric dentist office, the sheriff’s department and the fire department.

Joan writes. . .

We are a small group of ladies that gather once a month to sew to donate. Some of local items we have donated are fleece hats given to our pre-school.  We used a pattern from Nancy’s Notions.  They loved them. Kid capes were given to our local day care centers. We borrowed a doll from the pre-school and made doll clothes, diapers, blankets, a mattress for a crib, etc. for their room. This month we are making pillows for cancer patients.  We are making a port pillow, heart shaped pillows, rectangle pillows.  These are delivered to local hospitals that give cancer treatments. One month we did walker bags for a local nursing home.  We did lap quilts for shut-ins. We have made burp cloths and receiving blankets and bibs for Northeast Nebraska Community Action Partnership.
We like to find local spots we can donate for we have found postage is soo expensive.

Finally – a couple of specific patterns.

I designed Warren the Charity Bear especially for donations. He can be made out of any kind of fabric, with any kind of stuffing, and has lots of possible variations so you won’t get bored if you decide to make a lot of them – like Kathy and many others have done. 🙂

Kathy made the Warrens in this photo and Caroline made the ones in the top photo – both for Knit-a-Square.

Lots of colorful and fun Warren Bears - made with a free pattern from Shiny Happy World

I’ve also heard that Warren makes an excellent post-op cough pillow for kids. People who have had chest or abdominal surgery are taught to hug a pillow when they cough, to help support the incision and ease pain. Warren is just the right size and shape for this. 🙂 He also has very small arms and legs – small enough that lines and cords in a hospital bed won’t get caught on them.

You can see how to make Warren here.

I also have a tutorial here showing how I made an easy scrap quilt for charity.

If you have any other suggestions – either for places to donate or favorite patterns to use – please leave a note in the comments section!

Happy sewing!